
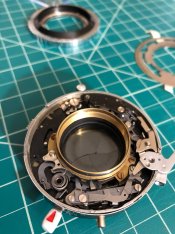
Hi folks, I am wondering if I can get some advice from you about repairing a compur shutter. I got a #0 synchro compur shutter whose cocking lever is jammed. After I stripped down the shutter, I found the cocking ring and the pinion gear for the main drive cam are not fully coupled as shown in the picture below. The space makes the cocking lever slip. I am wondering if the space between the teeth can be adjusted or it just indicates the cocking ring or the pinion gear need to be replaced? Thank you very much!


- Home
- Forums
- Analog Workflow Forums (100% Analog/Traditional)
- Analog Equipment
- Camera Building, Repairs & Modification
You are using an out of date browser. It may not display this or other websites correctly.
You should upgrade or use an alternative browser.
You should upgrade or use an alternative browser.
Synchro Compur shutter repair
-
A
- Thread starter wgyang
- Start date


Recent Classifieds
-
For Sale PENTAX SPOTMATIC SPII
- Started by Peter Schrager
-
For Trade For Trade, Nikon D750 DSLR for Leica lllf
- Started by dankapsner
Forum statistics
shutterfinger
Member
The main cocking ring looks off set at the center collar of the shutter. I would remove the cocking ring and inspect the center collar for a wear grove and if one is found fill it with brass shim stock or similar. If the cocking ring fits onto the collar with no side play and even spacing all around I would inspect the cocking gear shaft to be perpendicular to the base palate.
BrianShaw
Member
are You sure you have all of the parts. Looks to me like parts of the release mechanism are missing.
Greg Heath
Member
Hi folks, I am wondering if I can get some advice from you about repairing a compur shutter. I got a #0 synchro compur shutter whose cocking lever is jammed. After I stripped down the shutter, I found the cocking ring and the pinion gear for the main drive cam are not fully coupled as shown in the picture below. The space makes the cocking lever slip. I am wondering if the space between the teeth can be adjusted or it just indicates the cocking ring or the pinion gear need to be replaced? Thank you very much!
View attachment 223932
I tore one down like a decade ago. My photos may not match your shutter, but might give you some clues.. good luck. Shutter repair is not easy. You may even learn new swear words. I know I did.
https://www.flickr.com/photos/kb2qqm/albums/72157651667174417
Greg
I took out the locking level beside the shutter release. I think the release mechanism you mention is in the photos below.are You sure you have all of the parts. Looks to me like parts of the release mechanism are missing.
Attachments
Thank you for your advice! I'll check these two parts when I get home today.The main cocking ring looks off set at the center collar of the shutter. I would remove the cocking ring and inspect the center collar for a wear grove and if one is found fill it with brass shim stock or similar. If the cocking ring fits onto the collar with no side play and even spacing all around I would inspect the cocking gear shaft to be perpendicular to the base palate.
Thanks for sharing me your photos. The manual and youtube videos helped me a lot to figure out the mechanism. But I still found the learning curve is steep for meI tore one down like a decade ago. My photos may not match your shutter, but might give you some clues.. good luck. Shutter repair is not easy. You may even learn new swear words. I know I did.
https://www.flickr.com/photos/kb2qqm/albums/72157651667174417
Greg

Greg Heath
Member
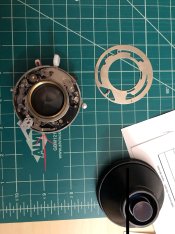
No problem. Whatever you do don’t disassemble the shutter from the back because the aperture leaves will fall out. Rebuilding the aperture absolutely sucks. You have to place them with micro tweezers and toothpicks. It was an absolute nightmare and took me 2.5 weeks. Live and learn 
shutterfinger
Member
Check for side play in the cocking gear also.
I checked the pinion gear and the shaft. By eyeball, they don't look bent. Are there multiple specifications for the gear and the tension ring? The tension ring is eccentric relative to the center leaving no space between the ring and mounting tube near the pinion gear while sufficient space on the other side due to the force from the tension ring spring. Is it normal to see a loose fit tension ring?
Thanks!


Thanks!
I checked the pinion gear and the shaft. By eyeball, they don't look bent.
At photo #2 the bearing for the sprocket wheel looks oblique to me.


shutterfinger
Member
If you don't have a digital caliper get one. Example: https://www.ebay.com/itm/6-150mm-LC...262908&hash=item363f8e6e6c:g:75UAAOSwvIpajs0a
Measure the bearing/center collar where the cocking lever sits, it should be the same diameter all the way around. Measure the inside diameter of the cocking lever at the collar opening, it too should be the same all around.
Being you have a gap on one side I suspect that the bearing/collar is worn on the cocking gear side. Very heavy usage is the only thing I can think of that will cause this unless the shutter was used in a needs a CLA condition for an extended period of time. I don't know if there is a repair for that collar or not. Brass shim stock soldered to the worn down side and dressed so the collar is even around the barrel is all I can think of short of finding a replacement case.
Mr Bill
Member
- Joined
- Aug 22, 2006
- Messages
- 1,439
- Format
- Multi Format
If you don't have a digital caliper get one.
Certainly it can be useful to have some measuring tools like this. Something else that might be useful in this case could be some small drill bits, etc. IF you happen to have one that is a snug fit into the bearing (use the shank, not the cutting end) you can estimate elongated wear by seeing how much the drill bit wiggles. You can also judge if the bearing is perpendicular (visually) to the base. It won't fix anything though; it's just another sort of measuring tool. Or maybe it can serve as a pry bar should the bearing be tilted?
Kino
Subscriber
I have to wonder if the lens barrel is not cocked in relation to the plane of the shutter face, causing the gap. This might have happened by being dropped with a large front element on the shutter or by sudden force to the front lens element while the shutter was braced or immobile.
Is the face of the lens barrel parallel to the rear of the shutter back plane? Try placing the shutter on a level surface and then examine the face of the lens barrel. Is it tilted?
In a chapter in the book "Restoring the Great Collectable Cameras, 1945-1970", Thomas Tomosy outlines a procedure for correcting a warped shutter; maybe this is your problem...
Kino
Subscriber
Interesting idea, but such impact to deform the central barrel part would have likely caused substantial outer marks and the obliqueness too should be visible between outer barrel and lens plate,
I have no direct experience with this problem, but in the book it is the back plane of the shutter which gets warped, so it could be deformed and the barrel would remain unscathed. The barrel is directly attached to the back plane (disc) of the shutter rear and extends through the front cover without other attachment, so it could be tilted and still look correct from the front.
The front lens element could be totally destroyed in an accident, but simply unscrewed and removed without visual evidence of a problem.
Total conjecture, but worth exploring...
BrianShaw
Member
At this point, I’d tear it down to components and examine for damage to two parts, in particular: the cocking ring and the plate under the mainspring. One or both are damaged
Question: is it my imagination (or the limitations of the pictures), but do the first few teeth of the cocking ring look damaged in addition to it possibly being out-of-round. That plus the possible bend of the spring gear makes me wonder if the shutter had jammed and was forcibly cocked.
Sad to say, but this is a project shutter that may or may not be repairable. If you want to do photography, then best bet might be to find a replacement.
What lens was in it?
BrianShaw
Member
... and there always seems to be “more to the story”... care to share?
BrianShaw
Member
... and to address a question asked in post 1... clock restoration folks indeed replace broken gear teeth by filing out the old, affixing patch metal, and filing in new teeth. But that’s not the best cure for worn holes or bent pinions/plates. It’s a lot of work and if here are other bent or worn components it might not really solve the problem.
In this case you might have to replace all teeth on the cocking ring to cover the gap you now have.
In this case you might have to replace all teeth on the cocking ring to cover the gap you now have.
BrianShaw
Member
The reason I ask is because on these shutters it is common for the self-timer to jam and a natural tendency to force the cocking ring to unhandled it. What I suspect as “backward bends” in the first couple of teeth indicate that as a possibility. If so, make sure you also overhaul the self-timer... or remove it. Good luck... you’ve got a real challenge on your hands.... and there always seems to be “more to the story”... care to share?
Mamiya_Repair
Advertiser
I believe your problem is with a broken or missing bearing on the mounting collar. I've seen two styles of mounting collar bearings on the Compur #0: one is a bearing milled into the brass collar and another is a nylon/plastic ring. The plastic rings crack with age and cause exactly the issue that you are having. The photo I have attached shows the plastic type bearing on the right and the milled bearing on the left. Since the plastic bearings are no longer available (all the ones that I have are split/cracked from age) you would need to fabricate a bearing for the cocking ring.
Bill

Bill
Hi Bill, I didn't know you answered my post here. I just want to give you guys an update. The missing bearing did cause the gap between the tension ring and pinion gear. I bought a new mounting tube from Bill. With the new mounting tube, the tension ring meshes with the gear now.I believe your problem is with a broken or missing bearing on the mounting collar. I've seen two styles of mounting collar bearings on the Compur #0: one is a bearing milled into the brass collar and another is a nylon/plastic ring. The plastic rings crack with age and cause exactly the issue that you are having. The photo I have attached shows the plastic type bearing on the right and the milled bearing on the left. Since the plastic bearings are no longer available (all the ones that I have are split/cracked from age) you would need to fabricate a bearing for the cocking ring.
Bill View attachment 224074
Thank you all for your advice!
| Photrio.com contains affiliate links to products. We may receive a commission for purchases made through these links. To read our full affiliate disclosure statement please click Here. |
PHOTRIO PARTNERS EQUALLY FUNDING OUR COMMUNITY:  |