Struggling with (new) cyanotype toning

img421.jpg

H
img421.jpg

  • Tel
  • Apr 26, 2025
  • 1
  • 0
  • 12
Caution Post

A
Caution Post

  • 2
  • 0
  • 36
Hidden

A
Hidden

  • 1
  • 0
  • 36
Is Jabba In?

A
Is Jabba In?

  • 3
  • 0
  • 45
Dog Opposites

A
Dog Opposites

  • 2
  • 3
  • 148

Recent Classifieds

Forum statistics

Threads
197,480
Messages
2,759,716
Members
99,514
Latest member
cukon
Recent bookmarks
0

aconbere

Subscriber
Joined
Aug 2, 2023
Messages
237
Location
Seattle, WA
Format
4x5 Format
I’ve been spending the last few months refining my cyanotype printing process and have gotten somewhere that I’m pretty happy with.

I’d love to be toning some of my prints but I have had only a little luck and it’s left me confused. Would love it if anyone had any advice. I’ll try to document my process. I apologize that I don’t have good pictures of dry prints at every stage, hopefully this is good enough to get the idea.

First off I’m using Christina Anderson and Annette Golaz’s books as reference / guidance. Places I’m confused are that for instance Annette says that cyanotypes should not need bleaching for tea toning and that at 125F I should see results in about an hour (but also mentions it could take 24! Maybe I’m inpatient).

I’m printing with new cyanotype. I mixed the sensitizer myself and I’m by and large happy with my results.

I’m attempting to tone with green tea. I’m starting from a dry print. My toner is 20g of loose leaf tea steeped in 1L of boiling water for 15min. I begin toning when it reaches 125F.

I start by wetting the print for about a minute in plain water (tap). Then adding the print facedown to the toner.

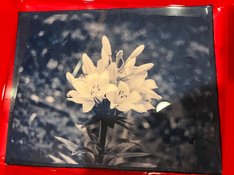
I really need to get better at taking pictures of every step, but while this is not the exact test strip it is representative of the starting print tones.

IMG_1939.jpeg


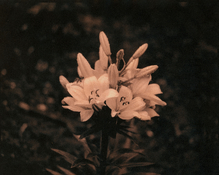
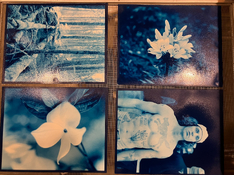
First I tried without bleaching. 1 hour in the toner. Started at 125F but has since cooled to room temp. This is a very different color than before toning! But definitely not the brown / black I’ve seen folks achieve.

IMG_1938.jpeg


The I tried bleaching the print first. I fully bleached i back with sodium carbonate until a mustard yellow color.

IMG_1940.jpeg


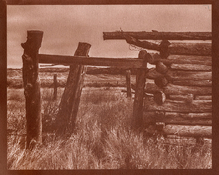
Then added it to the toner. After 6-7 minutes it stopped changing color and achieved this final “light brown”. While writing this I’m noticing that in bleaching there was some density lost and the darkest shadows of the step wedge aren’t at d-max anymore. I wonder if I’d be happier with this if I added some exposure.

IMG_1947.jpeg


Lastly I had a print that I tried toning last week that wasn’t bleached. Like the example it became I kind of dark purple. And then I tried bleaching it after toning. (note this is overexposed as I was working off a silver negative and got times wrong!)

IMG_1944.jpeg


and after toning and bleaching… it did turn black! (with a LOT of staining in the highlights).

IMG_1945.jpeg


phew that was a lot, given all of that would love folks thoughts. Should I expect to bleach my prints? Should I give the unbleached prints more time? Is New Cyanotype important? Does it tone differently? Are there things I haven’t considered?

Thank you!
 

Attachments

  • IMG_1943.jpeg
    IMG_1943.jpeg
    868.7 KB · Views: 23

koraks

Moderator
Moderator
Joined
Nov 29, 2018
Messages
20,672
Location
Europe
Format
Multi Format
I think you're doing fine, really. What you're finding is that bleached prints tone more effectively. The beneficial side-effect of this is that it cuts down toning time, and this prevents excessive staining of the paper. The toned step tablet in the 3rd image looks great.

Keep going, I see no problems!
 
OP
OP
aconbere

aconbere

Subscriber
Joined
Aug 2, 2023
Messages
237
Location
Seattle, WA
Format
4x5 Format
Ha! Okay sold, I will carry on with bleaching then. It’s hard to gain perspective on your own sometimes. Sitting here like “But the book says bleach isn’t needed!”.

Appreciate it.
 

fgorga

Member
Joined
Aug 31, 2015
Messages
738
Location
New Hampshire
Format
Multi Format
Hello,

Looking at the table in the back of Ms. Golaz's book (p259), I see that she recommends green tea toning only using 'calcareous water' (i.e. water with 0.5 g / L of calcium carbonate). Have you tried this?

With most toning agents you get different results depending on if you add the calcium carbonate or if you use distilled water. In some cases (as noted in the book), one solution works much better than the other. Also, I would avoid using tap water for toning; too many impurities whose concentration can change over time.

Adding calcium carbonate to the mix probably acts as a mild (compared to sodium carbonate), in situ bleach. It is milder because the calcium compound has limited solubility compared to the sodium compound, hence the pH is lower.

I have had good luck with Goalz's method although I have not tried green tea. My favorite toner with this method is sumac. I have tried several different sumac 'products', all with similar results.

Here are several threads where I have reported my results...


https://www.photrio.com/forum/threads/cyanotype-toning-options.207444/#post-2828187 and a couple of posts below this one.

I find that I get nice toning fairly quickly (10 min or so) but some materials do take longer, in these cases, I often reheat the toning solution one or more times (in a microwave oven). I don't bother measuring the temperature so I can't supply that detail.
 
OP
OP
aconbere

aconbere

Subscriber
Joined
Aug 2, 2023
Messages
237
Location
Seattle, WA
Format
4x5 Format
Wow! You’re totally right! In fact the results she mentions for “rainwater” sounds exactly like the prints I get without bleach “dark blue shifting to black”.

I think my confusion arose because Christina Anderson lists tea toner as a one-bath toner. Then alternatively I’ve read green tea acts like black tea with less staining.

In either case Golaz seems to suggest I would do well to mix in some calcium carbonate or trying some other toning materials.

Here is my latest result with an actual print (The oddities in this print existed before the toning so it serves as a useful test). I'm actually pretty happy with how this turned out. In this case I bleached it back most of the way (the deepest blues didn't want to bleach) and then toned for 10-15 minutes.
 

Attachments

  • 2025-01-30-0001.jpg
    2025-01-30-0001.jpg
    1.7 MB · Views: 53

fgorga

Member
Joined
Aug 31, 2015
Messages
738
Location
New Hampshire
Format
Multi Format
That is a very nice print tone-wise!

I don't have Anderson's cyanotype book, but I imagine that she is referring to the traditional way of toning cyanotypes. Nothing wrong with this approach but I think that Gotez's new approach is much better. The two methods are really quite distinct.

I note that you are located in Seattle. You have a very good source of botanical dye stuffs that is local to you... https://botanicalcolors.com/. I have purchased some materials from them.
 
OP
OP
aconbere

aconbere

Subscriber
Joined
Aug 2, 2023
Messages
237
Location
Seattle, WA
Format
4x5 Format
That is a very nice print tone-wise!

I don't have Anderson's cyanotype book, but I imagine that she is referring to the traditional way of toning cyanotypes. Nothing wrong with this approach but I think that Gotez's new approach is much better. The two methods are really quite distinct.

I note that you are located in Seattle. You have a very good source of botanical dye stuffs that is local to you... https://botanicalcolors.com/. I have purchased some materials from them.

I am in Seattle, that’s great, I’ll give them a shot. I’ve also been saving all my avocado pits for months, and my wife is a wood worker and I’ve been hoping to steal her hardwood sawdust.
 

koraks

Moderator
Moderator
Joined
Nov 29, 2018
Messages
20,672
Location
Europe
Format
Multi Format
Here is my latest result with an actual print

It's brilliant! Very nicely done indeed.

Adding calcium carbonate to the mix probably acts as a mild (compared to sodium carbonate), in situ bleach. It is milder because the calcium compound has limited solubility compared to the sodium compound, hence the pH is lower.

I can confirm that even the small amount of calcium carbonate present in the tap water where I lived before was enough to (slowly) bleach a cyanotype print. I can see how using tea made with 'hard' water could effectively function as a (slow) one-bath toner that combines toning + bleaching action.
 
OP
OP
aconbere

aconbere

Subscriber
Joined
Aug 2, 2023
Messages
237
Location
Seattle, WA
Format
4x5 Format
It's brilliant! Very nicely done indeed.


I can confirm that even the small amount of calcium carbonate present in the tap water where I lived before was enough to (slowly) bleach a cyanotype print. I can see how using tea made with 'hard' water could effectively function as a (slow) one-bath toner that combines toning + bleaching action.

Too kind! Thank you.

Still have a lot of work to do :smile:
 

FotoD

Member
Joined
Dec 15, 2020
Messages
363
Location
EU
Format
Analog
Nice print!

I tried Golaz' methods but found them unnecessarily complicated. If I want to stain the paper that can be done more easily with pigments, and any color is possible.

If I was starting out I'd stick with an alkaline bleach (carbonate or ammonia) and tannins (green teas are a good choice for minimal stain).

If you want a large shift in tone but less density loss: go back and forth between bleach and toner bath a couple of times, short times in all but the last toning bath. You don't have to bleach away the shadows to make them change color,

Or if you want a one-bath toner, add a couple of drops of ammonia to the tea.

For minimal stain: make the green tea with cold water, let it "brew" for a couple of hours.

Good luck!
 
OP
OP
aconbere

aconbere

Subscriber
Joined
Aug 2, 2023
Messages
237
Location
Seattle, WA
Format
4x5 Format
Thought I’d give Golaz’s method a proper shot. 12.5g of green tea steeped in 1L of distilled water (boiled) for 15 min. Strained and poured into a tray with .5g of calcium carbonate.

I got distracted after about an hour and a half of checking and little change. Total time was between 3-4 hours in the toner.

I don’t have a perfect before picture (because I’ve really got to get better at that). So my conclusion is that for whatever reason this method is just not at all compatible with my prints.

I believe that if I now add this print to dilute sodium carbonate it will turn a nice black / sepia brown.

The best results I’ve gotten with test strips has been adding the print to a bath of green tea until dark / navy. Then bleaching it in sodium carbonate until the desired tone is reached. I’ll give that a shot with a proper print.
 

Attachments

  • IMG_2012.jpeg
    IMG_2012.jpeg
    1.1 MB · Views: 34
  • IMG_2013.jpeg
    IMG_2013.jpeg
    1.6 MB · Views: 34

koraks

Moderator
Moderator
Joined
Nov 29, 2018
Messages
20,672
Location
Europe
Format
Multi Format
Yeah, that doesn't look all that effective.
The prints themselves, however, look absolutely splendid. What paper is that, btw? The texture in an earlier photo reminded me of Fabriano Artistico?
 
OP
OP
aconbere

aconbere

Subscriber
Joined
Aug 2, 2023
Messages
237
Location
Seattle, WA
Format
4x5 Format
Yeah, that doesn't look all that effective.
The prints themselves, however, look absolutely splendid. What paper is that, btw? The texture in an earlier photo reminded me of Fabriano Artistico?

There’s a little hint in the picture (and the reason I’m throwing the lilly’s to the toning wolves). If you look closely you can see that I’ve accidentally coated on the “Arches Platine” watermark 😰. In this case the 145gsm variety. Christina Anderson noted it in her book as being a favorite of hers and I could buy a bunch for relatively cheap.

I would say that in general I find the single weight to be preferable to work with at 8x10. It has a nice suppleness to it in the wash and moves nicely. I find the smooth side to have slightly less texture than the double weight version.

I have a feeling my opinion might flip if I were printing larger. Say 16x20 where I might worry about dimpling the single weight paper.
 
OP
OP
aconbere

aconbere

Subscriber
Joined
Aug 2, 2023
Messages
237
Location
Seattle, WA
Format
4x5 Format
And here’s after 30s in 1g/L sodium carbonate.

All the blue has disappeared, the whites have picked up a red brown stain, the blacks are a dark reddish brown to full black.

I happen to like this look, but I wish I understood why none of the documented methods work for me! 🤣
 

Attachments

  • IMG_2018.jpeg
    IMG_2018.jpeg
    1 MB · Views: 26

koraks

Moderator
Moderator
Joined
Nov 29, 2018
Messages
20,672
Location
Europe
Format
Multi Format
I happen to like this look

You're not alone; I quite like those peachy hues in the flower. Reminds me a bit of lith prints, but I quite like the coolness of the low values this print has. Very nice!

the “Arches Platine” watermark

Ah, so I could have known! The paper has a beautiful texture.
 
OP
OP
aconbere

aconbere

Subscriber
Joined
Aug 2, 2023
Messages
237
Location
Seattle, WA
Format
4x5 Format
Here's a scan, but I had to tweak it a bit to get it to look true to life. In person there is almost no blue at all in the image, but I think white balancing tools really want to cool the picture down to make the whites whiter. It also really wants to pick up any glare from outside and turn blue. Anyway, this is pretty true to what it looks like in my hand.

My toned prints turn pretty dull after toning, so I've taken to coating them in a 50/50 mixture of bees wax and mineral oil. The result is that they are semi-matte and the luster is returned to the print.
 

Attachments

  • 2025-02-11-0002.jpg
    2025-02-11-0002.jpg
    1.8 MB · Views: 28
OP
OP
aconbere

aconbere

Subscriber
Joined
Aug 2, 2023
Messages
237
Location
Seattle, WA
Format
4x5 Format
It’s been a journey but I finally got one I like.

10min bleach in sodium carbonate
50min tone in tannic acid
30min wash


IMG_2558.jpeg
 

Andrew O'Neill

Moderator
Moderator
Joined
Jan 16, 2004
Messages
11,763
Location
Coquitlam,BC Canada
Format
Multi Format
Tannic Acid is the way to go for me. I usually like to to a partial bleach, leaving just deepest tones, then stick it in the Tannic Acid for a while. Sometimes I'll tone first, then stick it in a very mild bleach, then back into the Tannic Acid. Last week, I boiled some of the Fenugreek seeds and toned (no bleach). Colour is okay, but prefer Tannic Acid. Now I've been playing around with Ferroblend, which has me ripping my hair out LOL!
 
OP
OP
aconbere

aconbere

Subscriber
Joined
Aug 2, 2023
Messages
237
Location
Seattle, WA
Format
4x5 Format
Tannic Acid is the way to go for me. I usually like to to a partial bleach, leaving just deepest tones, then stick it in the Tannic Acid for a while. Sometimes I'll tone first, then stick it in a very mild bleach, then back into the Tannic Acid. Last week, I boiled some of the Fenugreek seeds and toned (no bleach). Colour is okay, but prefer Tannic Acid. Now I've been playing around with Ferroblend, which has me ripping my hair out LOL!

Your videos are what got me settled on this method. I tried toned then bleach and I got a very strong split tone (that I didn’t care much for), i tried returning the print to bleach the next morning and it immediately picked up a very strong stain 🤔

I’m wondering if perhaps the sodium carbonate reacts with the tannic acid left in the paper (and I’ve washed insufficiently).
 

koraks

Moderator
Moderator
Joined
Nov 29, 2018
Messages
20,672
Location
Europe
Format
Multi Format
I finally got one I like.

WOW!
That's really nice.

I've been trying to tone cyanotypes with tannic acid from time to time, but no luck. I think it's due to the tannic acid I'm using, which I obtained from a winemakers' supplies store. AFAIK tannic acid is a complex of substances and as such it's ill-defined, so it probably makes quite a difference what type you use. @aconbere where did you get yours from, please?

I’m wondering if perhaps the sodium carbonate reacts with the tannic acid left in the paper (and I’ve washed insufficiently).
Yeah, that sounds plausible to me. Seems like tannic acid has a propensity to form complexes that hare hard to dissolve and wash out.

Now I've been playing around with Ferroblend, which has me ripping my hair out LOL!

Tsk tsk, people should only start with alt. process printing once they've already gone bald.
 
OP
OP
aconbere

aconbere

Subscriber
Joined
Aug 2, 2023
Messages
237
Location
Seattle, WA
Format
4x5 Format
Now I've been playing around with Ferroblend, which has me ripping my hair out LOL!
I have been glued to the FerroBlend thread since it showed up, really excited to see where y’all get with that. Oddly enough I think more than anything it might inspire me to make some cuprotypes 🤔
 

Andrew O'Neill

Moderator
Moderator
Joined
Jan 16, 2004
Messages
11,763
Location
Coquitlam,BC Canada
Format
Multi Format
I have been glued to the FerroBlend thread since it showed up, really excited to see where y’all get with that. Oddly enough I think more than anything it might inspire me to make some cuprotypes 🤔

I'm making my first cuprotype as we speak!
 
OP
OP
aconbere

aconbere

Subscriber
Joined
Aug 2, 2023
Messages
237
Location
Seattle, WA
Format
4x5 Format
I'm making my first cuprotype as we speak!

Oh I’ll be super excited to see what you do. I’m personally most intrigued by the deep brick red as found in the complex toner. But I’m waiting on some other bits before putting in my order for chemicals.

[edit] example posted is from @fgorga’s article and not my own work.
 

Attachments

  • IMG_2513.jpeg
    IMG_2513.jpeg
    223.2 KB · Views: 16
Photrio.com contains affiliate links to products. We may receive a commission for purchases made through these links.
To read our full affiliate disclosure statement please click Here.

PHOTRIO PARTNERS EQUALLY FUNDING OUR COMMUNITY:


Ilford ADOX Freestyle Photographic Stearman Press Weldon Color Lab Blue Moon Camera & Machine
Top Bottom