Strange Marks in 4x5 BW Negatives

Chiaro o scuro?

D
Chiaro o scuro?

  • 0
  • 0
  • 206
sdeeR

D
sdeeR

  • 3
  • 1
  • 239
Rouse St

A
Rouse St

  • 1
  • 0
  • 262
Untitled

A
Untitled

  • 3
  • 2
  • 300

Recent Classifieds

Forum statistics

Threads
199,199
Messages
2,787,715
Members
99,835
Latest member
Onap
Recent bookmarks
0

christianglz

Member
Joined
Jan 11, 2023
Messages
11
Location
Mexico City
Format
Multi Format
Hello All,

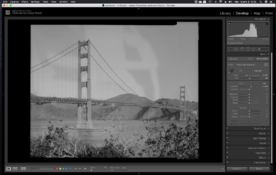
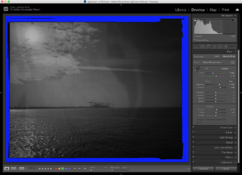
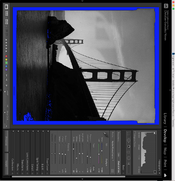
I recently developed some sheets of Ilford Delta 100 Professional as per usual, upon scanning them with a DSLR I noticed that some strange marks are present in some of the negatives, the marks are extremely similar, I'd say that they are the same mark produced by the same process that is marking the negatives, most of them are fine, only a very few have this problem, you can see the marks in the attached files, I underexposed them in Lightroom so that the marks are more evident and I rotated the third so that it matches the orientation of the previous two images.

I've been thinking about it and can't seem to find a reasonable answer, I'll try to explain my theory about what's going on but first, the usual method I follow to develop film at home is as follows:
  • 1 minute presoak bath with tap water with the Stearman Press Tank loaded and light-tight
  • Develop with HC-110, usually with dilution B for as long as the film requires
  • 1 minute stop bath with Ilfostop
  • 5 minute fix bath with Ilford Rapid Fixer or Kodak Rapid Fixer (w/o the hardener)
  • Wash for about 10 minutes
  • Hang and dry
There are several things that come to mind as the potential culprits of these marks but none seem to fit or fully explain what's going on, here they are:
  1. Film handling: I thought that I was somewhat marking the negatives while loading them in the film holders or when loading the development tank, I try to be very careful when doing this and only handle the film by the sides and never touch it directly as to avoid said marks, the fact that the marks are extremely similar seems to rule out this as the potential cause, how could I scratch them or touch them in the very same way three times in a row?.
  2. Lens performance: This is where it gets more confusing, I only have a Fujinon SWD 90mm f/5.6 and a Fujinon W 210mm f/5.6 and with both lenses, the optics are as close to mint as you can get, no fungus, no scratches, no dust, no mold, no separation or any other defect, shutter is fine and aperture is smooth and working fine, also, flare, light leaks and any other optics-related issue gives very different marks, perhaps at some point I touched the lens on the rear element w/o me knowing and left some oil but, I don't think so.
  3. Composition: Another improbable cause, two of the photos are backlit and the first one is not, so, no apparent issue there.
  4. Camera Performance: This is the least probable cause, it's a brand new Intrepid 4x5 Mark V and it performs as it should.
  5. Exhausted Chemicals: I honestly think that this is not the thing that's causing them, the marks would not be as well defined as they are, also, uneven development produces some other marks and defects but none as similar as these are.
  6. Film Holders: Also, to be clear, they are clean, no light leaks or any oils, stains or anything else besides a clean surface
  7. DSLR Scanning: One last thing that I did not considered is that the camera sensor might be dirty but at this point, I don't know.
As you can see, all my options and there, I honestly don't know what's causing them, they are present in 4 of 25 sheets that I developed, if any of you has any idea, suggestion or comment, please let me know what you think about this, this is the first time for me and being a newcomer to the large format arena, I can't think why the negatives are marked as they are, I've never had this problem with 35mm film or medium format.

Many thanks and good day to everybody.
 

Attachments

  • Artifacts_4x5_No_1.png
    Artifacts_4x5_No_1.png
    1 MB · Views: 87
  • Artifacts_4x5_No_2.png
    Artifacts_4x5_No_2.png
    842 KB · Views: 89
  • Artifacts_4x5_No_3.png
    Artifacts_4x5_No_3.png
    604.3 KB · Views: 89
Last edited:

BAC1967

Subscriber
Joined
Oct 30, 2014
Messages
1,437
Location
Bothell, WA
Format
Medium Format
Could it be a reflection off the camera that you’re using to scan? I have had that problem. When I scan with a camera I set up a black tent that hides all but the lens and keeps out stray light.
 
OP
OP
christianglz

christianglz

Member
Joined
Jan 11, 2023
Messages
11
Location
Mexico City
Format
Multi Format
Could it be a reflection off the camera that you’re using to scan? I have had that problem. When I scan with a camera I set up a black tent that hides all but the lens and keeps out stray light.

It is!

I just kept looking at it and said to myself, maybe that's the reflection of the camera, it makes perfect sense and now that I think about it, the shiny side of the negative is always facing the camera and that's what is making the strange shape, it's the same in all the photos because it's the same camera setup for all the negatives, that's why it's always in the same place regardless of the photo orientation, it's the negative orientation that counts, it looks like a lighter shape because it is of course, a negative.

This does not happens with 35mm and medium format because the negative size is much smaller and the camera is very close to the lightbox.

Well, problem solved, many thanks!!
 

MattKing

Moderator
Moderator
Joined
Apr 24, 2005
Messages
53,252
Location
Delta, BC Canada
Format
Medium Format
Speaking generally, the very first thing to check is whether you can see something like this in the negatives themselves. Use a magnifier, and a good backlight.
By the way, another likely culprit would be your backlight - is it uneven?
 

BAC1967

Subscriber
Joined
Oct 30, 2014
Messages
1,437
Location
Bothell, WA
Format
Medium Format
It’s best to scan the emulsion side of the negative. You will have to flip it in your editing software. Also, I use glassless negative carriers for scanning, glass can give you reflections. Make sure your backlighting is masked off to eliminate light that can reflect off the camera. there should only be light going thru the negative. It’s easy to cut out a cardboard mask.
 
OP
OP
christianglz

christianglz

Member
Joined
Jan 11, 2023
Messages
11
Location
Mexico City
Format
Multi Format
Speaking generally, the very first thing to check is whether you can see something like this in the negatives themselves. Use a magnifier, and a good backlight.

That's the thing that was more puzzling, the negatives are fine and crisp, clean and very nice.
 
OP
OP
christianglz

christianglz

Member
Joined
Jan 11, 2023
Messages
11
Location
Mexico City
Format
Multi Format
It’s best to scan the emulsion side of the negative. You will have to flip it in your editing software. Also, I use glassless negative carriers for scanning, glass can give you reflections. Make sure your backlighting is masked off to eliminate light that can reflect off the camera. there should only be light going thru the negative. It’s easy to cut out a cardboard mask.

I still have to make a 4x5 mask, great tip about scanning emulsion side up, flipping is no problem at all

Many thanks, I appreciate your input.

Cheers!
 

mshchem

Subscriber
Joined
Nov 26, 2007
Messages
14,778
Location
Iowa City, Iowa USA
Format
Medium Format
Yes, I vote for reflection. In image 2 it looks like in the center is a circular object, maybe the lens of the DSLR?

Have you considered making a contract, then scanning or copying?
 

Sirius Glass

Subscriber
Joined
Jan 18, 2007
Messages
50,411
Location
Southern California
Format
Multi Format
So the problem is with your scanning process. Many anomalies in scanning film are a result of the scanning process or the scanning algorithms.
 
Photrio.com contains affiliate links to products. We may receive a commission for purchases made through these links.
To read our full affiliate disclosure statement please click Here.

PHOTRIO PARTNERS EQUALLY FUNDING OUR COMMUNITY:


Ilford ADOX Freestyle Photographic Stearman Press Weldon Color Lab Blue Moon Camera & Machine
Top Bottom