Steve's Adventures in Bellows Building Land

Where Did They Go?

A
Where Did They Go?

  • 2
  • 2
  • 37
Red

D
Red

  • 4
  • 3
  • 110
The Big Babinski

A
The Big Babinski

  • 2
  • 6
  • 155
Memoriam.

A
Memoriam.

  • 7
  • 8
  • 208
Self Portrait

D
Self Portrait

  • 3
  • 1
  • 104

Forum statistics

Threads
198,020
Messages
2,768,268
Members
99,529
Latest member
elgatosuizo
Recent bookmarks
0

Steve Smith

Member
Joined
May 3, 2006
Messages
9,109
Location
Ryde, Isle o
Format
Medium Format
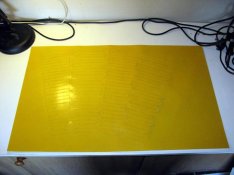
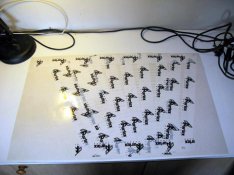
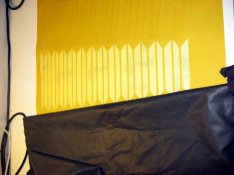
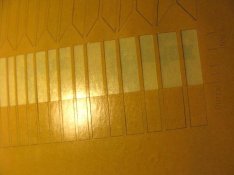
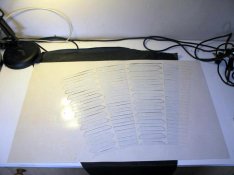
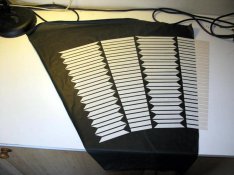
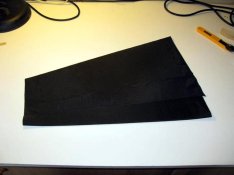
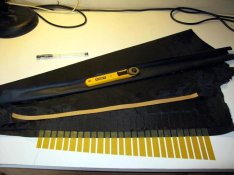
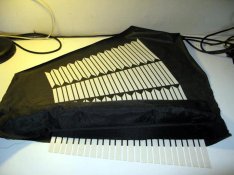
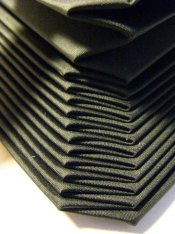
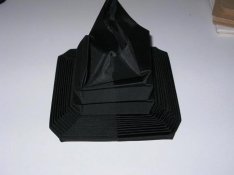
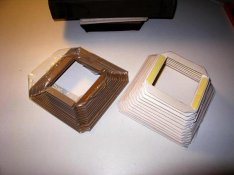
After a bit of tidying up at the weekend, I found an old changing bag with a broken zip which I don't use any more. I decided to cut it up and make it into a set of 5" x 4" bellows with the help of the laser cutter we have at work.

I have already documented this on Facebook: http://www.facebook.com/media/set/?set=a.10150831112427011.400754.538602010&type=1

I know some people don't like Facebook as they think their souls will be stolen after just one visit so I will start to add some pictures here in subsequent posts.

Feel free to point, laugh and tell me where I went wrong or alternatively, post your own bellows making hints and tips.


Steve.
 
OP
OP
Steve Smith

Steve Smith

Member
Joined
May 3, 2006
Messages
9,109
Location
Ryde, Isle o
Format
Medium Format
I started off with a sheet of polyester about 0.3mm thick and laminated a high strength sheet adhesive to both sides. Then I used our laser cutter to cut out the shapes of the stiffener ribs. The rear was taped up to prevent the pieces from falling out. The laser was also used to mark out various laminating lines to the front so I could line up the covering cloth and cut it to the correct length.
 

Attachments

  • Bellows1.jpg
    Bellows1.jpg
    34.9 KB · Views: 129
  • Bellows2.jpg
    Bellows2.jpg
    49.1 KB · Views: 153
OP
OP
Steve Smith

Steve Smith

Member
Joined
May 3, 2006
Messages
9,109
Location
Ryde, Isle o
Format
Medium Format
I then removed half of the release liner from the first set of stiffeners and lined up the edge of the outer cover down the centre line. This is the side which will have the overlapping join.
I then carried on removing the release liner pieces from each set of stiffeners and sticking the cloth down until it was stuck to all four sets.
 

Attachments

  • Bellows6.jpg
    Bellows6.jpg
    31.3 KB · Views: 110
  • Bellows5.jpg
    Bellows5.jpg
    36.5 KB · Views: 103
  • Bellows4.jpg
    Bellows4.jpg
    31.5 KB · Views: 112
  • Bellows3.jpg
    Bellows3.jpg
    37.6 KB · Views: 114
OP
OP
Steve Smith

Steve Smith

Member
Joined
May 3, 2006
Messages
9,109
Location
Ryde, Isle o
Format
Medium Format
Then it was turned over and the tape was removed followed by the outer framework leaving just the stiffener ribs stuck to the outer cover material.
 

Attachments

  • Bellows7.jpg
    Bellows7.jpg
    38.6 KB · Views: 118
  • Bellows8.jpg
    Bellows8.jpg
    55.8 KB · Views: 106
  • Bellows9.jpg
    Bellows9.jpg
    53.8 KB · Views: 121

ChristopherCoy

Subscriber
Joined
Aug 9, 2011
Messages
3,599
Location
On a boat.
Format
Multi Format
Nice. I'm going to eventually try this with some translucent material that light can pass through.
 
OP
OP
Steve Smith

Steve Smith

Member
Joined
May 3, 2006
Messages
9,109
Location
Ryde, Isle o
Format
Medium Format
Then the inner cloth was applied in the same manner as the outer cloth. The join was offset by about 30mm to prevent excessive build up of thickness in one area.

The last picture shows an extra strip of adhesive along the overlapping edge. This is the outer cover. The inner cloth has already been finished in a similar manner.
 

Attachments

  • Bellows13.jpg
    Bellows13.jpg
    27 KB · Views: 116
  • Bellows12.jpg
    Bellows12.jpg
    44.5 KB · Views: 110
  • Bellows11.jpg
    Bellows11.jpg
    55.8 KB · Views: 138
  • Bellows10.jpg
    Bellows10.jpg
    50.7 KB · Views: 103
OP
OP
Steve Smith

Steve Smith

Member
Joined
May 3, 2006
Messages
9,109
Location
Ryde, Isle o
Format
Medium Format
Now for the fun bit - folding. You usually need to use all three of you hands to do this. A second brain can be useful too.

The rotary cutter sitting on the top is to stop it unravelling itself. Something I would not be too pleased about!
 

Attachments

  • Bellows14.jpg
    Bellows14.jpg
    90.6 KB · Views: 116
  • Bellows15.jpg
    Bellows15.jpg
    72.6 KB · Views: 191
Last edited by a moderator:
OP
OP
Steve Smith

Steve Smith

Member
Joined
May 3, 2006
Messages
9,109
Location
Ryde, Isle o
Format
Medium Format
The two heaviest books I could find at the time being used to teach the material what its new shape is going to be.

I think the titles are quite appropriate.
 

Attachments

  • Bellows16.jpg
    Bellows16.jpg
    36.6 KB · Views: 150
  • Bellows17.jpg
    Bellows17.jpg
    23.6 KB · Views: 106
OP
OP
Steve Smith

Steve Smith

Member
Joined
May 3, 2006
Messages
9,109
Location
Ryde, Isle o
Format
Medium Format
Finally, a couple of trial runs I made earlier using paper and a polythene bag. If Lomo are interested in making a view camera with lots of light leaks, they can contact me to supply the bellows.
 

Attachments

  • Bellows18.jpg
    Bellows18.jpg
    41.7 KB · Views: 136
OP
OP
Steve Smith

Steve Smith

Member
Joined
May 3, 2006
Messages
9,109
Location
Ryde, Isle o
Format
Medium Format
OP
OP
Steve Smith

Steve Smith

Member
Joined
May 3, 2006
Messages
9,109
Location
Ryde, Isle o
Format
Medium Format
I see. I would do that with clear polyester stiffeners and just the outer cover made from a translucent PVC or similar material.

I have always wanted to build a shed with a bellows style roof. Just think of two of the sides and rotate it by 45 degrees. The guttering would be fun to do.


Steve.
 

ic-racer

Member
Joined
Feb 25, 2007
Messages
16,512
Location
USA
Format
Multi Format
Wow, very nice!
I did something similar. A 'poor-man's' version where I used scissors to cut the polyester ribs free in the middle and left the ribs attached at the ends. Then cut the ends free after gluing to the first fabric with spray-on contact cement.

mannequin.jpg
 
Last edited by a moderator:
OP
OP
Steve Smith

Steve Smith

Member
Joined
May 3, 2006
Messages
9,109
Location
Ryde, Isle o
Format
Medium Format
I have enough cloth left over to make another set so I am going to do an experiment.

In this first set of bellows the inner and outer cloths are only stuck together by the adhesive on the stiffeners. they are free to move away from each other in the surrounding areas although the folds will most likely keep them together.

I want to make another set with the outer cloth laminated in the same way but with a piece of adhesive over the whole of the inner cloth so the two are also joined together in the areas around the stiffeners.

I don't know if it will make any difference but I will find out soon!


Steve.
 

Curt

Member
Joined
Sep 22, 2005
Messages
4,618
Location
Pacific Nort
Format
Multi Format
When I made my first bellows I used some cloth from the fabric store that was as light blocking as I could find while being fairly thin. I bought some thin blank liner also. Then I made a layout on very thin Kraft paper and glued stiffeners onto it. Over that I glued, with spray adhesive again, a layer of tin foil. Over the tin foil I glued the backing cloth. Then I folded and glued the overlap together. I don't have the bellows out to photograph it right now but some thirty years later it doesn't leak. It's been sitting most of the time. I made the camera out if Brass and Cherry predominately with hand tools. The key is light tight and flexible.

For my new project I had an 11x14 bellows made. I do believe in self made though as much as possible. When I get up my horses I'm completing the 11x14 film holders I started. I made a traditional holder and it's nearly identical to the original specifications laid out a century ago. now with the working holder and the drawings I can go at will.

Curt
 

himself

Member
Joined
Apr 8, 2011
Messages
513
Format
Multi Format
looks to have worked really well and lasers... wow, I had to cut all mine out one by one with a Stanley knife.
oh, and how come you only went for black, surely something a little more fun could have been in order :wink:
 
OP
OP
Steve Smith

Steve Smith

Member
Joined
May 3, 2006
Messages
9,109
Location
Ryde, Isle o
Format
Medium Format
and how come you only went for black, surely something a little more fun could have been in order :wink:

The only reason I made the bellows was because I had the changing bag which was no longer any good. Other colours would be good though.

a layer of tin foil.

I like the idea of the foil. not just to make it light tight but because it would hold the folded corners in the right shape. (can't cut it on the laser though!).


Steve.
 

ChristopherCoy

Subscriber
Joined
Aug 9, 2011
Messages
3,599
Location
On a boat.
Format
Multi Format

himself

Member
Joined
Apr 8, 2011
Messages
513
Format
Multi Format
The only reason I made the bellows was because I had the changing bag which was no longer any good. Other colours would be good though.
[...]

shoulda run to the local charity shop and picked up an old bit of material, I suppose you still could, but then it may end up being too thick to fold properly.
 
OP
OP
Steve Smith

Steve Smith

Member
Joined
May 3, 2006
Messages
9,109
Location
Ryde, Isle o
Format
Medium Format
Perhaps one of my Hawaiian shirts on the outside.


Steve.
 
Photrio.com contains affiliate links to products. We may receive a commission for purchases made through these links.
To read our full affiliate disclosure statement please click Here.

PHOTRIO PARTNERS EQUALLY FUNDING OUR COMMUNITY:


Ilford ADOX Freestyle Photographic Stearman Press Weldon Color Lab Blue Moon Camera & Machine
Top Bottom