split grade printing

Chiaro o scuro?

D
Chiaro o scuro?

  • 0
  • 0
  • 210
sdeeR

D
sdeeR

  • 4
  • 1
  • 246
Rouse St

A
Rouse St

  • 1
  • 0
  • 267
Untitled

A
Untitled

  • 3
  • 4
  • 313

Recent Classifieds

Forum statistics

Threads
199,199
Messages
2,787,744
Members
99,835
Latest member
Onap
Recent bookmarks
1

splash_fr

Member
Joined
Sep 6, 2013
Messages
47
Location
Freiburg, Germany
Format
Multi Format
Hi all.
Did my first split grade print this weekend and wasted lots of paper. But thats OK, i got a nice result in the end...

Doing the stuff in the darkroom ist obviously different than reading about it in a book.

So a couple of practical questions came up:

(1) With the soft (#00) test strip i want to determine the highlights of the final print. But what if I have a small light area that only covers one or two of the different exposures of the test strip? Should I make several different strips, each with two/three exposures only but all covering the bright part? Or guess the correct exposure even if most of the stripes are only in dark areas?

(2) Should I use #00 or #0 for the soft part? Most guides say #0, but I think most of them mean "the softest you can get". I use a fujimoto g70 dichro with diffuser head by the way.

(3) When the exposure times for soft and hard are identical I could have achieved (more or less) the same with one fixed gradation, right?

(4) If i dodge during soft I increase, during hard I decrease local contrast, right?

So much to do, so little time....

Rgds,
Gerd.
 

ic-racer

Member
Joined
Feb 25, 2007
Messages
16,562
Location
USA
Format
Multi Format
The soft exposure can also be done with your maximum yellow setting on the enlarger. The hard exposure, with the maximum magenta setting. If you don't like doing two exposures, you can combine the light colors and make a single exposure using a chart.
 
Joined
Jan 21, 2003
Messages
15,708
Location
Switzerland
Format
Multi Format
Hi all.
Did my first split grade print this weekend and wasted lots of paper. But thats OK, i got a nice result in the end...

Doing the stuff in the darkroom ist obviously different than reading about it in a book.

So a couple of practical questions came up:

(1) With the soft (#00) test strip i want to determine the highlights of the final print. But what if I have a small light area that only covers one or two of the different exposures of the test strip? Should I make several different strips, each with two/three exposures only but all covering the bright part? Or guess the correct exposure even if most of the stripes are only in dark areas?

(2) Should I use #00 or #0 for the soft part? Most guides say #0, but I think most of them mean "the softest you can get". I use a fujimoto g70 dichro with diffuser head by the way.

(3) When the exposure times for soft and hard are identical I could have achieved (more or less) the same with one fixed gradation, right?

(4) If i dodge during soft I increase, during hard I decrease local contrast, right?

So much to do, so little time....

Rgds,
Gerd.

1. With the soft (#00) test strip i want to determine the highlights of the final print. But what if I have a small light area that only covers one or two of the different exposures of the test strip? Should I make several different strips, each with two/three exposures only but all covering the bright part? Or guess the correct exposure even if most of the stripes are only in dark areas?

This can get a little trying at times, and you have to make your test strip such that you get in the ball park for the soft exposure. You can see on the enlarger base board, or by studying the negative, in which areas it's important to get the highlight density right, and by that adjust how you make your first test strip.


2. Should I use #00 or #0 for the soft part? Most guides say #0, but I think most of them mean "the softest you can get". I use a fujimoto g70 dichro with diffuser head by the way.


It's up to you. You can use a G0.5 or a G1 too. The negative dictates this, and how you want the final print to look.


3. When the exposure times for soft and hard are identical I could have achieved (more or less) the same with one fixed gradation, right?


If you make straight prints with no dodging or burning - yes.
But the REAL benefit of split grade printing is in dodging and burning at different filter grades. I have started using three different filters when I print difficult negatives sometimes, and it could be that I use a G3.5 filter to burn in a certain area, where neither a G1 or G5 looks right.


4. If i dodge during soft I increase, during hard I decrease local contrast, right?

In a way, but since you also affect print density, it's tough to generalize like this.
If you dodge during soft exposure you will lose highlight detail where you dodged, and the rest of the tones are moved up the tone scale, closer to bright highlights. Then when you add the hard exposure, the total exposure in that area will be brighter. If there was no way to get full black in that area, you just moved tones around without doing anything to the contrast.
If you dodge during the hard exposure, you lessen the impact of the black, while your highlights in that same area will remain largely unchanged. If there was not detail in the shadow values prior to dodging, and you gain shadow values by doing so, you could claim that you have increased local contrast, or the relationship between local tonal values.

Local contrast is describing the relationship between tonal shifts in a micro environment, but it affects the entire negative. Usually this is accomplished when you expose your film and develop it. By changing exposure, developing time, and agitation, you alter the relationships between tonal values in the negative. If you develop the film longer you get more contrast in the negative. But if you counter that by agitating less, you end up with similar mid-tones, but compressed highlights and raised shadow values for the same overall contrast, but a steeper mid-section of the curve, increasing local contrast.
 

Blighty

Member
Joined
Oct 11, 2004
Messages
914
Location
Lancaster, N
Format
Multi Format
For question #1 Move the test strip section by section such that your strip will have x number of identical scenes each of increasing exposure.
question#2 As a general rule, use the softest filtration you can - that's what I do anyway!
question #3 Even when soft/hard exposures are different, you could still (more or less) achieve the same result with a single filter BUT (as Thomas Bertillson says) it's not the real reason for split-grade printing.
Question #4 Thomas has it spot-on.
 
OP
OP
splash_fr

splash_fr

Member
Joined
Sep 6, 2013
Messages
47
Location
Freiburg, Germany
Format
Multi Format
Thanks to all for the helpful tips and explanations!

But I think Michael R is right and I'll stay at basic printing for a while and try to get overall brightness an contrast right.

Rgds,
Gerd.
 

ic-racer

Member
Joined
Feb 25, 2007
Messages
16,562
Location
USA
Format
Multi Format
I'll stay at basic printing for a while and try to get overall brightness an contrast right.

Rgds,
Gerd.

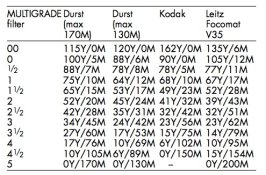
In that case I believe the G70 has filter numbers that go to 200, so you can try either the "KODAK" or "DURST" filter combinations in this table.

chart.jpg
 

rwhawkins

Member
Joined
Mar 6, 2009
Messages
24
Location
Oakland, CA
Format
4x5 Format
I have tried split grade printing, but was never a big fan. My experience was that I could always get a print I was happy with choosing an intermediary grade, so the advice to learn the "feel" of the contrast grades first is one I would echo. The next step, and where I find split grade printing very useful, is actually split grade burning by doing a basic exposure with one contrast and then going back over the print burning with a softer grade. I use that technique all the time.
 
Joined
Jan 21, 2003
Messages
15,708
Location
Switzerland
Format
Multi Format
I have tried split grade printing, but was never a big fan. My experience was that I could always get a print I was happy with choosing an intermediary grade, so the advice to learn the "feel" of the contrast grades first is one I would echo. The next step, and where I find split grade printing very useful, is actually split grade burning by doing a basic exposure with one contrast and then going back over the print burning with a softer grade. I use that technique all the time.

Or burning with a harder grade can be extremely helpful too when you try to add texture to an otherwise dull and uniform looking area.
 

Hatchetman

Member
Joined
May 27, 2011
Messages
1,553
Location
Chicago, IL
Format
Multi Format
So I guess you have to change filters in the dark? That would not be fun with my enlarger.
 

Hatchetman

Member
Joined
May 27, 2011
Messages
1,553
Location
Chicago, IL
Format
Multi Format
It shouldn't be difficult. You have a safelight, right?

I do. I don't always use it though. I guess I could cover the easel with black paper/cloth and then aim the safelight at the enlarger head where I'd have to slide the filter holder into its little slot. After struggling to get the filter into the cheapy holder. My only complaint with my Beseler 67 is its lousy filter holder.
 

MattKing

Moderator
Moderator
Joined
Apr 24, 2005
Messages
53,252
Location
Delta, BC Canada
Format
Medium Format
I do. I don't always use it though. I guess I could cover the easel with black paper/cloth and then aim the safelight at the enlarger head where I'd have to slide the filter holder into its little slot. After struggling to get the filter into the cheapy holder. My only complaint with my Beseler 67 is its lousy filter holder.

The below the lens Ilford and Kodak filters worked great with the condenser head on my Beseler 67C.
 

Hatchetman

Member
Joined
May 27, 2011
Messages
1,553
Location
Chicago, IL
Format
Multi Format
The below the lens Ilford and Kodak filters worked great with the condenser head on my Beseler 67C.

Yes, you are probably right. I got the Ilford set with the enlarger. I'll see if I can get a vintage Kodak set on the cheap. Good idea.
 

DREW WILEY

Member
Joined
Jul 14, 2011
Messages
14,080
Format
8x10 Format
With split printing all you need are two filters. You just buy optical (taking-quality) glass filters, one deep green, the other deep blue, which
can be used below the lens. Life is simple. Even simpler is to use a conventional colorhead which can have the filtration reset in the dark. Then
you can do either true split printing or ordinary variable contrast work. I gave up even bothering with so-called grade numbers long ago. Split
printing is far easier to do than to explain. But not all VC papers are the same. With some you need at least a token amount of exposure of both
emulsions in order to obtain a good DMax.
 

Nige

Member
Joined
Sep 8, 2002
Messages
2,317
Format
Multi Format
and I'll stay at basic printing for a while and try to get overall brightness an contrast right.

When doing this, you still need to get the highlights right and if your image has one particular area that those highlights are present, the the issue you highlighted earlier about getting sensible infomation from the test strip still exists. This is when you 'need' a test strip printer that moves the paper under that one spot, rather than you running the test strip across the image. Ralph Lambrect has plans for a fancy one (I had a quick search but I can't find the link). I made a simple one (out of matt board) which works fine. I've attached a pdf of how I made it (which I thought I'd uploaded here but can't find!)
 

Attachments

  • ProofPrinter.pdf
    365.2 KB · Views: 182

MattKing

Moderator
Moderator
Joined
Apr 24, 2005
Messages
53,252
Location
Delta, BC Canada
Format
Medium Format
I do agree that it is important to get some experience with "standard" printing, but I think learning about split grade printing is good for beginners, because of one particular consequence of split grade printing.

I find that if you understand how the two (or three) different emulsions in variable contrast papers respond to the filters, you will be a better printer. And split grade printing forces you to think about that.
 

pdeeh

Member
Joined
Jun 8, 2012
Messages
4,765
Location
UK
Format
Multi Format
I'm very much the tyro printer, but I really don't think the very conservative approach to learning so often advocated works for everyone, and certainly not me.

I had a negative I was struggling to print the other week, and couldn't make it "pop" in the way I envisaged it needed to. So just to try something new and refresh myself, I tried split-grade a la Les McLean.

The very first test print was almost perfect. It's not a "master print" by any stretch of the imagination but it is enough to have a couple of copies around to remind me that I can produce something worth looking at.

Does this mean I'll now never learn the basics properly or will split-grade print everything? Of course not.

When learning, many people need to have something ahead to spark their interest. There are of course plenty of people for who being methodical and thorough and doing one thing at a time until they have it perfected before moving on works very well (I'd guess many or even most people at APUG might fall in this category), but it is not a universally-applicable learning method.
 
Joined
Jan 21, 2003
Messages
15,708
Location
Switzerland
Format
Multi Format
It is also worth reminding everyone "split-grade" is nothing more than a specific case of multiple grade or variable contrast printing.

Exactly. Split grade printing doesn't work for all negatives either, particularly thin or low contrast ones, where simply a single high contrast filter is usually what's called for.
 
Joined
Jan 21, 2003
Messages
15,708
Location
Switzerland
Format
Multi Format
I had a negative I was struggling to print the other week, and couldn't make it "pop" in the way I envisaged it needed to. So just to try something new and refresh myself, I tried split-grade a la Les McLean.

The very first test print was almost perfect. It's not a "master print" by any stretch of the imagination but it is enough to have a couple of copies around to remind me that I can produce something worth looking at.

Good for you for being able to work with a difficult negative.

You can turn this argument around and claim that you should instead work on making better negatives that require less darkroom gymnastics.

A very good friend of mine has showed me how to make good negatives that print with ease, and while it was a painful lesson in processing film, the waste reduction at the printing stage is significant.
Believe it or not, it actually made the difference between me being able to afford printing in the darkroom and not. Instead of being frustrated with the results with very minute adjustments at the printing stage I now pop a negative into the enlarger, knowing I need roughly 22 to 25 seconds at f/8 and Grade 2.5 to 3.5 on the enlarger lens for my usual 6x8" print I make very few test strips anymore. Just one whole sheet that's a test print, no split grade needed. Adjust from there, and the second sheet is 80% of the time exactly what I was looking for, and 20% of the time I have to make a third one. That's for a finished print that require no more adjustments.

Some will say to just shoot film and process according to the manufacturers' instructions. If they can do that - great! But then you use a lot of the built-in range in the printing process to make up for that 'slop' or hysteresis in the negative making stage.
If you learn how to make great negatives, you have the entire built-in range of the variable contrast system to basically be creative with. That's worth a lot when you're pushing the envelope and trying to improve what your prints look like and take them from average or mediocre to something really stunning.
 

DREW WILEY

Member
Joined
Jul 14, 2011
Messages
14,080
Format
8x10 Format
I'm glad I learned to print on graded papers first, because I learned to optimize the workflow based on relatively basic parameters. In fact, many
times I use VC papers in the same manner, without any filtration control. But then it there when I need it - a bit of punch to the highlights or
shadows, respectively; differential dodging/burning with different filters; and of course, the occasional negative that requires full split printing
technique. In fact, split printing can be used supplementary to ordinary VC printing with milder filters, as needed. So none of these printing methods is "one versus another". These are just different tools to have in your toolbox.
 

ROL

Member
Joined
Oct 27, 2005
Messages
795
Location
California
Format
Multi Format
For me, it is rare to come across, and a pleasure to read, a thread so full of rational difference of opinion, all of which seems applicable depending on one's experience or particular workflow. The range of technique and outcomes suggests vital, knowledgeable, darkroom workers. Maybe there is hope for APUG, after all. (Of course, that only applies to posts above this one. :wink:)
 
Photrio.com contains affiliate links to products. We may receive a commission for purchases made through these links.
To read our full affiliate disclosure statement please click Here.

PHOTRIO PARTNERS EQUALLY FUNDING OUR COMMUNITY:


Ilford ADOX Freestyle Photographic Stearman Press Weldon Color Lab Blue Moon Camera & Machine
Top Bottom