• Welcome to Photrio!
    Registration is fast and free. Join today to unlock search, see fewer ads, and access all forum features.
    Click here to sign up

Split-grade printing & the dry-down effect

a sidebar

H
a sidebar

  • Tel
  • Feb 3, 2026
  • 0
  • 0
  • 36
On The Mound

A
On The Mound

  • 1
  • 3
  • 68

Forum statistics

Threads
202,143
Messages
2,835,752
Members
101,135
Latest member
aenser
Recent bookmarks
0

Sim2

Member
Allowing Ads
Joined
Nov 21, 2009
Messages
492
Location
Wiltshire UK
Format
Medium Format
Split-grade printing & the dry down effect

This is a fairly unthought through thought, but I throw it open to the denizens of printing for any feedback/repudiation/thoughts etc - all welcome, even negative concerns!

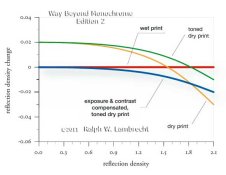
Accepting that dry-down does occur (fibre paper) and that it seems to mainly be evident (or most evidient) in the lighter tones of a print. When the value is applied to all the exposure this leads to a lightening of the dark tones, due to the reduced exposure - which can be brought back by selenium toning or adding contrast to the print over & above the test print indication.

If the dry-down value is applied to the soft grade 0 print exposure to account for the visible dry-down darkening, yet no dry-down value is applied to the hard grade 5 print exposure - might this retain the contrast/depth of black on a final print that was indicated on the test print?

Probably not very well explained, wil try to clarify if required but any thoughts on this as a viable printing process?

Sim2.
*thinking*
 

Vaughn

Subscriber
Allowing Ads
Joined
Dec 13, 2006
Messages
10,292
Location
Humboldt Co.
Format
Large Format
Sounds perfectly reasonable to me, though I have little experience with split-grade filtering. Protecting the values of the highlights using just the filter that affects those highlights seems to be a very sound theory.
 

Dan Henderson

Member
Allowing Ads
Joined
Feb 6, 2005
Messages
1,880
Location
Blue Ridge,
Format
4x5 Format
I find my soft and hard exposure times with test strips, use that information to produce a work print, then dry it in a microwave oven so that I can study the actual print tones in detail, increasing or decreasing each as needed. Often I find that I need to decrease highlights a bit -- 1/4 or 1/3 stop -- and increase shadows a converse amount to improve the contrast. For me, test strips just get me a close work print from which I can refine the final print.
 

Rick A

Subscriber
Allowing Ads
Joined
Mar 31, 2009
Messages
10,038
Location
Laurel Highlands
Format
8x10 Format
I just read about this on Les McLean's website. He expleines it all very well, including dry down.

lesmcleanphotography.com
 

Nicholas Lindan

Advertiser
Advertiser
Joined
Sep 2, 2006
Messages
4,316
Location
Cleveland, Ohio
Format
Multi Format
The statement "highlights are controlled by the #00/#-1 exposure" is only half true.

Highlights are controlled by the #00 filter only when the #00 exposure is greater or equal to the #5 exposure.

Highlights are controlled less by the #00 filter and more by the #5 filter as the print is made at higher contrast where the #5 exposure is greater than the #00 exposure. Obviously, at the limit, the #5 filter is the sole provenance of the highlights when #5 is used to make the entire print exposure.

The converse holds for shadows. If the #00 exposure is greater than the #5 exposure then the #00 exposure will have an effect on the shadows.

See http://www.darkroomautomation.com/support/appnotesgmeasured.pdf for more information. The application note has general applicability even though it deals with metering for split-grade printing.
 
Joined
Jan 21, 2003
Messages
15,716
Location
Switzerland
Format
Multi Format
A bit off topic, but there is also a lot to be had by not using just the Grade 00 and 5 filters. You don't necessarily have to use only those two filters. You can use, for example Grade 1 and 4 if you wish, depending on what you want to achieve. Often I will make an entire print with a Grade 2 filter, but might burn in the sky with a Grade 3.5 or 4.... The possibilities are endless and the only limitations are your creativity, curiosity, and critical eye.

In simple terms, it's easier to think about dry-down as a percentage, in exposure, of the whole print. It's less confusing, and accurate enough. Just make a work print with basic exposures and either do as Mr Henderson does and dry the print in the microwave or just let it air dry. Base your final exposure on that. With time, you will learn to account for dry-down as the print is wet.
Just subtract, say 5% or 10% (depending on paper) from any exposure you make (high contrast AND low contrast) when you reach something that looks good wet.

- Thomas
 

Vaughn

Subscriber
Allowing Ads
Joined
Dec 13, 2006
Messages
10,292
Location
Humboldt Co.
Format
Large Format
Or one just gets to know through experience what the highlights should look like wet in order to get what you want when the paper is dry. No math to worry about then! :D

I find the platinum prints and carbon prints dry down in both the highlights and shadows, so I have learned to judge the prints wet.
 
OP
OP
Sim2

Sim2

Member
Allowing Ads
Joined
Nov 21, 2009
Messages
492
Location
Wiltshire UK
Format
Medium Format
oooo - some replies! Thank you all for your inputs.

Here is where i am with this - I seem to be getting consistent results with regard to dry-down with Multigrade matt, gloss and warmtone. Using the percentage dry down facility on the RH Designs stopclock (so far on both split grade channels) the whites or lightest tones come down to the level of my wet test print. The blacks always come lighter than the wet test print. This is ok for some images as the intention is to use selenium at 1:5 which does push the blacks down again. When the intention is to selenium tone at 1:20, this has marginal effect on the blacks so I have been "guessing" an extra 1/4 or 1/2 half stop on the grade 5 exposure. Sort of ok with some reprints needed after drying etc.

Part of the last half year or so has been a process of really tightening up the "unpredictableness" of some of my processes. Partly to be a better more consistent printer and partly to reduce wastage as paper prices have gone up considerably - I like and want to continue to afford/use warmtone paper! Exposure, development, choice of chemicals etc has all been up for grabs and open to question. Questioning and analysing my percieved knowledge has been useful, though frustrating at times. The dry-down has been workable till last weekend...

I have started to print/test with the Multigrade Art 300 and had a print that dried down so differently that it needs a reprint and with the cost of this paper I started to question my experience with the dry-down. So, that neg has had:
1/ a test print that looks good wet (my reference),
2/ duplicate allowed to dry (to confirm extent of dry-down),
3/ a set at four different % levels on both channels (to re-establish a dry-down percentage)
4/ a set at two of the 3/ % levels with dry-down reduction on grade 0 only (to establish the difference compared to 3/ and 1/).

All were at the same base exposure, chems, times etc with duplicates printed in case the result is worth testing through the selenium toning. 4/ has just finished washing and will be drying, with some expectation!

A long-winded ramble there I know, but might assist with considerations of what I am trying and how. The end point really is to get the dark tones to match (as closely as possible) the wet print without having to resort to punching via the selenium. May not be possible but... This would give a tad more personal reassurance when printing with premium papers such as warmtone and the 300.

Thanks for your thoughts
Sim2.
*off to the drying rack*
 
Last edited by a moderator:

RalphLambrecht

Subscriber
Allowing Ads
Joined
Sep 19, 2003
Messages
14,962
Location
K,Germany
Format
Medium Format
Or one just gets to know through experience what the highlights should look like wet in order to get what you want when the paper is dry. No math to worry about then! ...

That's what I do. In my experience, taking a 1/12 stop of the exposure time will nicely compensate for the dry-down with Ilford MGIV.
 

Jean Noire

Member
Allowing Ads
Joined
Oct 1, 2006
Messages
587
Format
Multi Format
"Dry-Down

This is a subject you’ll run into VERY often. Stated simply: the term dry-down comes from the observation made by many photographers that B&W prints look darker when they are dry than they do when they are wet. Just about everyone notices this when they first start making photographs. You might also like to know that some people have made a considerable amount of money selling devices intended to compensate for this effect.

In my humble opinion (fortunately I’m not the only person who thinks this), there really is no such thing as dry down. What people see as dry-down is simply a highly reflective, wet print surface which, because it is swollen with water, reflects more detail in the darker parts of the image. If you want to get rid of the dry-down problem without spending hundreds of dollars on equipment of dubious merit, just remember never to judge a print without thoroughly squeegeeing off all of the surface water first. Since I got into this habit (and started to question the concept of dry-down) I’ve had no problem at all." . David Kachel.

I have found that this has some merit.
Regards,
John
 
Last edited by a moderator:

Blighty

Member
Allowing Ads
Joined
Oct 11, 2004
Messages
914
Location
Lancaster, N
Format
Multi Format
Hiya Sim2,
I zap my highlight test in the microwave for 30sec and just take the G00 exposure from that. The G5 test is dried in the same way and the exposure combo is read from this. This automatically takes account of the very slight lightening of the darkest tones upon drying.
 
OP
OP
Sim2

Sim2

Member
Allowing Ads
Joined
Nov 21, 2009
Messages
492
Location
Wiltshire UK
Format
Medium Format
Ooo, I get the feeling I may have tapped the hornets nest a bit with dry-down!

Very happy to hear other even contrary viewpoints/workflows whilst I may be chasing rainbows defend my workflow, I shall.

I needed a replacement accurate timer & the RH Designs fitted the bill, the dry-down factor capability came with it so there was no extra expense. Apart from testing paper, there has been no other expense in this quest.

I did previously try the microwave option, but for me, I found that the microwave print dried different to an air dried print. The only thought I had was that as the emulsion has swelled when wet, if forced dry perhaps the water is evaporated but the paper/emulsion doesn't have the time to "shrink" back to a natural state leading to a different surface arrangement and reflectivity. Didn't work for me, other users may have other findings.

I do not have the time luxury of waiting for a test print to dry before printing the real print, therefore evaluating a wet test print is my workflow.

I think that letting the excess water drain off or squeegeeing a print is sound advice, especially with a matt type paper. Although my last test of no dry-down on grade 5 was not a silver bullet experience (I guess if it was, someone else would have found it a long time ago!) it seemed to do no harm compared to compensating the grade 5 tests, having just toned some of these tests I shall wait for them to dry but am thinking that this may be a way forward, for me.

Thanks for your thoughts, more welcome!

Sim2.
 

Vaughn

Subscriber
Allowing Ads
Joined
Dec 13, 2006
Messages
10,292
Location
Humboldt Co.
Format
Large Format
I have heard dry-down attributed to the shrinking of the emulsion/paper when dry. That the paper does shrink has been easily shown when dry-mounting FB prints...dry mount tissue does not shrink, and if the tissue is attached to a damp (but dry to touch) print, trimmed, then mounted in the press, often one ends up with a little tissue showing on two opposing ends (Paper tends to shrink more in one direction and is dried by the heat of the mount press).

Since we see the image as light passing between the silver bits in the gelatin, reflecting off the paper base, and through the silver/gelatin again to our eyes, the shrinking of the paper moves the bits of silver closer together -- letting less light thru in both directions. Obviously this would affect all tones in the paper, but I believe we notice it most in the highlights because of the relative amount of open space between the silver bits in the highlights-- or something like that!

Dry down on alt processes can be greater and seen across the tonal range because of the greater amount of shrinkage of watercolor papers and the thicker emulsion of carbon prints.

YMMD -- whatever works (and how one thinks it works) for you is what is important!
 

RalphLambrecht

Subscriber
Allowing Ads
Joined
Sep 19, 2003
Messages
14,962
Location
K,Germany
Format
Medium Format
... In my humble opinion (fortunately I’m not the only person who thinks this), there really is no such thing as dry down. What people see as dry-down is simply a highly reflective, wet print surface which, because it is swollen with water, reflects more detail in the darker parts of the image. ...

Yes, dry-down is due to a reflectivity change in the emulsion surface, and since the reflectivity change exists, dry down exist (1st attachment) and can be measured. Nevertheless, dry-down is not a big issue. Just make your test prints and judge the wet print until highlights and shadows are as you want them, then, reduce the exposure by a fixed amount (usually 1/12 stop) and highlight dry-down is compensated for as best as you can. Subsequent toning in selenium will compensate for some shadow dry-down effects (2nd attachment).
 

Attachments

  • DryDown1.jpg
    DryDown1.jpg
    18.1 KB · Views: 151
  • DryDown2.jpg
    DryDown2.jpg
    22.4 KB · Views: 164

Jean Noire

Member
Allowing Ads
Joined
Oct 1, 2006
Messages
587
Format
Multi Format
Yes, dry-down is due to a reflectivity change in the emulsion surface, and since the reflectivity change exists, dry down exist (1st attachment) and can be measured. Nevertheless, dry-down is not a big issue. Just make your test prints and judge the wet print until highlights and shadows are as you want them, then, reduce the exposure by a fixed amount (usually 1/12 stop) and highlight dry-down is compensated for as best as you can. Subsequent toning in selenium will compensate for some shadow dry-down effects (2nd attachment).

Thankyou Ralph for the illustration.
Please note though that these are not my words you have quoted. I have acreditted them to David Kachel. I have not given my personal opinion on "dry down" but posted the quote as something the OP might like to consider.
Best wishes,
John
 
Joined
Sep 10, 2002
Messages
3,676
Location
Eugene, Oregon
Format
4x5 Format
Whatever dry-down is attributable to, either the shrinking of the emulsion/paper when dry or just a simple change in reflectance, it does exist. There are times when fine detail in the highlights of a dry print simply do not show in the wet one.

While I admire and respect all attempts to quantify dry-down, I find that different subjects, prints with finer separation in the highlights than in the shadows as opposed to prints with more important separation in the shadows for example, react differently, at least to my perception of what my finished print should be, to simple "across-the-board" adjustments in exposure and contrast. This is borne out by the graph the Ralph has so kindly posted. A quick glance shows that a dry print will never exactly match a wet one in overall surface reflectance. For me, applying a certain amount of dry-down compensation comes right after the test-strip stage and before fine-tuning start. This just helps me get the print exposure(s) closer to what will be the final one(s).

My printing work-flow includes a lot of time evaluating prints that are very close to each other in overall exposure, contrast and manipulations and under varying lighting conditions in order to arrive at a final decision (for that session anyway) of how to print a particular image. Therefore, it is no problem for me to simply dry the prints and make those evaluations using dry prints to begin with -- no guess work or exposure adjustment calculations to do at all. (This latter can be especially fiddly when having to subtract, say 1/12 stop or 10% or whatever from areas that have been dodged and burned and need subtractions from the dodging and burning time that are different that changes in overall exposure, etc...)

In the summer, I simply take the print outdoors and let the sun do its work; in the winter, the microwave works well, as do the heaters in my darkroom.

If you're in a hurry, then by all means apply a dry-down factor. If you have time, however, evaluating dry prints is much superior in my estimation.

Best,

Doremus Scudder

www.DoremusScudder.com
 
Last edited by a moderator:

RalphLambrecht

Subscriber
Allowing Ads
Joined
Sep 19, 2003
Messages
14,962
Location
K,Germany
Format
Medium Format
Thankyou Ralph for the illustration.
Please note though that these are not my words you have quoted. I have acreditted them to David Kachel. I have not given my personal opinion on "dry down" but posted the quote as something the OP might like to consider.
Best wishes,
John

Thanks for the clarification, but whoever said it, it conflicts itself, has been proven wrong and does not need to be considered.
 

RalphLambrecht

Subscriber
Allowing Ads
Joined
Sep 19, 2003
Messages
14,962
Location
K,Germany
Format
Medium Format
... A quick glance shows that a dry print will never exactly match a wet one in overall surface reflectance. For me, applying a certain amount of dry-down compensation comes right after the test-strip stage and before fine-tuning start. This just helps me get the print exposure(s) closer to what will be the final one(s). ...

That's how I work too. I apply the dry-down factor right after having made the test strips and still evaluate the print after dry-down, because the factor only corrects for highlight dry-down.

... In the summer, I simply take the print outdoors and let the sun do its work; in the winter, the microwave works well, as do the heaters in my darkroom.

If you're in a hurry, then by all means apply a dry-down factor. If you have time, however, evaluating dry prints is much superior in my estimation. ...

I use a microwave too, but I'm not convinced that a microwave oven is the correct tool to estimate dry-down, because surface gloss is a primary factor for dry-down, and a microwave alters the surface gloss significantly, giving it far more gloss than air-drying a print.
 

Vaughn

Subscriber
Allowing Ads
Joined
Dec 13, 2006
Messages
10,292
Location
Humboldt Co.
Format
Large Format
An interesting thread! Thanks to those putting some thought into all this and sharing those thoughts! Looks like there are several factors involved. I'll even toss one more out that I have mentioned before that someone might run afoul of. And that is being influenced by one's first impression of one's print when flipping on a viewing light in the darkroom, and seeing the print with eyes dialated.

And one more -- a slight fogging due to unsafe safelights. While not actually dry-down, it might be mistaken for dry-down if the final print was left out under the safelights longer than usual during exposure and processing.

Vaughn
 

anon12345

Member
Allowing Ads
Joined
May 25, 2010
Messages
207
Location
Central OK
Format
Multi Format
Regarding this subject, a photographer in his book stated . . . "the final judgments about subtle high values cannot be made with a wet print.". He then continues by explaining methods to dry the prints, and he makes no suggestion on compensating for dry-down. For me this makes the most sense, due to the variables in printing papers. In this sense, drying the test prints/work prints before evaluating the prints eliminates the need to compensate for a wet-look. This must be the most accurate method. That is to say, to evaluate a "dry print" under normal viewing conditions. My difficulty has been compensating for the effects of toning which seem to alter the contrasts during the final washing of the print.
 
Last edited by a moderator:

RalphLambrecht

Subscriber
Allowing Ads
Joined
Sep 19, 2003
Messages
14,962
Location
K,Germany
Format
Medium Format
Regarding this subject, a photographer in his book stated . . . "the final judgments about subtle high values cannot be made with a wet print.". He then continues by explaining methods to dry the prints, and he makes no suggestion on compensating for dry-down. For me this makes the most sense, due to the variables in printing papers. ...

He has a good point, but waiting for a fully dried print is unfortunately a bit unpractical, because it takes hours to dry a FB print by air, and any accelerated drying method changes the surface gloss and, consequently, don't give exactly the same dry-down (even that it helps a lot). It's very practical to know ones dry-down factor (1/12 stop for example), do a test strip for the highlights, pick the desired strip and take 1/12 stop off the exposure time.
 

Bob Carnie

Subscriber
Allowing Ads
Joined
Apr 18, 2004
Messages
7,735
Location
toronto
Format
Med. Format RF
Once again Ralph hits it on the head. After a few good rounds of prints one fully understands that some time off final wet print balance is usually chosen.
He has a good point, but waiting for a fully dried print is unfortunately a bit unpractical, because it takes hours to dry a FB print by air, and any accelerated drying method changes the surface gloss and, consequently, don't give exactly the same dry-down (even that it helps a lot). It's very practical to know ones dry-down factor (1/12 stop for example), do a test strip for the highlights, pick the desired strip and take 1/12 stop off the exposure time.
 
Photrio.com contains affiliate links to products. We may receive a commission for purchases made through these links.
To read our full affiliate disclosure statement please click Here.

PHOTRIO PARTNERS EQUALLY FUNDING OUR COMMUNITY:


Ilford ADOX Freestyle Photographic Stearman Press Weldon Color Lab Blue Moon Camera & Machine
Top Bottom