sp-445 first use review

Relaxing in the Vondelpark

A
Relaxing in the Vondelpark

  • 6
  • 2
  • 131
Mark's Workshop

H
Mark's Workshop

  • 0
  • 1
  • 79
Yosemite Valley.jpg

H
Yosemite Valley.jpg

  • 3
  • 1
  • 88
Three pillars.

D
Three pillars.

  • 4
  • 4
  • 89
Water from the Mountain

A
Water from the Mountain

  • 4
  • 0
  • 110

Forum statistics

Threads
197,544
Messages
2,760,818
Members
99,399
Latest member
fabianoliver
Recent bookmarks
0

chuck94022

Member
Joined
Jan 11, 2005
Messages
869
Location
Los Altos, C
Format
Multi Format
[tl;dr: Nice tank, some issues, one of which could be a deal breaker if caused by the design.]


I was happy to receive my SP-445 after contributing to the campaign and watching its evolution. I must admit I was disappointed to see the design move from a plunger based agitator to an inversion tank, but it still retained a nice compact footprint.

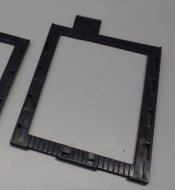
The received unit came fully assembled, nothing to do but use it. The holders did show a miniscule amount of curve, discussed in other threads. It didn't seem to be an issue, and certainly wasn't an issue for loading sheets.

I first tried the tank, lights on, with water, to see how it handled fluids. Unlike it's closest competitor, the now abandoned HP-CombiPlan, this tank takes on the chemistry very rapidly, and it appeared to flow smoothly from the pour-in side, through the baffles, and onto the film. One could fill the tank in a small number of seconds - it takes the liquid as fast as you care to pour it. But this could be a problem - more on that later in the review.

I followed the directions carefully for placing the lid on top - wetting the seal first. Then to some inversions, using water. Unfortunately, even with the best care, this tank leaks a bit intermittently during inversions. I held it at the top to assure the lid wouldn't come off, and didn't unnecessarily squeeze the tank. But leak it did. Not enough to ruin a development session, but enough to justify doing your work over a sink to catch the drippings, and to wear gloves.

My experience during development with regard to leakage was a bit mixed. It didn't leak with every inversion, so I'm sure it does have something to do with pressures by the hands, but it isn't clear what causes it or how it would be avoided. The seal is one o-ring on a press-fit lid. There is a large area to seal, and it is sufficiently thin plastic that some movement of the surfaces around the seal could easily account for such leakage during handling.

During development, a 5 minute period, the tank lost 15ml of liquid. It lost less (miniscule amount) during stop, and also less during fix (I didn't measure it, but less than 10ml).

I would note too that the lid on my unit does not sit flush against the top of the tank. There is about a millimeter gap between the lid flange and the top of the tank. The lid can be pressed flush, but it naturally rises back up to this gap. I'm not sure if this is the cause of the leak. Here's a photo of the gap:

sp-445 lid.jpg


Leaking is the primary reason I was hoping the plunger agitation would work. I really don't like leaky tanks.

On to the results! I processed two test images taken the same day on Fuji Acros 100. I shot a scene outside, in extremely contrasty light, just because. Due to the result, I will do another test indoors with a controlled scene and lighting.

After development, I <cough> s c a n n e d <cough> the first negative to evaluate it carefully for even development. I did not see the streaking reported in another thread. Unfortunately, I found one disturbing area in the image, which I've indicated with an arrow:

devtestneg-arrow.png


(EDIT: The negative was inserted into the holder upside down, so this area was near the bottom of the tank.)

I suspect this is due to overly strong fluid flow when I poured in the developer, but I have no way to prove it. It has the look of a light leak, but I have confidence in that film holder and in my technique. The spot on the negative is roughly aligned with a port on the tank's baffle. I do note though that the negative on the other side of the same dev tank holder doesn't appear to have the same flaw. So I'm not ready to declare that this is a repeatable flaw in the design. It does tell me that I can't yet depend on this tank for critical images until I've done further testing.

One other oddity, that only exists with this negative: The tiny tabs that hold the negative secure in the holder left little marks on the negative. It appears that fluid didn't get under the tabs during processing for some reason. I don't know if this is the result of the slight curvature or something else. I will note that I don't generally do a pre-wash before development - this may convince me to do otherwise with this tank. Both issues might be mitigated by getting the negative wet before adding developer.

It is possible that the slight curvature of the holder might account for both of the above issues. A slightly convex holder would press the film against the tabs, and would also expose the film more directly to the flow. I'll attempt to straighten the holder perfectly before conducting more tests.

Bottom line is this: it is, overall, a nice design, and should be a good addition to my darkroom. I'm glad I bought it. However, until I'm confident it can repeatably perform on my most critical negatives, I'll stick to my lights-out dip and dunk process. In the mean time, I look forward to the advice of others, and to input from the designer of the tank, to help me refine my technique with this new tool or debug the unit itself, whatever is required.
 
Last edited:

Alan9940

Member
Joined
Jun 17, 2006
Messages
2,380
Location
Arizona
Format
Multi Format
Regarding the leaking, did you follow Tim's suggestion to squeeze the tank slightly, then put on the drain/fill cap? Have you seen his "Tips & Tricks" video? It's posted on his website, if you haven't seen it. The lid on my tank also sits up about 1mm like yours, but I didn't notice any leaking. But, I always work in a darkroom sink and I'm not exactly careful when pouring in/out fluids. :smile: I always wear nitrile gloves when handling any photo chemicals. Therefore, mine may have leaked a little and I didn't even know it.

One of my holders is dead flat, while the other has a very slight curve. I've read of the possible issues due to holder curvature, but haven't had any problems with mine. I've also read that specific films may be more susceptible to streaking, marking, etc, so, perhaps, I just haven't used the "right" film. I have yet to see any mark on my film caused by the tiny tabs that hold it at the bottom of the holder. But, I do a 2 - 3 minute pre-soak which may or may not have anything to do with that.

Regarding the mark as shown in the pic with the arrow, it's very difficult to tell anything based on that scan, but are you sure it's not an air bell? If you suspect a light leak, it would be simple enough to test; each run you could include a test film in the suspect holder positioned in the suspect slot. Turn the film around for a second run--if light leak, it won't move.
 
OP
OP
chuck94022

chuck94022

Member
Joined
Jan 11, 2005
Messages
869
Location
Los Altos, C
Format
Multi Format
I'm pretty certain it isn't a light leak - unless it is a leak at the tank. Also pretty confident it isn't an air bell. I'll be doing further testing, will certainly keep the thread posted on that.
 

tim48v

Partner
Joined
Jul 6, 2015
Messages
288
Location
Erie, Colorado
Format
Large Format
First, regarding the leakage, so far, 100% of people having problems with leaking, fixed it by doing the "squeeze play". While it is theoretically possible that the parting line from the mold (see attached pdf) is too heavy and causing problems, this is only a theoretical possibility. We haven't actually confirmed that is is an issue for anyone.

As for the negative you posted: I think you're referring to the dark band above the arrow. Doesn't look like a light leak to me (especially if it was at the bottom of tank.) But check to make sure both light baffle plates are installed and they are in the right order.

I'd guess that this is a result of uneven development due to over agitation. You didn't mention what technique you used. I always tip the tank "broadside". Rotating it on the narrow axis will cause fluid to tumble through the holes in the baffle plates.

Note: our research shows that the turbulence continues for almost 20 seconds after you stop turning the tank.

I'm also a little concerned by the short development time. I don't remember what Fuji recommends, but 5 minutes seems short and could amplify any issues.
 

Attachments

  • SP-445 parting line.pdf
    58.8 KB · Views: 399

summicron1

Subscriber
Joined
Jul 28, 2010
Messages
2,918
Location
Ogden, Utah
Format
Multi Format
i didn't have any leakage issues, nor uneven development, but the bands on the film holder -- all those stripes -- left very nice even marks on my negatives. Whether this is scratches (and some look like they are) or marks in the surface with the foto-flo, I don't know.

they were fully soaked in foto-flo mixed water, usual concentration I always use. And there the marks are.

They're disturbing. I would love for someone to tell me what I'm doing wrong here.

charlie trentelman
 

summicron1

Subscriber
Joined
Jul 28, 2010
Messages
2,918
Location
Ogden, Utah
Format
Multi Format
Charlie,
Send me a sample photo at timothy@stearmanpress.com
Check the film holder to make sure it's "flat". Are these marks on all your negatives or just some? what film?
Tim


sending you full scans via email, but here's some screen shots. The marks are on all 4 sheets of film, to varying degrees.
Bright sun exaggerates the situation, but you can see the marks on the surface, and shiny lines which look like scratches to me. I haven't tried to make prints yet, or even scans.
Screen Shot 2016-09-06 at 10.04.43 AM.png
Screen Shot 2016-09-06 at 10.04.59 AM.png


The holders are absolutely flat. Film is HP5
 

tim48v

Partner
Joined
Jul 6, 2015
Messages
288
Location
Erie, Colorado
Format
Large Format
did you foto-flow in the tank or afterwards? I've seen something similar if I don't agitate enough during the wetting agent.
I've shot a lot of HP5 with no problems. What chemistry did you use?
 

summicron1

Subscriber
Joined
Jul 28, 2010
Messages
2,918
Location
Ogden, Utah
Format
Multi Format
did you foto-flow in the tank or afterwards? I've seen something similar if I don't agitate enough during the wetting agent.
I've shot a lot of HP5 with no problems. What chemistry did you use?
yes, i did use foto-flo, although perhaps did not agitate it as much as recommended. I use D76 1:1, as per always.

maybe another cupla shots, agitate more with foto-flo. you really wouldn't think plastic could scratch negatives....
 
OP
OP
chuck94022

chuck94022

Member
Joined
Jan 11, 2005
Messages
869
Location
Los Altos, C
Format
Multi Format
...
I always tip the tank "broadside". Rotating it on the narrow axis will cause fluid to tumble through the holes in the baffle plates.

Note: our research shows that the turbulence continues for almost 20 seconds after you stop turning the tank.

...

I'm also a little concerned by the short development time. I don't remember what Fuji recommends, but 5 minutes seems short and could amplify any issues.

Hi Tim,

Broadside - I'll try it.

The reason I shortened to 5 mins was due to a N-2 pull. I too was uncomfortable with it, which is why I'll be more controlled with my next test shots.

-chuck
 

tim48v

Partner
Joined
Jul 6, 2015
Messages
288
Location
Erie, Colorado
Format
Large Format
We've got two threads intermixed!
Summicron1,
We've used a lot of D-76 1:1 (until we discovered our SP-76EC); also shot a lot of HP5.
Did you say the film holders look flat?

These look like lines from inadequate wetting agent. Have you tried rewashing and using the foto-flo in a tray?

The film is almost as hard as the plastic, unlikely to scratch it.

Let me know what your find.
 

summicron1

Subscriber
Joined
Jul 28, 2010
Messages
2,918
Location
Ogden, Utah
Format
Multi Format
BTW, we're still trying to replicate the problem. Would like to note that members of our Flickr group: https://www.flickr.com/groups/sp-445/
have posted some great photos using the SP-445 and HP5. We just need to figure out what's different.

I will mail you a cupla sample negatives tomorrow -- I'm wondering if pre-soaking the film causes issues? I notice an older thread here on scratches/issues with HP5 that folks said were solved by simply not pre-soaking the film, although Simon claims it should make no difference.

I have been, next time I won't.
 

Alan9940

Member
Joined
Jun 17, 2006
Messages
2,380
Location
Arizona
Format
Multi Format
Another tip I'll add to this thread for new SP-445 users: to ensure a complete drain of liquid, remove caps and drain as normal, but when you think it's empty tip the tank back upright, then drain; do this a couple of times and the tank really will be empty.
 

faberryman

Member
Joined
Jun 4, 2016
Messages
6,048
Location
Wherever
Format
Multi Format
After development, I <cough> s c a n n e d <cough> the first negative to evaluate it carefully for even development. I did not see the streaking reported in another thread. Unfortunately, I found one disturbing area in the image, which I've indicated with an arrow:

Looks like light between the leaves to me. I'd like to see the print before making a final judgment though.
 

rubbernglue

Member
Joined
Aug 24, 2013
Messages
177
Format
Multi Format
BTW, we're still trying to replicate the problem. Would like to note that members of our Flickr group: https://www.flickr.com/groups/sp-445/
have posted some great photos using the SP-445 and HP5. We just need to figure out what's different.

I have seen this aswell. My procedure is this:

-Pre-soak
-Dev. (normally 1 minute agitations)
-rinse
-Fix (it normally stands for 10 minutes with a couple of inversions)
-rinse
-add some soap to the rinse as I remove the film.

I have only developed 4 sheets in total as of yet, but with my last two I noticed this problem, and also that the film was difficult to remove from the holder afterwards - it had stuck like glue to the holder and I had to use a tool to almost pry it loose.
My guess so far have been that the surface of the holder is too flat in some places and needs some trimming with a knife or something to make water come in easier and not make the film stuck, which is why I came to think that the "lines" which came on the back of the film is lack of fixer? I (almost) made my "lines" to disappear efter fixing a second time afterwards.
 

AgX

Member
Joined
Apr 5, 2007
Messages
29,973
Location
Germany
Format
Multi Format
These look like lines from inadequate wetting agent. Have you tried rewashing and using the foto-flo in a tray?

In summicron1's photos I see blinking small lines that to me impress as typical scratches.
It is beyond my imagination how such could be related to wetting agent.
 

MattKing

Moderator
Moderator
Joined
Apr 24, 2005
Messages
51,974
Location
Delta, BC Canada
Format
Medium Format

Simon Howers

Member
Joined
May 21, 2011
Messages
124
Location
West Yorkshi
Format
Large Format
These look like lines from inadequate wetting agent. Have you tried rewashing and using the foto-flo in a tray?

The film is almost as hard as the plastic, unlikely to scratch it.

Let me know what your find.

Two tanks arrived in the post yesterday. I use Graphmatic magazines so have been using a MOD54 - which conveniently takes 6 sheets. I find the MOD54 fiddly to load accurately in a changing bag, whereas the SP-445 is a breeze. I had a mag with some exposed (very time-expired) FP4 so I loaded the tanks (3 sheets apiece) and used RO9 at 1:25 for 9 minutes. I just gave the second tank a couple of minutes extra development time on the same developer.
The tanks did not leak and standard inversion was easy. I noticed that the caps can come loose quite easily so I just put a finger over each cap whilst inverting.
I too have noticed the marks on the film corresponding to the bars on the film holder and to me it looks like detergent stains (wetting agent.) The trick, I suspect, is to wash the film in the tank and then dump it into a tray with the wetting agent before hanging to dry.
I scanned a couple of sheets and the marks did not appear on the scanned image.

I mostly stand develop FP4+ so I'll report on this in due course.

In summary, I found the product well made and easy to use.
 

moviemaniac

Member
Joined
Aug 24, 2012
Messages
42
Location
Austria
Format
Multi Format
In summicron1's photos I see blinking small lines that to me impress as typical scratches.
It is beyond my imagination how such could be related to wetting agent.

Exactly. I just got back from my first use of the development tank. To be exact: I used both tanks with Delta 100 and HP5+
I got the shock of my life when I looked at the negatives after developing - the back side touching the guiding rails is scratched on every single negative. Vertical lines extending more or less all the way for every single ridge. It remains to be seen whether these show up while scanning/enlarging, but if they do I'll have no choice but to bin the tanks.

I examined the film holders: They're all okay, no sharp areas to be felt when I run my fingers across the ridges.

And no, it's not a problem with development or wetting agent at all! I used a spare piece of film, inserted it into the holder and removed it again and - voila - the scratches are there.

I really hope that's not an entire afternoon of shooting ruined. No earth-shattering pictures taken, but nonetheless...
 

tim48v

Partner
Joined
Jul 6, 2015
Messages
288
Location
Erie, Colorado
Format
Large Format
We've heard of the scratches showing up on a few negatives. Haven't figured out why some people see them and most don't. I think everyone who has reported this is using Ilford film. (We've sent systems to Ilford in the UK for review.)

The good news is that we have sent samples with the scratches out to be professionally scanned; nothing showed up on the images. People have also reported that they don't show up in enlargements either.

I've attached a photo of an experimental mod to the film holders. Takes about 5 minutes with an Xacto knife and fine sandpaper. Seems to work fine, the film is thick enough that we probably don't need as much material as we first thought.
 

Attachments

  • experimental film holder.jpg
    experimental film holder.jpg
    136.2 KB · Views: 443

moviemaniac

Member
Joined
Aug 24, 2012
Messages
42
Location
Austria
Format
Multi Format
Thanks, Tim!

This did put my mind at ease a little bit, however the scratches look really bad. I'll just have to wait until tomorrow to scan them, I suppose. There might also be a difference between scanning/enlarging with a diffused light source vs modern scanners with harsh LED light or condenser enlargers.
Even if the scratches don't show up - do I want to take the risk going forward? They might not show up now, but any previous damage might just shop up later should anything happen to the negative at a later time. Also, if it's okay now, will it be ok in five years when film manufacturers switch or tune their film base? Or when I switch scanners? A lot of variables at play here and I'm not sure I'm comfortable taking the risk.

Your mod looks interesting. Has this been thoroughly tested with different films/different film bases (thin acetate/thick acetate/polyester...). Any issues with two sheets sticking together on the back during development?

I'll report back tomorrow when I've tried scanning the sheets...

thanks
 

tim48v

Partner
Joined
Jul 6, 2015
Messages
288
Location
Erie, Colorado
Format
Large Format
It has not been "thoroughly" tested. However, there is enough distance between the sheets and the film (even the thinner films, have not tried the old film pack films, those are really thin) are stiff enough to keep from sticking.
 

moviemaniac

Member
Joined
Aug 24, 2012
Messages
42
Location
Austria
Format
Multi Format
Thanks!

Well, the negs were already dry (the scratches look really bad once dry), so I hurried into my study, with a heartbeat of 180 bpm, and scanned the first one. Clean, no scratches in the scan. Hallelujah! Thank god I didn't make any bets - I would've lost :D

BTW: The whole process was very straightforward, I enjoyed using the tank for development! Just one thing: I once tried to unscrew one cap single-handedly and the lid lifted 2-3mm, giving me a huge scare. No fogging in the end. Always use two hands or a strip of duct tape to secure the lid as a safety measure.
 

tim48v

Partner
Joined
Jul 6, 2015
Messages
288
Location
Erie, Colorado
Format
Large Format
Note that the "light tightness" is a function of the O ring and not the lid being down snug. The groove for the O -ring may appear to be too large (that's the movement you saw.) It is actually industry standard. There needs to be room for the rubber to squish against the two mating surfaces.
 
Photrio.com contains affiliate links to products. We may receive a commission for purchases made through these links.
To read our full affiliate disclosure statement please click Here.

PHOTRIO PARTNERS EQUALLY FUNDING OUR COMMUNITY:


Ilford ADOX Freestyle Photographic Stearman Press Weldon Color Lab Blue Moon Camera & Machine
Top Bottom