Some Waxing Experiments on Salt Print

evancanoe.JPG

A
evancanoe.JPG

  • 4
  • 0
  • 61
Ilya

A
Ilya

  • 3
  • 1
  • 61
Caboose

A
Caboose

  • 4
  • 2
  • 72
Flowers

A
Flowers

  • 7
  • 1
  • 68

Recent Classifieds

Forum statistics

Threads
197,675
Messages
2,762,796
Members
99,437
Latest member
fabripav
Recent bookmarks
0

nmp

Member
Joined
Jan 20, 2005
Messages
1,995
Location
Maryland USA
Format
35mm
So I got myself some Dorland's Wax Medium while ago and I used it on one of my salts.


Procedure:

Coat #1
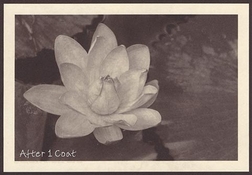
: Applied wax with gloved fingers. Let sit for a few minutes (around 5,) then took off the excess with a cotton pad. Turns out it wasn't a good idea to let it dry first because it hardened the wax just enough make it flaky. Cotton pad I used did have some fiber shedding too. May not be the best material for this purpose. Then used a hair dryer to warm up the wax in the hopes of healing some of the marks created by the rubbing action and leveling the wax over the contours of the paper. Allowed to dry overnight.

Coat #2: This time used a piece of fabric from an old tee-shirt folded into a pad, picked up some wax and applied it directly over the print and immediately with another pad took the excess off and continued buffing the surface. Much better outcome. Hair dryer and overnight drying as before.


First impressions:

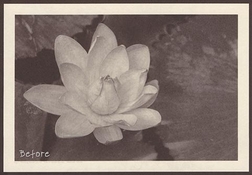
It introduces significant gloss as – more like pearl as the paper texture still plays a role. I would want to back off the glossiness a bit so the reflections do not distract when viewed at an angle too much. May be try both coats next time with the Coat #2 procedure with a little more buffing.

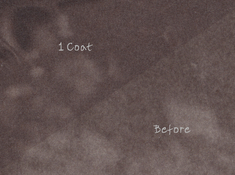
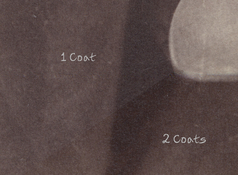
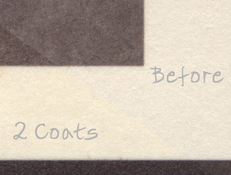
Looking at it straight on – it brings a significant amount of pop to the print – darkening the shadows while keeping the highlights close to where they were – increasing the perceived contrast and the DR on the print. Quantitatively, a spot measurement on the scan in the dark area of the print gave 63 before vs 59 after 1 coat vs 50 for 2 coats (Average RGB values.) That is a significant improvement, I would say. The same in the white border measured 228 vs 229 vs 228 – essentially unchanged.

The edges also seem better defined. The dusty look (my term) of a salt print brought out by fibers of the paper sticking out is replaced with a more cleaner one.


Attachments:

Cycle the first 3 quickly to appreciate the difference:

1. Before applying wax
2. After Coat #1
3. After Coat #2
4. High mag comparison: before vs 1 coat
5. High mag comparison: 1 coat vs 2 coats
6. High mag comparison: before vs 2 coats – white border area
AsIs.jpg

1Coat.jpg

2Coats.jpg

Before vs 1 Coat.jpg

1 Coat vs 2 Coats.jpg

Before vs 2 Coats Whites.jpg


Bottom line:

I like what I see. Recommended if you are looking for some way to add some luster and depth to your salt prints. The process is fairly easy with a pre-made cold wax – no need to mix anything.


:Niranjan.
 

gone

Member
Joined
Jun 14, 2009
Messages
5,505
Location
gone
Format
Medium Format
Thank you for such a clear and concise test. I like the version w/ 1 coat, the one w/ 2 coats pops more, but looks more like a "regular" print. However, the thumb nails on my monitor surely look different than the prints in person, so that is what it is. It's interesting how an old T-shirt seems to be the best thing for many applications, photo or otherwise.

The tricky part will be dealing w/ reflections, as any surface that's shinier will have more glare issues. You can hopefully find a happy medium between too much and not enough. I have issues w/ reflections on my glossy FB papers, and it's more annoying on the pics w/ lots of dark areas.
 
Last edited:
OP
OP

nmp

Member
Joined
Jan 20, 2005
Messages
1,995
Location
Maryland USA
Format
35mm
Thank you for such a clear and concise test. I like the version w/ 1 coat, the one w/ 2 coats pops more, but looks more like a "regular" print. However, the thumb nails on my monitor surely look different than the prints in person, so that is what it is. It's interesting how an old T-shirt seems to be the best thing for many applications, photo or otherwise.

The tricky part will be dealing w/ reflections, as any surface that's shinier will have more glare issues. You can hopefully find a happy medium between too much and not enough. I have issues w/ reflections on my glossy FB papers, and it's more annoying on the pics w/ lots of dark areas.

You are welcome. I figured some pictures would be helpful.

I agree with you about 1 coat and 2 coats. I would still use 2 coats since that tends to average up some coating related defects and marks. But as I mentioned I would redo the 1st coat like how I did the second. And add some more buffing at both steps. Then again some might prefer more gloss. Buff to taste, I would say...🙂

:Niranjan.
 

koraks

Moderator
Moderator
Joined
Nov 29, 2018
Messages
21,004
Location
Europe
Format
Multi Format
Cool. I waxed quite a few alt. process prints, mostly salt prints, a couple of years ago. Got a can of cheap furniture wax and went about it pretty much like you did in method #2. Usually I would heat up the print with the hair dryer, then let cool and then buff again for a smooth finish. The wax I used gave a bit of a gloss, but not glaringly so. It worked quite OK, but then again, I can also appreciate the look of a 'naked' salt print. Its dead-matte surface has a unique quality of its own, especially on certain papers.

I also tried beeswax once or twice but never managed to get it onto the print instead of either embedded into it (when heated) or brushed over it without it sticking (unheated). I didn't have any lavender oil to mix it with, I guess that's where I went wrong. I should try that sometime, still. Beeswax + lavender would olfactorily beat the crap out of the petroleum stench of that cheap furniture wax.
 

Rick A

Subscriber
Joined
Mar 31, 2009
Messages
9,857
Location
Laurel Highlands
Format
8x10 Format
I've been using bee's wax mixed with orange oil on my salt prints, one coat and then buffed with an old cotton T shirt. Choice of paper makes more difference than how many coats of wax.
 

Erik L

Subscriber
Joined
May 9, 2007
Messages
816
Location
Grand Junction CO
Format
8x10 Format
As Koraks mentioned, it looks real nice after applying it if you melt it with a hair dryer. You can literally watch it melt and sink into the pores of the paper. It almost disappears visually but adds a bit of depth to the shadows and can somewhat tame too hot highlights a bit. I find that application with my finger is fine and not too finicky because once you melt it it becomes a uniform coating.
 
OP
OP

nmp

Member
Joined
Jan 20, 2005
Messages
1,995
Location
Maryland USA
Format
35mm
Cool. I waxed quite a few alt. process prints, mostly salt prints, a couple of years ago. Got a can of cheap furniture wax and went about it pretty much like you did in method #2. Usually I would heat up the print with the hair dryer, then let cool and then buff again for a smooth finish. The wax I used gave a bit of a gloss, but not glaringly so. It worked quite OK, but then again, I can also appreciate the look of a 'naked' salt print. Its dead-matte surface has a unique quality of its own, especially on certain papers.

I also tried beeswax once or twice but never managed to get it onto the print instead of either embedded into it (when heated) or brushed over it without it sticking (unheated). I didn't have any lavender oil to mix it with, I guess that's where I went wrong. I should try that sometime, still. Beeswax + lavender would olfactorily beat the crap out of the petroleum stench of that cheap furniture wax.

In the wax that I used, though it does have some "spiritual" contents, the smell is almost non-existent, which is definitely an advantage over other similar pre-made waxes.

:Niranjan.
 

fgorga

Member
Joined
Aug 31, 2015
Messages
741
Location
New Hampshire
Format
Multi Format
I have used Niranjan's method #2 with Renaissance Wax with similar results on both salt prints and platinum/palladium prints.

I have also tried beeswax and lavender oil... very messy and smelly, although the smell is pleasant!

In the end, I have decided that I like the look of unwaxed prints best. Thus, I do not wax prints routinely.
 
OP
OP

nmp

Member
Joined
Jan 20, 2005
Messages
1,995
Location
Maryland USA
Format
35mm
I realized I might have been using the word "buffing" erroneously. I guess there are 2 kinds of actions post-application. One is taking the excess wax off - which is done with relatively greater pressure and slower pace. The idea is first to apply liberally making sure you have covered all parts of the print, more than it is necessary, i.e. WAX ON. Then taking a cleaner pad, remove the excess material that is above the surface of the paper, i.e. WAX OFF. Heat treatment at this point will heal the surface imperfections. Print at this point would have added some depth and darkness, but may not be overly glossy. If more glossiness is required, then buffing can follow. Buffing is done at gentle pressure and greater speed - like shining shoes.

:Niranjan.
 

jeffreyg

Subscriber
Joined
Jun 12, 2008
Messages
2,599
Location
florida
Format
Medium Format
I haven't tried salt printing yet (maybe soon) but I have done platinum/palladium on cotton vellum ala Dan Burkholder and sprayed with Kamar varnish getting very nice results also made some books on cotton paper and sprayed for protection with Moab Desert Varnish also with very good results. I use Renaissance micro-crystalline wax polish on alabaster sculpture but haven't tried it on photographs. I don't know if any of these products are appropriate for your purpose but I thought I'd toss them out there if anyone wants to comment on their experience.


BHuij

Member
Joined
Oct 12, 2016
Messages
798
Location
Utah
Format
Multi Format
I've never had good luck with it, but maybe I'm using the wrong wax. When I got interested in the idea of waxing my salt prints, I read a lot of sources saying a 1:1 mix of lavender oil and beeswax was a great recipe, so I made some up. With an old tee shirt, I always got a lot of fuzz coming off and sticking to the print. I also never seemed to find the right temperature. When heated to liquid, it wouldn't spread out much over the print and took a lot of the wax mixture to cover an 8x10. When heated less, it was too "hard" to spread much at all, so I got really uneven application over the paper. When I tried heating gently with a heat gun to encourage the "lumps" of wax to spread out more and buffed with the tee shirt again, it seemed like the oil would soak way into the fibers of the paper (it was HPR) and leave blotchy spots that never seemed to fully dry.

Probably used way too much, and I guess there's just a lot more of a learning curve to getting the waxing process right than I bargained for. But also I'm wondering if 50/50 lavender oil + beeswax isn't the miracle recipe I was led to believe :D
 
OP
OP

nmp

Member
Joined
Jan 20, 2005
Messages
1,995
Location
Maryland USA
Format
35mm
I've never had good luck with it, but maybe I'm using the wrong wax. When I got interested in the idea of waxing my salt prints, I read a lot of sources saying a 1:1 mix of lavender oil and beeswax was a great recipe, so I made some up. With an old tee shirt, I always got a lot of fuzz coming off and sticking to the print. I also never seemed to find the right temperature. When heated to liquid, it wouldn't spread out much over the print and took a lot of the wax mixture to cover an 8x10. When heated less, it was too "hard" to spread much at all, so I got really uneven application over the paper. When I tried heating gently with a heat gun to encourage the "lumps" of wax to spread out more and buffed with the tee shirt again, it seemed like the oil would soak way into the fibers of the paper (it was HPR) and leave blotchy spots that never seemed to fully dry.

Probably used way too much, and I guess there's just a lot more of a learning curve to getting the waxing process right than I bargained for. But also I'm wondering if 50/50 lavender oil + beeswax isn't the miracle recipe I was led to believe :D

That's why I like the idea of cold wax - already pre-made. No mixing required. Just grab it and dab it.

:Niranjan.
 

BHuij

Member
Joined
Oct 12, 2016
Messages
798
Location
Utah
Format
Multi Format
When I inevitably get back into Kallitype and Salt Print making, I'll definitely give waxing another shot. Seems like a nice way to get a completely different surface finish and look compared to any silver gelatin papers, and help compensate for what I perceive as some of the flaws inherent to my chosen alt processes.
 
OP
OP

nmp

Member
Joined
Jan 20, 2005
Messages
1,995
Location
Maryland USA
Format
35mm
I haven't tried salt printing yet (maybe soon) but I have done platinum/palladium on cotton vellum ala Dan Burkholder and sprayed with Kamar varnish getting very nice results also made some books on cotton paper and sprayed for protection with Moab Desert Varnish also with very good results. I use Renaissance micro-crystalline wax polish on alabaster sculpture but haven't tried it on photographs. I don't know if any of these products are appropriate for your purpose but I thought I'd toss them out there if anyone wants to comment on their experience.


I just got my Renaissance wax - I am going to try that out too. I see that it does have some petroleum smell unlike Dorland.

I spent some time trying to use some of those sprays long time ago - not on alternative prints but on those other prints (which shall stay nameless.) I could never get it to not have some sort of defect - bubbles, unevenness, etc. What's the secret of getting a homogeneous, transparent coating with those things?

:Niranjan.
 

samcomet

Subscriber
Joined
Feb 4, 2008
Messages
378
Location
Sydney, Australia
Format
35mm RF
For what it is worth I found in a Zone VI Newsletter, number 78, June 1994, page 8 (from a complete Newsletter's series link from Photrio somewhere) the following formula which I have used quite successfully: 2 tablespoons of Stand Oil (distilled linseed oil) in 8 oz. Windsor/Newton Artists Turps to provide that really nice depth of blacks while keeping the highlights intact. I am using FB matte for this purpose. I've also used Windsor/Newton's Dammar Varnish as well with excellent effects. Might also be worth a try....Cheers! Sam
 
Photrio.com contains affiliate links to products. We may receive a commission for purchases made through these links.
To read our full affiliate disclosure statement please click Here.

PHOTRIO PARTNERS EQUALLY FUNDING OUR COMMUNITY:


Ilford ADOX Freestyle Photographic Stearman Press Weldon Color Lab Blue Moon Camera & Machine
Top Bottom