Just wandering how many of you that built your own sink from plywood used dado grooves to attach the sink sides to the sink bottom----this has been my plan, but now I'm wandering if that is the best way to do it. On one site, I saw where the instructions were to double the thickness of the sink bottom, then attach the sink sides with screws, alternating the screw location from low to high as you screw in the sides. That seems much simpler to me than the dados. Thoughts?
-
Welcome to Photrio!Registration is fast and free. Join today to unlock search, see fewer ads, and access all forum features.Click here to sign up
You are using an out of date browser. It may not display this or other websites correctly.
You should upgrade or use an alternative browser.
You should upgrade or use an alternative browser.
sink construction
-
A
- Thread starter Chuck_P
- Start date


Recent Classifieds
-
Free 3 enlarging lenses
- Started by jvo
-
For Sale Pentax 67 body with metered prism and grip
- Started by Guivd
-
For Sale Lens boards:Toyo, Canham, cambo, grafle
- Started by darinwc
-
For Sale Toyo 110mm lens boards (45 CF 45AR, 45ARII A11, AX
- Started by binglebugbob
-
Want to Buy Hasselblad A12 type III or IV back (Black or Silver)
- Started by jshcrlsn
Forum statistics
I used ply covered with masonite then several layers of spar varnish. The corners are just stuck together and I used sealant there and at the drain. -- I was able to give the bottom about a 4 inch in 6 ft angle and then the last foot with the drain is flat.
the whole sink has a 2x4 frame and the sink part is surrounded by this frame.
the whole sink has a 2x4 frame and the sink part is surrounded by this frame.
mr rusty
Member
I haven't done it yet, but I'm going to be making my own sink. My plan is to use 3/4 ply lined with 3mm PVC sheet. I intend to make a base covered with 3mm PVC, then add the ply sides standing on top of the base screwed in from the bottom. I will then have shallow sides that I can add in using the PVC sheet using solvent adhesive. A thought is to groove the bottom of the ply sides to add a strip of PVC first (i.e. an inset very short side of say 15mm) to glue to the base and then the proper side PVC will glue to both the base and the strip. I have seen that other people have made PVC lined sinks and it sound better/easier to me than trying to paint/seal the ply.
be interested to hear from others who have done this already.
be interested to hear from others who have done this already.
- Joined
- Mar 6, 2005
- Messages
- 2,261
- Format
- Large Format
My sink is over 20 years old. It is built of plywood covered with West Systems Epoxy. This is made for boats and available at marine supply shops. When mixed it becomes thin enough to soak into the wood and seal it. I used 3 coats and have never had to repair it.
+1 on the epoxy. My sink has a 2x6 frame with a marine plywood bottom. The whole interior is epoxied, then got a coat of epoxy paint. Still pretty new, but my last sink was made the same, the epoxy coat was 10 years old or so- and showed no signs of giving up the ghost.
I haven't done it yet, but I'm going to be making my own sink. My plan is to use 3/4 ply lined with 3mm PVC sheet. I intend to make a base covered with 3mm PVC, then add the ply sides standing on top of the base screwed in from the bottom. I will then have shallow sides that I can add in using the PVC sheet using solvent adhesive. A thought is to groove the bottom of the ply sides to add a strip of PVC first (i.e. an inset very short side of say 15mm) to glue to the base and then the proper side PVC will glue to both the base and the strip. I have seen that other people have made PVC lined sinks and it sound better/easier to me than trying to paint/seal the ply.
be interested to hear from others who have done this already.
I built sinks like this a few years ago and they work great. I did cut dadoes for the sides to set into and then glued and screwed everything together. Each sink section is 8' long.
Attachments


OP
OP
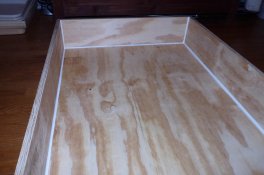
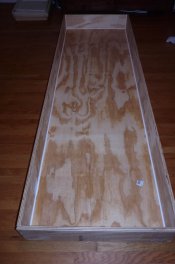
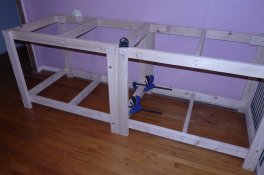
Finished the construction of the sink yesterday. I decided against the dado joints, only because I'm not skilled with a router, I had one available to borrow but I've never used one and so chose the simpler route, fearing that I may screw up the job and waste money. I saw on line a sink constructed by doubling up the sink bottom with 23/32 plywood and attaching the long sides with screws as shown, alternating every other screw high to low. This is a very sturdy construction, a bit heavy but that's ok. Still have to install the drain and make the stand for it, slowly but surely. I used liquid nail adhesive between the two bottom pieces and 1 1/4" screws systematically throught the bottom surface area. The available sink surface area is 30" x 96"
Attachments

Dan Dozer
Subscriber
- Joined
- Dec 10, 2004
- Messages
- 414
- Format
- Large Format
Looks great so far.
Couple of other suggestions -
See in the photos of Langedp's sink he has used foam strips on the front of the sink. These are split foam insulation for water piping from someplace like Home depot. Highly recommend you put these in to rest your elbows on.
Strongly suggest that you think carefully whether you want to sit or stand at your sink. I made the base of mine at a height so I could sit at a tall stool (with back support) and I'm very glad that i did. I know that many people make theirs to stand up at, but I don't think my back could take 3 - 4 hour sessions standing up.
OP
OP
Looks great so far.
Couple of other suggestions -
See in the photos of Langedp's sink he has used foam strips on the front of the sink. These are split foam insulation for water piping from someplace like Home depot. Highly recommend you put these in to rest your elbows on.
Strongly suggest that you think carefully whether you want to sit or stand at your sink. I made the base of mine at a height so I could sit at a tall stool (with back support) and I'm very glad that i did. I know that many people make theirs to stand up at, but I don't think my back could take 3 - 4 hour sessions standing up.
Thanks for the tips, I have already considered the foam padding, but had not considered the possiblility of wanting to sit at the sink, thanks.
OP
OP
I built sinks like this a few years ago and they work great. I did cut dadoes for the sides to set into and then glued and screwed everything together. Each sink section is 8' long.
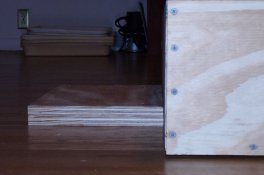
Regarding the 2x4 legs for the stand, it looks like they are not touching the floor, are those leveling pegs of some type?
Definitely consider the sit option. I built my sink cabinets so that the sink overhangs them by 10 to 12 inches and the height is such that I can stand at the sink or sit in an office type chair adjusted towards it's max height. This was all based on a friends darkroom which I have used a lot. In a typical printing session I alternate between sitting and standing. Otherwise things start to hurt, which is a result of being a beat up 51 year old carpenter, bicyclist, base jumper, skydiver, and occasional car crasher. I can also sit or stand at the enlarger and with the office chair roll between the two if desired. Right now my darkroom is in storage otherwise I'd post pictures.
Of course if you are young and healthy then standing should be no problem.
Roger
Of course if you are young and healthy then standing should be no problem.
Roger
IMHO, it is a lot easier to buy a stool that lets you sit comfortably at a height that works well with sinks designed for working while standing up, then it is to stand and work at sinks designed for working while sitting down.
IMHO, it is a lot easier to buy a stool that lets you sit comfortably at a height that works well with sinks designed for working while standing up, then it is to stand and work at sinks designed for working while sitting down.
Basically the point I was trying make. The key for me is having some knee room and a chair that adjusts up high enough. The sink is at a good standing height, but not overly high. A stool would certainly be good too.
Roger
OP
OP
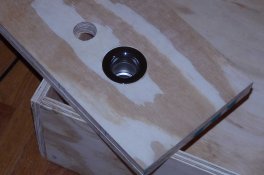
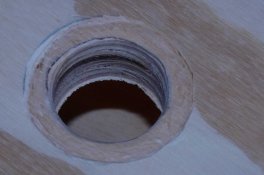
Did a practice run on drilling the hole for the drain and installing it---placed the drain in the hole, traced around the flange with a pencil, used a dremel tool to remove enough wood so that the drain flange sits flush with the sink bottom, only took a few minutes. I Just love that dremel tool.
Attachments

Last edited by a moderator:
We aren't splitting atoms here... You can throw together some ply with drywall screws and seal it with marine paint. Caulk the joints and it will outlast your kids. I got tied up with the ins and outs of building a sink before tackling it, and it only made it more difficult. I am sure what you are planning on will be sufficent. With no experience I built a sailing Dory from lapstrake planking and sent her out over Tybe Island without sinking, so I am sure you can run a bit of water over a sink without causing much damage...
-

- Chuck_P
- Deleted
OP
OP
We aren't splitting atoms here.........so I am sure you can run a bit of water over a sink without causing much damage...
Uhhh, not sure what you are driving at here, I've built the sink and caulked the joints as shown in post #8, not painted it yet though.
Uhhh, not sure what you are driving at here.
I was just saying that I had initially planned on a super intricate building process, and was really wound up about longevity and whatnot. I had to step back and simplify things before starting, and all turned out well. What you have done looks awesome, I didn't mean for that post to sound as it did!
OP
OP
I was just saying that I had initially planned on a super intricate building process, and was really wound up about longevity and whatnot. I had to step back and simplify things before starting, and all turned out well. What you have done looks awesome, I didn't mean for that post to sound as it did!
I see.......forum communication, sometimes its a hassle.
Regarding the 2x4 legs for the stand, it looks like they are not touching the floor, are those leveling pegs of some type?
Yes they are. I wanted to be able to adjust it to the variations in the floor and create the proper amount of slope to the drains. The sinks slope from the ends to the middle and from front to back. Not much, but enough to drain. I used these...
http://www.woodcraft.com/Product/2001073/10131/TNut-Levelers-4.aspx
We aren't splitting atoms here... You can throw together some ply with drywall screws and seal it with marine paint. Caulk the joints and it will outlast your kids. I got tied up with the ins and outs of building a sink before tackling it, and it only made it more difficult. I am sure what you are planning on will be sufficent. With no experience I built a sailing Dory from lapstrake planking and sent her out over Tybe Island without sinking, so I am sure you can run a bit of water over a sink without causing much damage...
Different strokes for different folks. Some people like to build things and put more effort into it and some don't. One approach is not right or wrong.
OP
OP
Yes they are. I wanted to be able to adjust it to the variations in the floor and create the proper amount of slope to the drains. The sinks slope from the ends to the middle and from front to back. Not much, but enough to drain. I used these...
http://www.woodcraft.com/Product/2001073/10131/TNut-Levelers-4.aspx
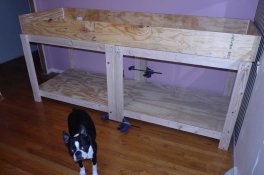
That's perfect.....I just finished the sink stand today, built in two 4 foot sections. Still have to install plywood on the bottom framing for storage, remove some old wall paper and will be painting those old "Pepto Bismol" (spelling?) colored walls to an off white soon---it's progressing. Thanks for the tip on those levelers,---wander if Lowe's or Home Depot carries them, will check tomorrow. Although I think some shims would probably do the trick for me.
Attachments
Last edited by a moderator:
Even older
Marine ply with epoxy resin, now twenty years old and not showing signs of needing to be recoated, which I had planned to do every 5 years or so
My new 48 inch wide large print troughs are construction ply with marine sealant and seem to be working well
What I really need is a new shed to put the darkroom in, but I also want a new 4WD to get my gear around in - On account of the fact I have just blown the head gasket on my Volvo 240GL - I wish a coat of epoxy resin around the rocker cover would fix that as well
That's perfect.....I just finished the sink stand today, built in two 4 foot sections. Still have to install plywood on the bottom framing for storage, remove some old wall paper and will be painting those old "Pepto Bismol" (spelling?) colored walls to an off white soon---it's progressing. Thanks for the tip on those levelers,---wander if Lowe's or Home Depot carries them, will check tomorrow. Although I think some shims would probably do the trick for me.
I believe Lowe's has them. You have to get T-nuts also if you use these.
I did a similar process for the drain as you did however I used a router. Just use some plumbers putty to seat the drain.
Yours is looking good and yes you need to change the color of that wall

OP
OP
Finished the stand and got the sink moved into the room. I'll be installing the drain on the right side, have most that have a plywood sink installed the drain in a corner of the sink? Seems I remember seeing some that have put it in the middle at the end of the sink.
Attachments
| Photrio.com contains affiliate links to products. We may receive a commission for purchases made through these links. To read our full affiliate disclosure statement please click Here. |
PHOTRIO PARTNERS EQUALLY FUNDING OUR COMMUNITY:  |