Simple Zone System testing?

Forum statistics

Threads
198,991
Messages
2,784,233
Members
99,763
Latest member
dafatduck
Recent bookmarks
0
Joined
Jan 16, 2010
Messages
1,685
Location
Atlanta, GA
Format
Medium Format
Hello all,

I am once again trying to shoot some 4x5 film and would like to develop a basic Zone System method. I have read Adams, Zakia and White, and also Phil Davis' "Beyond the Zone System" (which I used to work up some roll film a few years ago).

Does anyone have a down and dirty method for shooting some sheets, processing the film, making sample prints and then refining the results?

The Zakia/White method is, as Davis' describes it, the "suffering is good for the soul method." BTZS requires a densitometer which I can access via a friend.

Is there any simple method you've tried that will give good results with a minimum of wasted time and materials?
 
Last edited:

Horatio

Subscriber
Joined
Mar 13, 2020
Messages
964
Location
South Carolina
Format
Multi Format
@Vaughn has posted tips on using a minimum number of sheets to determine film speed and development. I can't recall the thread, but perhaps he'll chime in.
 

eddie

Member
Joined
Jul 24, 2005
Messages
3,258
Location
Northern Vir
Format
Multi Format
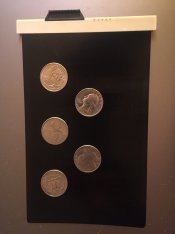
If you have 5 extra dark slides, you can drill holes in separate slides, allowing you to get 8 exposures on one sheet of film. I've illustrated it here using quarters. Each quarter represents a drilled out area of a different slide. To get the bottom row of exposures you use the top three but reversed to the bottom of the film. If you'd like to get more exposures per sheet, just drill smaller, nickle sized holes.
 

Attachments

  • IMG_2093.JPG
    IMG_2093.JPG
    593.6 KB · Views: 89

Bill Burk

Subscriber
Joined
Feb 9, 2010
Messages
9,318
Format
4x5 Format
The View Camera Store will test your film using BTZS for $50.00 you supply the film you are using.

https://viewcamerastore.com/collections/btzs-products/products/btzs-film-test-roll
This is the method that works. With as few as 5 sheets you work out the contrast results of five different development times. Plotting the numbers helps you find a relationship between time and contrast... from which all the N and plus and minus times that you need to fully implement the Zone System. 5 sheets.
 

grat

Member
Joined
May 8, 2020
Messages
2,044
Location
Gainesville, FL
Format
Multi Format
Assume negative film can handle 7 stops of dynamic range.

Meter the highlights and the shadows of a given scene. Determine the difference. If less than 7 stops, split the difference in half, add that to your shadow reading, and consider that zone V and shoot for that EV. If more than 7 stops, shift the midpoint up or down depending on what you want out of the photo, and shoot the adjusted EV.

Bracket +/- 1 stops (ie, 3 individual photos). Five if you're ambitious (+/- 2 stops). Determine which negative suits your process best.

Hey... You said simple, right? :smile:
 

Alan9940

Member
Joined
Jun 17, 2006
Messages
2,429
Location
Arizona
Format
Multi Format
Get a copy of Fred Picker's little book "Zone VI Workshop"; about as simple as it gets, IMO.
 

ic-racer

Member
Joined
Feb 25, 2007
Messages
16,552
Location
USA
Format
Multi Format
Picker Method in a nutshell:

Expose a sheet at guessed EI.
Process the sheet with a blank sheet. Check that the exposed sheet drops meter reading by 1/3 stop compared to blank sheet when placed over the meter.

With that EI, expose a Zone VIII sheet and process it at guessed time.

Place blank sheet in enlarger and find min-exposure for just off black.
Place Zone VIII sheet in enlarger and place coin on paper and make exposure.
If the outline of the coin is just visible, process time is OK.
 

Old_Dick

Member
Joined
Apr 23, 2014
Messages
396
Location
03082
Format
Multi Format
I have Fred's video in the cloud. Free download to anyone. Just need an email.
 

Paul Howell

Subscriber
Joined
Dec 23, 2004
Messages
9,705
Location
Scottsdale Az
Format
Multi Format
Fred Picker used a densitometry so if you can use your friends then it is a good way to go. Other option is to use John Schaeffer's technique, one sheet of film, a step wedge and a densitometry to find you film speed, found in Book2 The AA Guide Basic Techniques of Photography. I know that some have taken issue with his approach, but I think it works.
 

ic-racer

Member
Joined
Feb 25, 2007
Messages
16,552
Location
USA
Format
Multi Format
No need for a densitometer if your exposure meter is accurate to 1/3 stop. When Picker wrote that, I suspect many in his workshops did not have a meter accurate to 1/3 stop. Many electronic exposure meters will be accurate to 1/3 stop.
weston 6.jpg
 
Last edited:

ic-racer

Member
Joined
Feb 25, 2007
Messages
16,552
Location
USA
Format
Multi Format
This paragraph is not correct with respect to the instructions for many sensitometers. Not many densitometers come with a 0.1 reference, because it is so close to zero. The device is nulled at 0 with no negative in place (or with blank frame). The reference patches for calibration checks are frequently for the higher densities like 1.0 or 2.0.

Densitometer zero.jpg
 

Maris

Member
Joined
Jan 17, 2006
Messages
1,574
Location
Noosa, Australia
Format
Multi Format
I use just one sheet of film and a front lit scene near my darkroom at a time of day (mid morning for example) when the light won't vary for an hour or so.

Make five exposures across the film by moving the dark slide in equal steps. Take a guess and make the first exposure at notionally 1 stop under according to box speed. Next exposure is "normal" box speed, then 1 stop over, 2 stops over, 3 stops over. Keep notes.

Develop the film immediately and look for the first step that delivers the shadow detail that is wanted. That's the correct exposure.

Now go back to the scene (the light hasn't changed) and use the meter in the usual way. Adjust the film speed dial until the meter delivers the reading already known to be correct. Calibration done.

Normal development is 99% good for all scenes. Modern variable contrast enlarging papers deliver a N+1 zone expansion by just going up 1 paper grade, N-1 contraction by going down a grade, and so on.

Practice burning and dodging at the printing stage and do it with and without local contrast changes ;split grade and all that.
Modern variable contrast papers enable expressive controls that the classic Zone System can't deliver.
 

Vaughn

Subscriber
Joined
Dec 13, 2006
Messages
10,099
Location
Humboldt Co.
Format
Large Format
@Vaughn has posted tips on using a minimum number of sheets to determine film speed and development. I can't recall the thread, but perhaps he'll chime in.
Not me! Must have been some other tall hairy guy...
 

Bill Burk

Subscriber
Joined
Feb 9, 2010
Messages
9,318
Format
4x5 Format
If you had one of these you could put this on a slow-turning motor maybe 20 RPM, between a sheet of film and a 60 watt lightbulb with a blue filter like 80B.

I may soon be able to show you this in action...

150974014_4096209903743192_7640945741891433589_o.jpg
 
Joined
Sep 10, 2002
Messages
3,596
Location
Eugene, Oregon
Format
4x5 Format
Here's what I'd do for "down-and-dirty" Zone-System testing.

Film Speed Determination:
Rate the film 2/3 stop less than box speed for the initial tests. That will get you close enough to get started, you can adjust later.
There, that takes care of the film-speed testing. If you find later that you have an excess of shadow detail, you can always rater your film faster. Or slower if you need more detail there. Adjust in 1/3-stop increments till you get what you need.

Development time for "N" test: I use two methods (see below for Zone Rulers). The easiest is to simply find a scene with a full range of tones from Zone III detailed shadows through Zone VIII detailed whites as well as specular reflections or a light source in the scene for "blank paper white" and make a couple negatives (maybe three if you don't have a starting point for developing at all). Then, develop one at your best guess for N. If your using a completely new film/developer combination, start with 15% less developing time than the manufacturer recommends.

Develop a negative and proper proof it, i.e, a print at the minimum exposure time to get maximum black from your film rebate (you'll have to do a test strip to find this time; evaluate the strip dry and under regular, not-too-bright, lighting). If you plan on enlarging, do this step with an enlargement to take enlarger flare, etc. into account. If you plan on contact printing, make a contact print. Use the paper you plan on using mostly and use a middle contrast setting. I recommend 2.5 or even 3.

After you've found your proper-proofing time and made a print, first check Zone III. If it looks pretty good, i.e., dark with some texture still, and you have max. black for the film rebate, your proper-proofing time is good. If not, you may have misjudged your proper-proofing time (it's trickier than it looks till you get the hang of it), so go back and make the same print at an enlarging exposure time that renders Zone III how you want it.

Now, looking at your prints, evaluate Zone VIII and the specular reflection/light source. If Zone VIII has a bit of texture and the specular highlights are blank paper white, you're good to go. If not, you need to adjust your development time to get them there. If the whites are too gray, then increase development time 15% for the next negative. If Zone VIII is blocked (blank white) and there's no difference between it and the specular highlights, reduce development time 15% for the next negative. If there's a slight difference between Zone VIII and the specular highlight, but there is no detail in Zone VIII, just reduce 10% for the next neg.

Develop the next negative and repeat till you have it right. You should be close enough to make excellent prints from your negatives on test two; test three if you're really way off to start with.

You can extrapolate intermediate results to end up with a final developing time that's close. Err on the side of overexposure and underdevelopment. Then go out and make images, keep notes and adjust both personal E.I. and development time as needed.

N+ and N- Developing Times: You can forget expansions and contractions altogether and just rely on contrast controls in the darkroom. Many do this. I prefer a hybrid approach. I develop no more than N+1, relying on other contrast controls if I need more than this. For contractions, I only use N-1, relying on SLIMT and other contrast controls if needed. SLIMTs are another whole thread's worth, so I won't get into them here. I'd recommend finding N+1 and N-1 times and then relying on your VC paper for greater or lesser contrast when needed (e.g., if you need N+3, develop N+1 and print using a #4 or #5 filter, etc.).

You can always do the above development-time test for expansions and contractions; find a scene, make a few negatives, develop, proof and evaluate. However, if you don't want to bother right away, just go out and shoot. When you come across a scene that requires an expansion or contraction, make two or three negatives to do the development-time test with. For N+1, start with 20% more developing time than N. For N-1 start with 20% less time. Develop your first negative, proof, evaluate and tweak development time for the next. In a few tests, you'll be well in the ballpark. Any misses should be well within the flexibility of VC paper to still print well.

Keep notes and adjust when needed (have I said this before?).

I also have a method of making a full Zone-Ruler development test on two sheets of 4x5 film, which I'll attach. Still, if I can find a scene that has the tones I need, I prefer that method now, since it takes everything into account, from your meter and metering techniques through your printing paper, and is faster.

Best,

Doremus
 

Attachments

  • ZoneRuler-DevTimeTest.pdf
    118.1 KB · Views: 154
Last edited:

ic-racer

Member
Joined
Feb 25, 2007
Messages
16,552
Location
USA
Format
Multi Format
at 60 rpm looks like you can get 1/2, 1/4, 1/8 sec exposures
 
OP
OP
ParkerSmithPhoto
Joined
Jan 16, 2010
Messages
1,685
Location
Atlanta, GA
Format
Medium Format
Here's what I'd do for "down-and-dirty" Zone-System testing.

Film Speed Determination:
Rate the film 2/3 stop less than box speed for the initial tests. That will get you close enough to get started, you can adjust later.
There, that takes care of the film-speed testing. If you find later that you have an excess of shadow detail, you can always rater your film faster. Or slower if you need more detail there. Adjust in 1/3-stop increments till you get what you need.
This is great, Doremus. Exactly what I needed. I'll get busy and report back with outstanding images.
 

Bill Burk

Subscriber
Joined
Feb 9, 2010
Messages
9,318
Format
4x5 Format
This is great, Doremus. Exactly what I needed. I'll get busy and report back with outstanding images.

To validate Doremus... Zone System metering by definition comes out to 2/3 stop less than ISO/ASA. So it is the best starting point.

But if you think you are finding the real film speed, think again. It works at 2/3 stop less because of the way you meter and place exposure for Zone System.

As a "sanity check" use the film's rated speed and enter that value into an incident meter. Take an incident reading...

Then... take the 2/3 stop less than rated speed and enter into a spotmeter. Take readings and place as if for Zone System.

I can leave the rest as an exercise for the reader, but the result might be that you get identical recommended f/stop and shutter speed combinations.
 
OP
OP
ParkerSmithPhoto
Joined
Jan 16, 2010
Messages
1,685
Location
Atlanta, GA
Format
Medium Format
To validate Doremus... Zone System metering by definition comes out to 2/3 stop less than ISO/ASA. So it is the best starting point.

But if you think you are finding the real film speed, think again. It works at 2/3 stop less because of the way you meter and place exposure for Zone System.

As a "sanity check" use the film's rated speed and enter that value into an incident meter. Take an incident reading...

Then... take the 2/3 stop less than rated speed and enter into a spotmeter. Take readings and place as if for Zone System.

I can leave the rest as an exercise for the reader, but the result might be that you get identical recommended f/stop and shutter speed combinations.

Phil Davis explains this in Beyond the Zone System when describing his "Incident Metering" system. The BTZS charts use double the film speed when using incident meters. It's too much for me to repeat here, but Phil explained it if anyone is interested.
 
Photrio.com contains affiliate links to products. We may receive a commission for purchases made through these links.
To read our full affiliate disclosure statement please click Here.

PHOTRIO PARTNERS EQUALLY FUNDING OUR COMMUNITY:


Ilford ADOX Freestyle Photographic Stearman Press Weldon Color Lab Blue Moon Camera & Machine
Top Bottom