Resource icon

Shaping the tone curve of a Rodinal Negative

Three pillars.

D
Three pillars.

  • 1
  • 1
  • 20
Water from the Mountain

A
Water from the Mountain

  • 3
  • 0
  • 58
Rijksmuseum Amsterdam

A
Rijksmuseum Amsterdam

  • 0
  • 0
  • 49
Lotus

A
Lotus

  • 4
  • 0
  • 66
Magpies

A
Magpies

  • 4
  • 0
  • 99

Recent Classifieds

Forum statistics

Threads
197,521
Messages
2,760,527
Members
99,394
Latest member
Photogenic Mind
Recent bookmarks
0

df cardwell

Subscriber
Joined
Jul 16, 2005
Messages
3,357
Location
Dearborn,Mic
Format
Multi Format
df cardwell submitted a new resource:

(there was a url link here which no longer exists) - Shaping the tone curve of a Rodinal Negative

You can shape your film's tone curve by balancing exposure and development time with agitation.

Agitation is used to control the highlights of a negative.
More agitation raises the highlight density, less agitation lowers highlight density.

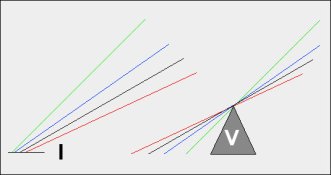
In this system, development time places your shadows. Exposure places your midtones.

It is effective to visualize comparative curves pivoting at Zone V rather than rising out of film base fog as is conventional in various systems....

(there was a url link here which no longer exists)
 
Last edited by a moderator:
Joined
Jan 21, 2003
Messages
15,708
Location
Switzerland
Format
Multi Format
Proof is in the pudding. Don, among others, has helped me very much with my film processing, getting it under control by re-learning basics and eliminating fancy work. By learning how to adjust agitation to exposure and lighting conditions, I have effectively opened up a whole new spectrum of possibility, and the cool part is - it's with the same materials every time!
I have used Kodak TMY-2 for a good while now, and while cost has forced me to use some cheapo Arista film now and then, the TMY-2 is my mainstay. Replenished Xtol is my developer of choice, and by exposing the film from EI 200 to 800, and subsequently altering development time and agitation intervals from 1m all the way to 5m I have learned how to control what my prints are going to look like.
This works, ladies and gentlemen, and I proved it to myself by doing it; with great guidance.
 

Jerevan

Member
Joined
Nov 19, 2004
Messages
2,258
Location
Germany/Sweden
Format
Large Format
Thanks, df! I was thinking of this the other day, wondering when you were going to write an article on Rodinal. :smile:

I see that you have witheld the speed rating of the film, but I assume that getting box speed out of Rodinal is like trying to have the cake and eat it. My observation with Rodinal (and its cousins such as R09) is that I seem to get good highlights but seldom any decent shadows, even when downrating from the box speed.
 
OP
OP
df cardwell

df cardwell

Subscriber
Joined
Jul 16, 2005
Messages
3,357
Location
Dearborn,Mic
Format
Multi Format
Jerevan: One way to look at the red curve is the shadows were 'pushed' and the highlights were 'pulled'.
Try that development time, and bracket the exposure from 100 to 1600.

Then let us know !
 

Jerevan

Member
Joined
Nov 19, 2004
Messages
2,258
Location
Germany/Sweden
Format
Large Format
Yes, I will try it out and see what I'll get. Should be interesting. :smile:
 
OP
OP
df cardwell

df cardwell

Subscriber
Joined
Jul 16, 2005
Messages
3,357
Location
Dearborn,Mic
Format
Multi Format
And it was talked about in The New Zone System Manual; White, Zakia, and Lorenz; 1977 or 78
Well worth reading.
 
Last edited by a moderator:

Ian Grant

Subscriber
Joined
Aug 2, 2004
Messages
23,234
Location
West Midland
Format
Multi Format
Interesting, the conventional wisdom in the 80's and 90's (in the UK) was that the best way to alter the curve with Rodinal was by altering it's dilution, and that works extremely well.

Peter Goldfield was the Guru of Rodinal, the quality of his 35mm Agfapan negatives and prints was stunning, many wouldn't believe he'd shot them with a Leica and not medium format. Peter had gone on workshops with Paul Hill before spending some time with Paul Caponigro in New Mexico, he imported Agfa materials into teh UK, rebuilding their market, and was a staunch supporter of the workshop system.

So there's another approach which is fairly unique amongst developers for controlling the curve. I used 3 different dilutions for N+2, N and N-2 development which gave far more control than simply altering development time or agitation.

Ian
 

Lee L

Member
Joined
Nov 17, 2004
Messages
3,281
Format
Multi Format
... So there's another approach which is fairly unique amongst developers for controlling the curve. I used 3 different dilutions for N+2, N and N-2 development which gave far more control than simply altering development time or agitation.

Ian
Arnold Gassan published his system for contrast control through dilution with HC-110 in the 70's. It's been discussed several times here on APUG. Perhaps you could post a separate 'How To' with specifics on Goldfield's and your dilution/contrast techniques with Rodinal.

Lee
 
OP
OP
df cardwell

df cardwell

Subscriber
Joined
Jul 16, 2005
Messages
3,357
Location
Dearborn,Mic
Format
Multi Format
Ian: Good stuff. Peter left us far too soon.

Technique doesn't conflict with itself. Curve shaping by dilution has been the preferred way for most sophisticated photographers since the mid '60s. It has its limits, however, and by considering the use of time and agitation, we multiply the potential of the technique.

Increasing the speed of the toe is always related to the time spent in the developer. It defies the way we have come to think about film, however, for we are pretty well indoctrinated to the"dog wagging his tail" image of a curve family. BUT if we allow ourselves to think of a different model, we open ourselves up to perceiving new ways to build negatives. See: Lorenz. New Zone System Manual.

The familiar notation of exposure and development is, of course, N-2, N, and N+2. Small adjustments are needed to maintain the Zone I or Zone II densities, while development alone raises and lowers the Zone VIII.

Lorenz suggested a simultaneous adjustment: Exp +2/N-2; Exp -2/N+2. This allows the midtone to maintain its density, while Zone II and Zone VIII are adjusted. If the Exposure Index is taken from Zone V, or Zone VI, then the speed of the film is constant while the scale is expanded or contracted.

Adding the tone curve shaping is a useful refinement to the process. I use 1 film for all my work, TMY2.
Using agitation and time (and, yes, dilution) I have 3 developments to choose from, a 10 step scale, and 8 step scale, and a 12 step scale. The important thing for me is that the the palettes have the same Exposure Index. So, I only need to make an incident reading, and begin shooting. Development can be decided beforehand or afterward, to satisfy either emotional or technical requirements of the image.

For instance, if the light is good, but there are unavoidable bright highlights on the face, I use an XTOL curve (second graph below) whose shoulder compresses the bright highlights.

If the light is normal, which for me is slightly flat and soft, with no direct light on the faces, I use the 10 tone, normal curve; Edwal 12.

If the light is completely overcast and flat, I use Rodinal to build an 8 tone scale.

By using this method of tone curve shaping, I was able to maintain an EI of 400 while devising 3 suitable tone curves. It has been a reliable method for me, letting me make quick decision while photographing people. It works equally well for 4x5 and 35 mm, because there is only one film.

Rodinal is the focus of this conversation, but XTOL, Pyrocat, Edwal 12 and other developers work well, too. For portraiture, I use 3 development schemes, and 3 different developers to make 3 coordinated palettes.

We've now gone beyond the planned scope of this article, but Ian brought an excellent point.

.
 

Attachments

  • Zone-Models.jpg
    Zone-Models.jpg
    30.7 KB · Views: 992
  • 3-tone-curve-palettes.jpg
    3-tone-curve-palettes.jpg
    41.5 KB · Views: 1,183
Last edited by a moderator:
OP
OP
df cardwell

df cardwell

Subscriber
Joined
Jul 16, 2005
Messages
3,357
Location
Dearborn,Mic
Format
Multi Format
An example of a 12 tone palette

A friend read this and asked the reasonable question, "What's different about a midtone based system from a Zone I based system ?"

I replied in a knee-jerk way, "Well, you can go straight to the shooting and not worry about fine tuning the exposure."

And then I realised that wasn't the BIG THING for me. The BIG THING is that meant I seldom need to burn and dodge a print. The scale of the scene fits the scale of the paper.

But the BIGGEST THING is that the midtone contrast, the LOCAL contrast, would be correct without mucking about. And then I remembered something David Kachel wrote (more years ago then I care to remember) about LOCAL CONTRAST. PLease take a look, David has left this online for you:

http://www.davidkachel.com/historical/prilclct.htm

And here is an example of an incident reading of an extremely long scale image, rendered in 12 tones, that prints on a normal paper with no gymnastics. The compensation takes place at the extremes of the scale, while the midtones are a straight line. THAT is the difference between this method, and conventional control systems. You can go straight to the shooting with a simple incident reading, and not need to burn and dodge to fit the scale on contrasty paper to hold local contrast.

bilschwab.jpg


.
 

Larry Bullis

Subscriber
Joined
May 23, 2008
Messages
1,254
Location
Anacortes, WA, USA
Format
Multi Format
DF, I appreciate the Kachel a lot. I began to notice this, oh, I guess in about 1965. Of course I've developed my own now rather instinctive ways of dealing with it which certainly have something in common with what you are suggesting, but still generally dealt with by more typical exposure/development controls. I tend to set my exposure where I want it, which often is not what straight shadow readings would indicate - exposure with a visualization of the whole curve. Then, I make a determination of the development which also might not conform. Having used the ZS for something like 45 years, I have a rather hefty intuitional tool set which generally serves me well. Getting to know your agitation methods has been quite interesting and I have been employing them (insofar as I'm able to work in my presently rather limited circumstances).

Anyway, thanks, and I'm going to keep these at hand. I'm reading philosophical text right now, and I have to say, Kachel is about as clear as Plotinus, but it's getting better on both sides of the equation.

L
 

markbarendt

Member
Joined
May 18, 2008
Messages
9,422
Location
Beaverton, OR
Format
Multi Format
Wow DF, great stuff. I need to do some testing!

Pardon me if this is simply restating the obvious here or correct me if I haven't got the concept.

Using this method I should be able to (within certain limits);

1 - Place my exposure based on what is best for my subject on any given film.

2 - Decide how much shadow detail I want in relation to my subject and adjust this with development time.

3 - Decide how much highlight detail I want in relation to my subject and adjust this with agitation.

So, for a back-lit afternoon portrait I could;

1 - set the camera by using an incident reading "under their nose" to place the main subject on the film exactly where it needs to be to print nicely,

2 - then extend or reduce development time a bit to control the details in the bushes behind them, and

3 - enhance or reduce my agitation to control the details in the sky.
 
OP
OP
df cardwell

df cardwell

Subscriber
Joined
Jul 16, 2005
Messages
3,357
Location
Dearborn,Mic
Format
Multi Format
That's pretty much how it works, Mark.

There ARE limits. The film, for one thing. TMY & TX are great for this. TXP, not so good.
Neopan 400, not good, for different reasons. FP4, great.

It will probably be sufficient to make 3 all purpose negatives. My 'Sangre de Christo' negative would have normal contrast from IV to VI,
and would run out from there. You've got the idea perfectly, as well as live in a place where it would be handy.

Sit down with a pencil and paper and draw the 'ideal' curve for your afternoon portrait. You might very well be able to make it.
Using LPD or 130 instead of Dektol gives your paper greater range to hold these tones, and split filtering will be easy if you need to hold a longer scale.
 

markbarendt

Member
Joined
May 18, 2008
Messages
9,422
Location
Beaverton, OR
Format
Multi Format
There ARE limits. The film, for one thing. TMY & TX are great for this. TXP, not so good. Neopan 400, not good, for different reasons. FP4, great.

Oh sure twist my arm and make me use TX, TMY, and FP4. :D

Seriously though, the TXP info is a disappointment since TX isn't available in 4x5. I would have thought that this technique would have been more universal.

What characteristics make a good film for this technique?


You've got the idea perfectly, as well as live in a place where it would be handy.

Yes it will. To that end I recently decided to start moving to shorter rolls, 12-20 shots, so that I will shoot an entire roll per subject/session and be able to develop more consistent negs.

Sit down with a pencil and paper and draw the 'ideal' curve for your afternoon portrait. You might very well be able to make it.
Using LPD or 130 instead of Dektol gives your paper greater range to hold these tones, and split filtering will be easy if you need to hold a longer scale.

Already using LPD and the more I learn about it the better I like it.
 
OP
OP
df cardwell

df cardwell

Subscriber
Joined
Jul 16, 2005
Messages
3,357
Location
Dearborn,Mic
Format
Multi Format
What characteristics make a good film for this technique?

A LOOOOOOOOOOOOONG Straight line, and a high Dmax.

Foto Import published many film and developer combinations which should help you cut through the infinite combinations.

I think this is a wonderful combination:

xtol-tm400.gif


Here is another:

xtol-fp4-135.gif


HP5 will be good, but I don't think you can do it with TXP. I've tried TXP in 220
with dilute XTOL and minimal agitation, and got to an almost Normal curve,
but it is almost all-toe and no shoulder, and your best friend on a soft, overcast day.
 

2F/2F

Member
Joined
Apr 29, 2008
Messages
8,031
Location
Los Angeles,
Format
Multi Format
Good information. Thank you for posting it.

I am interested to see the "unslid" curves laid on top of each other as well.
 
OP
OP
df cardwell

df cardwell

Subscriber
Joined
Jul 16, 2005
Messages
3,357
Location
Dearborn,Mic
Format
Multi Format
"I am interested to see the "unslid" curves laid on top of each other as well."

"ditto on the unslid curves. My brain is trying to translate them and rebelling"


Well, guys, this is how I do it. Maybe you could get a pencil and paper... and draw it out for yourselves ?
 

Peter Schrager

Subscriber
Joined
Jul 19, 2004
Messages
4,059
Location
fairfield co
Format
Large Format
thank you mr Cardwell...this is great info as I'm out in the "big" storm of 2010 here in NYC photographing in flat light with TMY2
seems like these negs will get the rodinal treatment when I get home
Thanks, Peter
 
OP
OP
df cardwell

df cardwell

Subscriber
Joined
Jul 16, 2005
Messages
3,357
Location
Dearborn,Mic
Format
Multi Format
Shoot a test frame here and there, Peter. You never know when it will ever snow again !

Don
 

Willie Jan

Member
Joined
Jun 11, 2004
Messages
950
Location
Best/The Netherlands
Format
4x5 Format
What I did 2 weeks ago was the following.

I was in an old wood factory left there for 30 years...
I was there on a cloudy day and it rained.
The scene had windows in it and the complete scene measured 8 stops.
The darkest area measured was set into III.

I overexposed my hp5 4x5 film, 2 stops. developed in pyrocat 1:1:100, 68dg for 8.5 minutes.

The next neg was shot at normal speed and developed for 1:1:100 for 12.5 minutes which is my normal time.

Conclusion:
The overexposed/underdeveloped photo looks somewhat low contrast. I can see all the roof details which where in zone III.

The normal exposed one, is crisp, fresh and does not show as much detail of the zone III. But this is how I would expect a zone III to come out. The windows need burning to get something in it.

When I show these two pics, everybody pics the one that is normal exposed.
So all the efford in getting all into one negative results in a worthless image.
The sparkle is gone leaving a flat thing. The macro contrast has been contracted, but the micro contrast also...
 
Joined
Jan 21, 2003
Messages
15,708
Location
Switzerland
Format
Multi Format
Why would you over expose and underdevelop on a rainy and cloudy day, with presumably flat lighting? To me that would be counter productive.

It's no wonder most people pick the negative that was exposed normally, as it would give you enough contrast to make the print look better.

If you shoot on a cloudy day with flat lighting and you over-expose, you still have to build contrast. That would result in a very dense negative that would be grainy and difficult to print so it looks appealing.

I only ever over-expose if there is a lot of contrast in the scene. That's the only time it makes sense to me.
 

Willie Jan

Member
Joined
Jun 11, 2004
Messages
950
Location
Best/The Netherlands
Format
4x5 Format
Why would you over expose and underdevelop on a rainy and cloudy day, with presumably flat lighting? To me that would be counter productive.

It's no wonder most people pick the negative that was exposed normally, as it would give you enough contrast to make the print look better.

If you shoot on a cloudy day with flat lighting and you over-expose, you still have to build contrast. That would result in a very dense negative that would be grainy and difficult to print so it looks appealing.

I only ever over-expose if there is a lot of contrast in the scene. That's the only time it makes sense to me.

because I got 8 stops of light and my paper is capable of showing 4.5 stops
 
Joined
Jan 21, 2003
Messages
15,708
Location
Switzerland
Format
Multi Format
So how will over-exposing help, then?
What you did was to move the tonal scale farther up the curve, and since the windows needed burning to reveal detail, your highlights got too far up the curve, into the 'difficult to print' territory.

Either you exposed too much, or you didn't adjust your development time enough. Or both.

It's a good thing you exposed two sheets. You came away with a nice print that works.
 
Photrio.com contains affiliate links to products. We may receive a commission for purchases made through these links.
To read our full affiliate disclosure statement please click Here.

PHOTRIO PARTNERS EQUALLY FUNDING OUR COMMUNITY:


Ilford ADOX Freestyle Photographic Stearman Press Weldon Color Lab Blue Moon Camera & Machine
Top Bottom