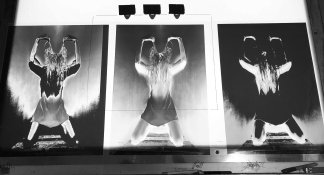
Separating digital negatives in shadows/midtowns/highlights for richer prints

REEM

A
REEM

  • 1
  • 0
  • 31
Kitahara Jinja

D
Kitahara Jinja

  • 3
  • 0
  • 50
Custom Cab

A
Custom Cab

  • 4
  • 1
  • 66
Table for four.

H
Table for four.

  • 11
  • 0
  • 116

Recent Classifieds

Forum statistics

Threads
197,603
Messages
2,761,736
Members
99,413
Latest member
hussein Alaskari
Recent bookmarks
0
Joined
Jun 3, 2018
Messages
55
Location
Doha
Format
Digital
I asked this question to Bob and he suggested to take it on a public post so everyone can benefit :smile:

In brief, I want to try richer prints by separating in photoshop a digital negative into shadows/midtowns/highlights and print multi-layer coats to enhance the image.

I understand that there are blendif layers involved but i would be grateful if you guys can shed some more light on this process.

Thanks
 

Bob Carnie

Subscriber
Joined
Apr 18, 2004
Messages
7,731
Location
toronto
Format
Med. Format RF
Hi Minas
thanks for asking this so I can share my method. Its boring but here goes.

Using photoshop and with a Black and White image on screen I do the following.
Size image
Add Canvas Black
Place registration marks in black canvas


To make the palladium negative
1. make a layer
2. Invert the image
3. Flip Horizontal
4. Flatten and Save as the Palladium Negative

To make the shadow negative I go back in history to the point where I started with just the image and registrations.
1. make a layer
2 un click the background layer
3. click on the area to the right to open up the Blend if option of the top layer
4. on the top bar graph I bring the right slider over until I only see the shadow areas highlighted
5. I flatten this layer and get rid of layers when prompted
6. I then invert
7. I then flip horizontal
8. I Save As the Shadow Negative.

To make the highlight negative I go back in history to the point where I started with just the image and registrations.
1 make a layer
2. un click the background layer
3. click on the area to the right to open up the Blend if option of the top layer
4. on the top bar graph I bring the left slider over until I only see the highlight areas
5. I flatten this layer and get rid of layers when prompted
6. I then invert
7. I then flip horizontal
8. I Save As the Highlight Negative


On a lightbox I register all three negatives together for multiple printing


Bob
 

Bob Carnie

Subscriber
Joined
Apr 18, 2004
Messages
7,731
Location
toronto
Format
Med. Format RF
Brendan 1.jpg

Middle image is palladium- left image is for highlights right image for shadows.

Image courtesy Brendan Meadows.
 
Joined
Aug 29, 2017
Messages
9,283
Location
New Jersey formerly NYC
Format
Multi Format
Hi Minas
thanks for asking this so I can share my method. Its boring but here goes.
...


On a lightbox I register all three negatives together for multiple printing


Bob

Bob Can you show examples of the results?
 
Joined
Dec 10, 2009
Messages
6,297
Format
Multi Format
Hi Minas
thanks for asking this so I can share my method. Its boring but here goes.

Using photoshop and with a Black and White image on screen I do the following.
Size image
Add Canvas Black
Place registration marks in black canvas


To make the palladium negative
1. make a layer
2. Invert the image
3. Flip Horizontal
4. Flatten and Save as the Palladium Negative

To make the shadow negative I go back in history to the point where I started with just the image and registrations.
1. make a layer
2 un click the background layer
3. click on the area to the right to open up the Blend if option of the top layer
4. on the top bar graph I bring the right slider over until I only see the shadow areas highlighted
5. I flatten this layer and get rid of layers when prompted
6. I then invert
7. I then flip horizontal
8. I Save As the Shadow Negative.

To make the highlight negative I go back in history to the point where I started with just the image and registrations.
1 make a layer
2. un click the background layer
3. click on the area to the right to open up the Blend if option of the top layer
4. on the top bar graph I bring the left slider over until I only see the highlight areas
5. I flatten this layer and get rid of layers when prompted
6. I then invert
7. I then flip horizontal
8. I Save As the Highlight Negative


On a lightbox I register all three negatives together for multiple printing


Bob
Thanks Bob for showing your method. Do you have a special pin registered system?
 

Bob Carnie

Subscriber
Joined
Apr 18, 2004
Messages
7,731
Location
toronto
Format
Med. Format RF
I am doing this image now in stages so yes as I go along , will take a few weeks .. Yes I am using a stoesser pin registration system you can see the pins on the light table on image supplied.

This image is one of 7 I am making for Brendan Meadows, it will be at LA Art fair but I do all 7 images at a time so therefore the time lag.
 
Joined
Dec 10, 2009
Messages
6,297
Format
Multi Format
I am doing this image now in stages so yes as I go along , will take a few weeks .. Yes I am using a stoesser pin registration system you can see the pins on the light table on image supplied.

This image is one of 7 I am making for Brendan Meadows, it will be at LA Art fair but I do all 7 images at a time so therefore the time lag.
This process looks like it takes a lot of patience and precision aligning. I make Ziatypes with one neg and I struggle with highlights and shadow detail. This might be the key to what I want with my printing. Do you recoat your prints? I've heard Irving Penn makes multiple coatings and exposures.
 

DennyS

Member
Joined
Oct 5, 2010
Messages
77
Format
Hybrid
Bob, just to get everybody on the same page, can we assume you're using the highlight and shadow negs for gum or cyanotype or something other than additional hits of Pt/Pd?

And Minos, are you asking about multiple negatives for Pt/Pd or gum or some combination print?
 
OP
OP
Joined
Jun 3, 2018
Messages
55
Location
Doha
Format
Digital
Bob, just to get everybody on the same page, can we assume you're using the highlight and shadow negs for gum or cyanotype or something other than additional hits of Pt/Pd?

And Minos, are you asking about multiple negatives for Pt/Pd or gum or some combination print?


Thank you Bob for your response, truly appreciated.

Denny, I ask for Pt/PD prints only, I haven't start with gum printing yet. My target is richer, deeper Pt/Pd prints.


Minas
 
Last edited:

DennyS

Member
Joined
Oct 5, 2010
Messages
77
Format
Hybrid
Minas, just as a reality check, what papers/developers/processing routine are you using that you find you need to improve on? I'm assuming you are working from good digital negatives...
 

Bob Carnie

Subscriber
Joined
Apr 18, 2004
Messages
7,731
Location
toronto
Format
Med. Format RF
This process looks like it takes a lot of patience and precision aligning. I make Ziatypes with one neg and I struggle with highlights and shadow detail. This might be the key to what I want with my printing. Do you recoat your prints? I've heard Irving Penn makes multiple coatings and exposures.
Yes three different coatings in this case. 1. one palladium coat for the palladium negative process and dry.. 2. Blue Coat for the shadow negative with gum process, process and dry, 3. Yellow Coat for highlight negative with gum process and dry.

Paper needs to be pre shrunk, I do not use special sizing, I use Hahnemuhle Platinum Rag, with Ink press negatiives.
When thinking this through I try to use complimentary colours and I try to have the colder colour go into the shadow but this can certainly change.

I have memorized the colour wheel and when mixing colours a natural third colour is made when mixing ... for example cyan and yellow = green So you can imagine the creative
implications of this.
I have also found that hand retouching , and colouring with the pigments is really easy after the finished print is done and one wants to do extra hits of colour .
 

Bob Carnie

Subscriber
Joined
Apr 18, 2004
Messages
7,731
Location
toronto
Format
Med. Format RF
Bob, just to get everybody on the same page, can we assume you're using the highlight and shadow negs for gum or cyanotype or something other than additional hits of Pt/Pd?

And Minos, are you asking about multiple negatives for Pt/Pd or gum or some combination print?
Single hit of palladium

Multiple hits of Gum Pigments

Is what I am talking about here.
 

Bob Carnie

Subscriber
Joined
Apr 18, 2004
Messages
7,731
Location
toronto
Format
Med. Format RF
Thank you Bob for your response, truly appreciated.

Denny, I ask for Pt/PD prints only, I haven't start with gum printing yet. My target is richer, deeper Pt/Pd prints.


Minas
I am not so sure that multiple hits of Palladium or PT will add extra depth.. One can only get a certain black with PT PD and maybe the shadow only will work for this purpose This is not my interest area as I use the gum
to introduce colour and this is what I want , duo , tri or quad toned images.
 

DennyS

Member
Joined
Oct 5, 2010
Messages
77
Format
Hybrid
Bob, I think we're in agreement that multiple hits of Pt/Pd may not be the solution for deeper blacks. That's why I asked Minas for some details about his process. And just my $0.02, I think that trying to duplicate Penn's multiple hit techniques for Pt/Pd doesn't take into account that Penn didn't have the luxury of using digital negatives.
 

Bob Carnie

Subscriber
Joined
Apr 18, 2004
Messages
7,731
Location
toronto
Format
Med. Format RF
I am perplexed why Irving Penn did not use gum over as he was noted to try almost anything to perfect his prints... Steichan made the Pond in 1904 which indeed was multi layer over palladium and I would hope that Mr Penn was aware of this.

When I get everything right , and sometimes I do the tri colour prints from black and white negatives have as much or more Dmax as Silver and the added bonus is the colour.. For over 15 years I was trying to get the quad effect I was looking for in silver to no real avail, ( if you look in my past history here you will see many threads on the subject) but the moment I started using BlendIf and separating tonalitys and making negatives to apply colour in those specific regions the world of printing really opened up for me. To date I am ripping up all my test silver prints (hundreds) and am in the progress of making separation files for each.

My next step is to find a contone film for my image setter that allows me to make real silver negative separations at an affordable cost. Currently I have ortho 25 in rolls and am doing so but at about 15 -30 times the cost of inkpress negatives. I need about 50 rolls of 100ft film at 20 inch size to accomplish just my own needs and unless I find a suitable film I will be forced to use Inkpress,(which by the way gives outstanding quality) but has questionably poor keeping qualitys which forces me to work in batches and finish off each edition as I go. Rather than make all the film at once and then over the years print out when needed.

I am blessed to have these problems, just trying to sort them out... anyone know of a contone film that is light sensitive and is in rolls I am all ears.
Yes I am aware that I am talking about ridiculous amounts of film to accomplish what I need for my personal work.. I hope I live long enough to do it , and my power of attorney follows my wishes and gets the prints to a safe location.
 
Joined
Dec 10, 2009
Messages
6,297
Format
Multi Format
Yes three different coatings in this case. 1. one palladium coat for the palladium negative process and dry.. 2. Blue Coat for the shadow negative with gum process, process and dry, 3. Yellow Coat for highlight negative with gum process and dry.

Paper needs to be pre shrunk, I do not use special sizing, I use Hahnemuhle Platinum Rag, with Ink press negatiives.
When thinking this through I try to use complimentary colours and I try to have the colder colour go into the shadow but this can certainly change.

I have memorized the colour wheel and when mixing colours a natural third colour is made when mixing ... for example cyan and yellow = green So you can imagine the creative
implications of this.
I have also found that hand retouching , and colouring with the pigments is really easy after the finished print is done and one wants to do extra hits of colour .
Hi Bob,
Thanks for your generous info. Looks like your prints take a lot of time to make. It takes a lot of time and effort to register, expose, process and dry the print after each coating.

Best,
Don
 

Bob Carnie

Subscriber
Joined
Apr 18, 2004
Messages
7,731
Location
toronto
Format
Med. Format RF
I print 10 images at a time .. 2 prints per image
20 palladium first day - I reserve a full day for this
second day I can do a coat of blue
third day if required a third coat of yellow

fourth day if needed a hit of something to build up the image, but over three days I can expect about 20 prints which is pretty good.
the trick is to set up your workflow to do this and maximize your chemical requirments and do only one thing each session and do it well.
 

DennyS

Member
Joined
Oct 5, 2010
Messages
77
Format
Hybrid
the moment I started using BlendIf and separating tonalitys and making negatives to apply colour in those specific regions
Bob, I'm currently fine tuning cyanotype over Pt/Pd using the same approach, Pt/Pd for the shadows to fortify the cyanotypes and early results are very promising. I was inspired to try this by Kenro Izu's cyanotype nudes. BlendIf is a really powerful tool.
 

Bob Carnie

Subscriber
Joined
Apr 18, 2004
Messages
7,731
Location
toronto
Format
Med. Format RF
Bob, I'm currently fine tuning cyanotype over Pt/Pd using the same approach, Pt/Pd for the shadows to fortify the cyanotypes and early results are very promising. I was inspired to try this by Kenro Izu's cyanotype nudes. BlendIf is a really powerful tool.
I agree, PS has magnificent applications that even the experts are not aware, LAB and Blendif are rare for users but if applied really creative opportunities, I barely have scratched the surface, I want to start blending solarized images using two versions of an image one solarized and one straight and by using Blendif I can pick areas I want to be present or not present in my final print.
 
Joined
Dec 10, 2009
Messages
6,297
Format
Multi Format
I print 10 images at a time .. 2 prints per image
20 palladium first day - I reserve a full day for this
second day I can do a coat of blue
third day if required a third coat of yellow

fourth day if needed a hit of something to build up the image, but over three days I can expect about 20 prints which is pretty good.
the trick is to set up your workflow to do this and maximize your chemical requirments and do only one thing each session and do it well.

Ah. You leverage economies of scale with your time and materials.
 

Andrew O'Neill

Moderator
Moderator
Joined
Jan 16, 2004
Messages
11,777
Location
Coquitlam,BC Canada
Format
Multi Format
Hi Minas
thanks for asking this so I can share my method. Its boring but here goes.

Using photoshop and with a Black and White image on screen I do the following.
Size image
Add Canvas Black
Place registration marks in black canvas


To make the palladium negative
1. make a layer
2. Invert the image
3. Flip Horizontal
4. Flatten and Save as the Palladium Negative

To make the shadow negative I go back in history to the point where I started with just the image and registrations.
1. make a layer
2 un click the background layer
3. click on the area to the right to open up the Blend if option of the top layer
4. on the top bar graph I bring the right slider over until I only see the shadow areas highlighted
5. I flatten this layer and get rid of layers when prompted
6. I then invert
7. I then flip horizontal
8. I Save As the Shadow Negative.

To make the highlight negative I go back in history to the point where I started with just the image and registrations.
1 make a layer
2. un click the background layer
3. click on the area to the right to open up the Blend if option of the top layer
4. on the top bar graph I bring the left slider over until I only see the highlight areas
5. I flatten this layer and get rid of layers when prompted
6. I then invert
7. I then flip horizontal
8. I Save As the Highlight Negative


On a lightbox I register all three negatives together for multiple printing


Bob

Thank you very much Bob, for sharing this with us. I'll try it.
 
OP
OP
Joined
Jun 3, 2018
Messages
55
Location
Doha
Format
Digital
Minas, just as a reality check, what papers/developers/processing routine are you using that you find you need to improve on? I'm assuming you are working from good digital negatives...

I certainly enjoy reading this thread :smile: learning a lot

Denny, I make digital negatives, calibrated with Richard's (Bwmastery) method, I am at a very good stage. I use Pd/Na2 mostly, on Hahnemuehle platinum rag, COT320 and Arches platine, PO developer. I do have good results (see link for an example https://www.stratigos.eu/platinum-palladium?lightbox=dataItem-jngazic2) certainly but I am always investigating the possibilities of better prints.
 

DennyS

Member
Joined
Oct 5, 2010
Messages
77
Format
Hybrid
Minas, your technique sounds good and your prints look good, I doubt that you would see significant improvements with addtional hits of Pt/Pd. You might consider Bob's comments to try gum over Pt/Pd. The effects can vary from subtle to extreme, and if done well the prints have a richness/depth that can't be achieved with Pt/Pd alone. If you're looking for a good gum-over reference I'd suggest Gum Printing and Other Amazing Contact Printing Processes by Christina Anderson, and for gum printing specifically, Gum Printing A Step-By-Step Manual, also by Chris (full disclosure, I'm a contributor in that book).
 
Photrio.com contains affiliate links to products. We may receive a commission for purchases made through these links.
To read our full affiliate disclosure statement please click Here.

PHOTRIO PARTNERS EQUALLY FUNDING OUR COMMUNITY:


Ilford ADOX Freestyle Photographic Stearman Press Weldon Color Lab Blue Moon Camera & Machine
Top Bottom