ProfessorC1983
Member
I'll admit, it was mostly my inner contrarian that set me off on this goose chase... that and having too much quarantine time on my hands!
I've been researching various alt processes in search of an all-analog technique to create enlargements from 6x6 negatives. (Not at all to devalue the amazing work people are doing with contact printing digital negatives; it's simply not what I'm interested in.) Almost all of the literature contains some form of warning that alt process prints, particularly cyanotypes, can't be reliably made directly from a traditional enlarger. So naturally my first instinct was "I've GOT to try it!"
I picked up a neglected and rusty Omega B600 for a cool $40 and restored it to semi-working order, then constructed a new lamphouse with a 100W surface-mount 390nm UV LED, heatsink/fan, and designed a 3D-printed plastic hood that fits in place of the existing lamphouse. Aside from that the enlarger is as-is (condenser lenses, bellows, El-Omegar 75mm/f3.5), and I can easily swap between the UV and traditional lamphouses.
Which is a good thing, because this LED is blindingly bright, so much that I'm nervous to even be in the room while it's on, so I focus using the traditional bulb and then swap the lamphouse before an exposure. The LED manufacturer, Chanzon (available on Amazon) actually makes them all the way down to 365nm, albeit significantly more expensive, and I reasoned that 390 was enough of a cross section with cyanotype's sensitivity range while also providing enough visual light to signal me to keep the hell away when it's exposing (I use a standard smart-home outlet on a timer from my phone in the next room).
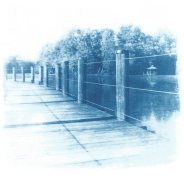
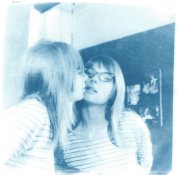
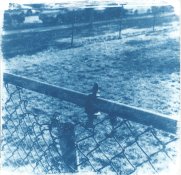
And the results are... surprisingly good for something impossible! So far the hardest part has been judging the exposure time, but it generally falls between 20 and 35 minutes, and seems highly dependent on the density of the negative, which I'm still working out. There seems to be a very limited zone between getting any kind of highlight detail and over-saturating the shadows, as the examples show. And around the 35-40 minute mark is where negatives start to physically distort a bit (especially the image of the girl/mirror which is a vintage pinup neg from the late 1960s)... though in my defense I haven't melted one yet and they always flatten back out!
I plan to do a lot more testing, especially with Mike Ware's 2019 Simple Cyanotype formula which allows a lot more control over contrast and tonal range. So far I've just been using the PF Traditional Cyanotype kit at standard 1:1. It also seems highly paper-sensitive which I suppose is typical for cyanotype... the more textured images attached are Stonehenge White pre-treated with citric acid, and smoother ones are Strathmore 500 Bristol Plate, untreated but with a few drops of 40% citric acid in the sensitizer. I just got a packet of Hannehmuhle Platinum Rag to try out as well. I've been developing ~60sec in 1% citric acid and then washing 20min in very gently running water.
Ultimately my goal is to move past cyanotypes into more black/brown alt processes such as VDB, Namias' sepia, and salted paper, so I'm hoping there's enough promise in the enlarger technique with cyanotype to move into the more expensive silver-based sensitizers.
So... am I fooling myself to continue pursuing this rabbit hole? Even if so, it's been a fun time-sink during an otherwise idle few weeks!
I've been researching various alt processes in search of an all-analog technique to create enlargements from 6x6 negatives. (Not at all to devalue the amazing work people are doing with contact printing digital negatives; it's simply not what I'm interested in.) Almost all of the literature contains some form of warning that alt process prints, particularly cyanotypes, can't be reliably made directly from a traditional enlarger. So naturally my first instinct was "I've GOT to try it!"
I picked up a neglected and rusty Omega B600 for a cool $40 and restored it to semi-working order, then constructed a new lamphouse with a 100W surface-mount 390nm UV LED, heatsink/fan, and designed a 3D-printed plastic hood that fits in place of the existing lamphouse. Aside from that the enlarger is as-is (condenser lenses, bellows, El-Omegar 75mm/f3.5), and I can easily swap between the UV and traditional lamphouses.
Which is a good thing, because this LED is blindingly bright, so much that I'm nervous to even be in the room while it's on, so I focus using the traditional bulb and then swap the lamphouse before an exposure. The LED manufacturer, Chanzon (available on Amazon) actually makes them all the way down to 365nm, albeit significantly more expensive, and I reasoned that 390 was enough of a cross section with cyanotype's sensitivity range while also providing enough visual light to signal me to keep the hell away when it's exposing (I use a standard smart-home outlet on a timer from my phone in the next room).
And the results are... surprisingly good for something impossible! So far the hardest part has been judging the exposure time, but it generally falls between 20 and 35 minutes, and seems highly dependent on the density of the negative, which I'm still working out. There seems to be a very limited zone between getting any kind of highlight detail and over-saturating the shadows, as the examples show. And around the 35-40 minute mark is where negatives start to physically distort a bit (especially the image of the girl/mirror which is a vintage pinup neg from the late 1960s)... though in my defense I haven't melted one yet and they always flatten back out!
I plan to do a lot more testing, especially with Mike Ware's 2019 Simple Cyanotype formula which allows a lot more control over contrast and tonal range. So far I've just been using the PF Traditional Cyanotype kit at standard 1:1. It also seems highly paper-sensitive which I suppose is typical for cyanotype... the more textured images attached are Stonehenge White pre-treated with citric acid, and smoother ones are Strathmore 500 Bristol Plate, untreated but with a few drops of 40% citric acid in the sensitizer. I just got a packet of Hannehmuhle Platinum Rag to try out as well. I've been developing ~60sec in 1% citric acid and then washing 20min in very gently running water.
Ultimately my goal is to move past cyanotypes into more black/brown alt processes such as VDB, Namias' sepia, and salted paper, so I'm hoping there's enough promise in the enlarger technique with cyanotype to move into the more expensive silver-based sensitizers.
So... am I fooling myself to continue pursuing this rabbit hole? Even if so, it's been a fun time-sink during an otherwise idle few weeks!