Scanning with the FOCOMAT IIc

Recent Classifieds

Forum statistics

Threads
197,574
Messages
2,761,308
Members
99,406
Latest member
filmtested
Recent bookmarks
0

NB23

Member
Joined
Jul 26, 2009
Messages
4,307
Format
35mm
Please read, you will thank me later ✌🏻❤️✌🏻
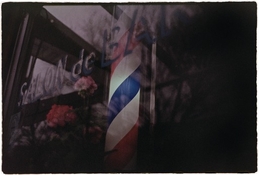
I will update with a few pics.
———————-

The focomat IIc is the most amazing enlarger. Each and every time I use it, which is everyday-for-the-past-15-years (except when on vacation), I feel an immense sense of joy.

Holding a Leica? Meh. Try fondling a focomat IIc and you shall understand what is true perfection.


A decade ago I sat down and thought hard: I was using that damned fine device every day, but it occured to me that I could bot possibly use for the rest of my life although I wanted exactly that! This would mean having to print until my death. I’m ok with that, but that would also mean to always have to live in a house with a darkroom in it. Goodbye hospice… haha.


How in the world could I figure out a scenario where it would be acceptable to have this Focomat pass as a fine decorative instrument and make it look acceptable, to my wife? Use it as a lamp? As a toaster? As a pillow?

The Focomat had to become a heirloom, no matter what. Wait a minute, I have two sons… and so I purchased a second focomat IIc. One for each. We’ll figure out the usefulness part later.


And then I found a solution. It occured to me how stupidly stupid I have been all this time. It is what it is, afterall: a simple yet perfect mechanical abd optical instrument: A perfect scanning hardware! If my idea works, this focomat IIc will be useful FOREVER abd everywhere, even in broad daylight. In the Kitchen, why not! And there it happened, my Focomat became as essential as a washing machine.


What? You may ask?


Here is what and how. You only need the following in order to get the BEST SCANS possible:


  • A full frame digital camera
  • A 1:1 macro lens in the 50/60mm range
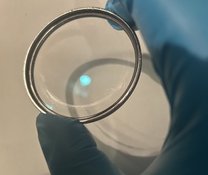
  • UV/Clear/Skylight filter on the Lens (very important)
  • Photoshop
  • Focomat IIc


In my case, I use a D750 + 60mm micro nikkor.


How, for 35mm film:


  • Unscrew the 60mm lens completely from the focomat.
  • Leave the 100mm on the focomat.
  • Raise the focomat’ lens level to approximately chest level, this way the bellows are the most compressed. If not, compress them maximally, by going up or down, or by locking them with the side pin. Maximum compression means a scanning ratio of about 1:125 for 35mm films.
  • Take out any contrast colored filter from the focomat.
  • Power up the light
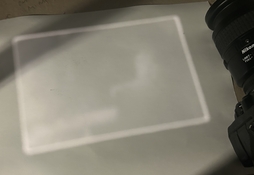
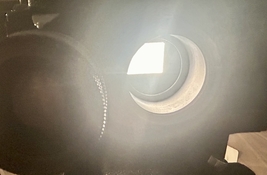
  • Position the 100mm lens which now projects a soft 5x7ish image onto the baseboard, which is exactly what we need.
  • Slide a film into the negative holder and frame it within the mask BY LOOKING AT THE BASEBOARD/EASEL. My Focomat masks allow me to print with borders, this also vastly facilitates quickly positioning the film within the mask by quickly glancing onto the baseboard.
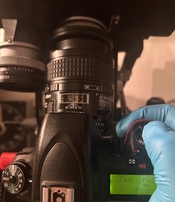
  • Once the film is placed within its frame/mask, slide the 100mm lens to the left. Now you have the beautiful 60mm lens mount pitching light through it (remember, there is no lens on that mount)
  • Take the camera with both hands, lens up. Now stick the 60mm lens’filter completely to the focomat’s 60mm lens mount. The camera’s macro lens’ UV filter acts as a Parallel guide. By pushing the filter onto the focomat’s lens mount, this will assure 100% parallelism to the negative. Absolute Genius!!
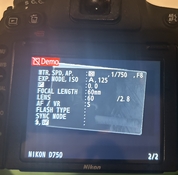
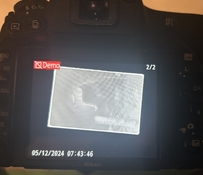
  • With your thumb, press the camera’s shutter. The camera, which is well pressed upwards against the 60mm lens mount, and which is perfectly parallel thanks to the UV filter pressed against the rim, will autofocus, measure light, and take a shot. Usually, my files are shot at 1/750th@f11, I let the camera meter and it’s always in that ballpark.
  • Pour down the camera onto the easel. Move the focomat lens back to 100mm position. Advance one frame by looking onto the easel for proper framing.
  • Move back to 60mm position. Take camera, shoot.
  • Pour down camera, change to 100mm, advance film, change to 60mm, shoot…


Notes:

Scanning a whole 36 exposure frame takes me 8 minutes.

Scanning xpan negatives is a breeze. Square format easy as well but you need to find the proper bellows distance.

Xpan and square, you need to shoot through the 100mm mount, and frame with the 60mm lens., for 35mm negatives you need to frame with the 100mm lens and shoot through the 60mm mount.


The 2-lens method is crucial for scanning: that’s how you breeze through a 36 exposure uncut film without even thinking and fiddling.


For color film, I scan a whole roll abd then cut the film. It is impossible to judge a color negative by the naked eye. I make the proper selection in photoshop/lightroom later on, deleting what needs to be deleted.

For BW films, I cherry pick from the contact sheet. Sweet.


The way the IIc is engineered makes it so easy to stick a lens and shoot on bith lens mounts, something impossible with the Ic or other enlargers I have tried.

We can call it luck, but I call it magical. The IIc was SO WELL MADE that it actually transcends time, eras. Had it not been so well engineered, it simply would not have been possible to use as a scanning device. You make

Something good and it somehow keeps on living, and living.

And thanks to german optical engineering, the whole light path is already engineered to be the most perfect as possible, and the negative flatness…


Viola! Easy peasy. I will create a youtube video of the whole pricess, should last no more than a minite, for real. It’s just that easy and efficient.


I have scanned over 1000 rolls of film, done 3 color books with the highest quality files, a few more on the way, exhibitions, color enlargements…. BW books next… all thanks to the IIc.


Don’t hesitate: buy one and you will understand, everyday, how smart it was.


Last word: I can scan to perfection a whole 36exposure uncut roll in less 8 minutes.
 
OP
OP
NB23

NB23

Member
Joined
Jul 26, 2009
Messages
4,307
Format
35mm
Examples of scanned images, fuji 200.
 

Attachments

  • IMG_8266.jpeg
    IMG_8266.jpeg
    50.9 KB · Views: 94
  • Web_NED3083.jpeg
    Web_NED3083.jpeg
    328.4 KB · Views: 84
  • Web_NED0904.jpeg
    Web_NED0904.jpeg
    651.4 KB · Views: 86

MattKing

Moderator
Moderator
Joined
Apr 24, 2005
Messages
51,996
Location
Delta, BC Canada
Format
Medium Format
Moved to the Scanning sub-forum.
 

miha

Member
Joined
Feb 15, 2007
Messages
2,923
Location
Slovenia
Format
Multi Format
@NB23 please show some pictures of the contraption!

BTW, you've announced a book a while ago, is it available yet?
 
Last edited:
OP
OP
NB23

NB23

Member
Joined
Jul 26, 2009
Messages
4,307
Format
35mm
@NB23 please show some pictures of the contraption!

BTW, you've announced a book a while ago, is it available yet?

Three Books are coming at once… well, two at once and available in the next coming weeks and a big one with introduction by legendary canadian artist Daniel Bélanger (I can’t express my luck enough) somewhere in june to september.

I will make a small announcement when time comes, marketing 😁
 
OP
OP
NB23

NB23

Member
Joined
Jul 26, 2009
Messages
4,307
Format
35mm
Yes, pictures are coming
 
OP
OP
NB23

NB23

Member
Joined
Jul 26, 2009
Messages
4,307
Format
35mm
Okay, what you see here is the projected image through the Focomat’s 100mm lens of a 35mm frame onto the back of a 8x10 print, on the focomat IIc baseboard.

As you can see, it is very blurry. I use this very effective method to simply place the negative within the mask. The white border shows on all 4 sides? Excellent, I am then ready to slide to the 60mm position.
 

Attachments

  • IMG_8383.jpeg
    IMG_8383.jpeg
    1.1 MB · Views: 31
OP
OP
NB23

NB23

Member
Joined
Jul 26, 2009
Messages
4,307
Format
35mm
Now that the negative is well within its mask, as onfirkedna few seconds ago (see previous post) I am ready to take a photograph through the 60mm mount.

Use your left hand to stabilise the camera while pushing up the camera to sit firmly onto the focomat’s mount, then click with your thumb. The autofocus will take care if everything.

Also, the 60mm lens with this particular setup’ magnification ratio of 1:1.4 (according to the lens’ focus marking) gives you some leeway left and right to crop the image. Therefore, you don’t need to be precise with the camera’s framing. You will always need to crop out the sides.

I am very haooy with the 24mp output that end up being around 18mp once cropped. A higher rez camera will give you even more insane goodness.

As a sidenote: I am so happy with the quality and resolution I am getting from my scans that I have NEVER felt the need to upgrade.
And if I ever feel the need, rescanning any negative is simply a joyous breeze.
 

Attachments

  • IMG_8385.jpeg
    IMG_8385.jpeg
    1.1 MB · Views: 46
  • IMG_8386.jpeg
    IMG_8386.jpeg
    1.3 MB · Views: 46
Last edited:
OP
OP
NB23

NB23

Member
Joined
Jul 26, 2009
Messages
4,307
Format
35mm
Here you see what I am talking about.

As seen from below, on the left is the 100mm lens that serves as a visual guide to frame the negative within its mask.

On the right, you see the negative ready to be “scanned” by placing the camera firmly against the ficomat’s lens mount, as seen in the prior post.
 

Attachments

  • IMG_8387.jpeg
    IMG_8387.jpeg
    850.2 KB · Views: 29
OP
OP
NB23

NB23

Member
Joined
Jul 26, 2009
Messages
4,307
Format
35mm
Here you see the result of the scan, on the D750’s screen.

Please note, this is a negative from a shot taken with a summar in snowy conditions. That particular summar renders as a THAMBAR, meaning verrry soft.
That’s not a problem: the Camera’s autofocus focuses on the grain. Always sharp grain, not a single hue is missed. The scan is perfect and extremely accurate.
 

Attachments

  • IMG_8382.jpeg
    IMG_8382.jpeg
    1,017 KB · Views: 32
  • IMG_8381.jpeg
    IMG_8381.jpeg
    1.1 MB · Views: 32
OP
OP
NB23

NB23

Member
Joined
Jul 26, 2009
Messages
4,307
Format
35mm
At last, the filter.
As you can see, the filter will get scratched by the continuous contact with the focomat’s lensless mount.
That is perfectly ok: physics being what they are, the scratches are never in the image path.

Here is my filter after 1000+ films scanned ( over 36,000 single scans)

You can also notice the filter’s rim being very worn from the constant banging. How cool!
 

Attachments

  • IMG_8393.jpeg
    IMG_8393.jpeg
    1.3 MB · Views: 23
  • IMG_8388.jpeg
    IMG_8388.jpeg
    1.3 MB · Views: 22
OP
OP
NB23

NB23

Member
Joined
Jul 26, 2009
Messages
4,307
Format
35mm
And VIOLA! WALA!

Please enjoy.
If you own a IIc, please understand that you are very lucky as you now have a VERY powerful tool necessitating exactly ZERO modification.
 
Last edited:

Hilo

Subscriber
Joined
Apr 19, 2011
Messages
917
Format
35mm
You explain it well.

a question: I have or had the various metal negative masks that Leitz made for the IIc. These are meant to slide into a slot underneath the bottom glass of the negative holder.

But I have never used them. Instead, I have cut from thin, black carton various sizes. Since these were only to get rid of excess light around the image, I wasn't precise. I then mask off the image, with or without black border, using the easel.

The original metal mask for 35mm that you use, I think these do not give a border around the negative. Did you file it out? That is perhaps not easy with this tough metal (which is not like the softer metal Leitz used for the masks of the Focomat Ic).

At any rate, you would not want too much of a border, right? As it would would not help the lightmeter of your camera?
 

geirtbr

Member
Joined
Feb 21, 2015
Messages
35
Format
35mm
I use an enlarger as well, an lpl 6700, but i turn the head around, move it down a little to the baseboard, and shoot with a small camera through the lensboard. I use olympus ep micro 4/3 with an olympus 35mm autofocus macro lens, but i think you can use any camera with a macro lens.

I think autofocus macrolens isnt really needed, the head and film holder is so stable that when you find focus it will stay focused through the whole roll. I also use a release cable, but i also dont think its really needed. I think one can do this with very basic equipment, main thing is to have a camera that takes photos in 12 bit raw format. I also think you can use many different types of enlargers for this, main thing is to have something stable and with good film holders and (for me) a head that can be turned 180 degrees.

However one thing is important, thats the color filtering. The lpl has dichroic color filters. I use those to adjust cyan so that the orange mask is largely neutralised (around 70-100 cyan, depending on roll). I found this help on color accuracy, especially on expired c41 films that has base fog.
 
OP
OP
NB23

NB23

Member
Joined
Jul 26, 2009
Messages
4,307
Format
35mm
The problem with single-lens enlargers is that advancing the film to the next frame is a huge pain as It requires screwing the lens in to frame the negative properly and then screw it out for taking a shot/scan.
Doing this for a color negative, 36 times over, can be super tedious. But for cherry picked frames, then yes it works without too much hassle.
Still, enlargers with lens turrets are a must, IMO, for this system to be sustainable...

And some/many enlargers don’t even allow a camera to be well pressed/aligned against the lens mount. So there is no effective control of parrallelism.

But the fact remains that many enlargers are possibly fine scanning devices, they just need figuring out. The Ic focomat doesn’t work, though.
 
Last edited:
OP
OP
NB23

NB23

Member
Joined
Jul 26, 2009
Messages
4,307
Format
35mm
You explain it well.

a question: I have or had the various metal negative masks that Leitz made for the IIc. These are meant to slide into a slot underneath the bottom glass of the negative holder.

But I have never used them. Instead, I have cut from thin, black carton various sizes. Since these were only to get rid of excess light around the image, I wasn't precise. I then mask off the image, with or without black border, using the easel.

The original metal mask for 35mm that you use, I think these do not give a border around the negative. Did you file it out? That is perhaps not easy with this tough metal (which is not like the softer metal Leitz used for the masks of the Focomat Ic).

At any rate, you would not want too much of a border, right? As it would would not help the lightmeter of your camera?

I filed them out.
I also purchased a few with extra Size opening from Kienzle.

My favorite IIc negative holder, though, is the one I ordered from Kienzle with top AN Glass.
 

geirtbr

Member
Joined
Feb 21, 2015
Messages
35
Format
35mm
The problem with single-lens enlargers is that advancing the film to the next frame is a huge pain as It requires screwing the lens in to frame the negative properly and then screw it out for taking a shot/scan.
Doing this for a color negative, 36 times over, can be super tedious. But for cherry picked frames, then yes it works without too much hassle.
Still, enlargers with lens turrets are a must, IMO, for this system to be sustainable...

And some/many enlargers don’t even allow a camera to be well pressed/aligned against the lens mount. So there is no effective control of parrallelism.

But the fact remains that many enlargers are possibly fine scanning devices, they just need figuring out. The Ic focomat doesn’t work, though.

I think its not so complicated to set up, I didnt have such a problem.
I use an enlarger in a public darkroom so I make a setup thats easy to setup and remove.
IMG_0915.JPG
 
OP
OP
NB23

NB23

Member
Joined
Jul 26, 2009
Messages
4,307
Format
35mm
Excellent!

I get it; you use the camera’s liveview screen to advance the film, yes?
 

Steve@f8

Member
Joined
May 5, 2017
Messages
342
Location
UK
Format
35mm
Examples of scanned images, fuji 200.

This is lateral thinking taken to another level, Ned!
I think the Achilles Heel of camera scanning, irrespective of the method chosen, is the conversion software, eg NLP as a LR add on ($99); some use LR or PS and do the inversion and correction manually. I’d be interested how you convert. Whatever s/w you’re using the resulting images have your ‘signature look’ so I’m mighty impressed!!
 
OP
OP
NB23

NB23

Member
Joined
Jul 26, 2009
Messages
4,307
Format
35mm
This is lateral thinking taken to another level, Ned!
I think the Achilles Heel of camera scanning, irrespective of the method chosen, is the conversion software, eg NLP as a LR add on ($99); some use LR or PS and do the inversion and correction manually. I’d be interested how you convert. Whatever s/w you’re using the resulting images have your ‘signature look’ so I’m mighty impressed!!

Haha yes! It took a lot of figuring out for something absurdly simple.
I cannot stress enough how lucky we are to be able to use all of Leica’s brilliant engineering and get the most ouf of each negative, in the digital world.

The way I convert is very simple: I shoot raw, then convert to adobe dng. I then invert the dng files in photoshop, and then I rotate (mirror) the files so they can be viewed as they were shot.

I then go to LEVELS and I use the GRAY pipette to determine the correct white balance by clicking on a neutral area of the image.

From that point, I proceed to correct the levels, the contrast.

And then I finish by cloning an insane, and sometimes insanely diabolical, amount of dust.

All of this still gives me pleasure: from using film, film cameras, using the lovely Focomat, quality time alone in the darkroom with music of my choice, and finally end up with images done on film, with the film look.

✌🏻✌🏻
 

Steve@f8

Member
Joined
May 5, 2017
Messages
342
Location
UK
Format
35mm
Haha yes! It took a lot of figuring out for something absurdly simple.
I cannot stress enough how lucky we are to be able to use all of Leica’s brilliant engineering and get the most ouf of each negative, in the digital world.

The way I convert is very simple: I shoot raw, then convert to adobe dng. I then invert the dng files in photoshop, and then I rotate (mirror) the files so they can be viewed as they were shot.

I then go to LEVELS and I use the GRAY pipette to determine the correct white balance by clicking on a neutral area of the image.

From that point, I proceed to correct the levels, the contrast.

And then I finish by cloning an insane, and sometimes insanely diabolical, amount of dust.

All of this still gives me pleasure: from using film, film cameras, using the lovely Focomat, quality time alone in the darkroom with music of my choice, and finally end up with images done on film, with the film look.

✌🏻✌🏻

Thanks Ned, brilliant stuff.
 
Photrio.com contains affiliate links to products. We may receive a commission for purchases made through these links.
To read our full affiliate disclosure statement please click Here.

PHOTRIO PARTNERS EQUALLY FUNDING OUR COMMUNITY:


Ilford ADOX Freestyle Photographic Stearman Press Weldon Color Lab Blue Moon Camera & Machine
Top Bottom