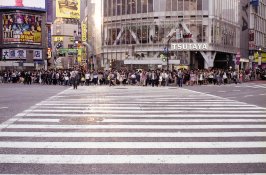
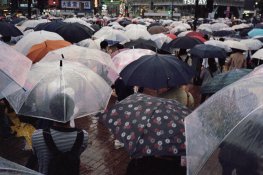
Scanning Portra 400, weird yellow cast

Forum statistics

Threads
198,324
Messages
2,772,994
Members
99,593
Latest member
StephenWu
Recent bookmarks
0

ericdan

Member
Joined
Feb 28, 2014
Messages
1,359
Location
Tokyo
Format
35mm RF
Hi,
I shot portra 400 at 320 - 400 EI and getting different results that I can't explain.
Process is
  1. scan and expose to the right
  2. import to Lr and invert tonal curve
  3. set WB, based on white "KODAK PORTRA" film markings
  4. export to TIFF and import again (to get around the upside-down controls after inverting)
  5. set WB (usually I click on concrete or something grayish to get closer and then fine-tune)
  6. adjust midtowns via exposure slider
  7. set black and white points
Sometimes the WB just can't get fixed. when I click on something grey it just jumps to 100, 100 on both sliders and retains an obvious yellow cast.
Other times it works just fine.
Any ideas what I am doing wrong? Should get rid of the yellow in the RGB tonal curves panel?
here are two examples, one that worked and one that didn't.
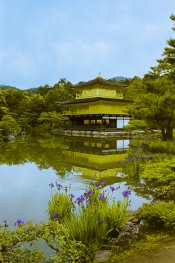
Elena Nikko1.jpg
1.jpg
 
Joined
Jul 13, 2006
Messages
266
Location
Europe
Format
Multi Format
Negative film does have an orange mask. If you can't filter the mask in the scan process, you'll never get correct colors.

You should profile your negative film. It is a tedious procedure, but has to be done only once for each emulsion.

I've just profiled the Fuji Pro 400 H with Vuescan Pro and a camera target from Wolf Faust (Affordable IT 8.7 (ISO 12641) Scanner Color Calibration Targets). For decades I was shooting slide film only, so this is new to me, but it's worth it.

BTW, inverting a negative to a positive in PS or LR does have a bug: because it is limited to 15+1 bits, it's not true 16 bit. If you scan at 8 bit, you will always have a problem.

BTW, there is CF Systems with ColorPerfect, a plug-in for PS. But you need to scan your film @ 16/48 bit linearized, otherwise it won't work.
 

John_M_King

Member
Joined
Nov 4, 2013
Messages
159
Location
UK County Durham
Scans with an obvious colour cast can usually be corrected with one of the programs like Photoshop or Paint shop pro by opening adjust> saturation and choosing the colour you want to reduce which is in your case yellow it will only take a little movement of the slider. Or you can open Adjust> colour balance and do the same.

Oddly enough I did a roll of 35mm Agfa last night and whilst most were all OK, there were 2 that had a predominant cyan colour cast which I corrected by the above method. Why two frames out of 36 should have a cast when they were all shot during the same lighting conditions I have yet to discover. (I scanned them with an Epson V500)
 
Joined
Jul 21, 2003
Messages
583
Location
Philadelphia
Format
8x10 Format
These actually have two different casts. The first one with the pond and pagoda has a green cast, that can be fixed by just pulling down the curve in the green channel. The second has a pretty harsh cyan/blue cast that that is easily fixed by desaturating/darkening those colors with the HSL sliders.

Fixing these things isn't really the hard part. It is being able to look at the file and try to determine what part of what channel is causing it in the first place.

I tend to use a curves adjustment layer in photoshop to see where spikes in the histograms of each channel might be contributing to the cast. From there I can just grab those points to quickly determine if that will have the affect I'm after and fine tune from there. If that doesn't work I go on to create a Hue/Saturation adjustment layer, and choose the hue that looks like it will be the problem (like cyan or blue in the second picture—see screenshot) desaturate/darken/change the hue sliders until you determine just what the problem is and then fine tune.

I never had need to try to photograph a color negative with a dslr and then try to convert/correct it in Lightroom; that is not what those tools are designed to do. Sure, you can make it work, be prepared to need to do some extra adjusting and color correction. It is like trying to use a screwdriver to drive a nail. It will work, but it might be a little difficult, and potentially painful.
 

Attachments

  • Screen shot 2014-06-26 at 9.49.57 AM.png
    Screen shot 2014-06-26 at 9.49.57 AM.png
    822.7 KB · Views: 123

colorfulbliss

Member
Joined
Jan 30, 2013
Messages
3
Location
Pittsburgh, PA
Format
35mm
I too am scanning color negative film with a dslr (Samsung NX100 in my case). Here is a sample of where I'm at so far. I tried many different methods of performing the inversion and in the end came back to ColorPerfect, but even then it took a while to get a workflow that was consistent. My best, most consistent results have come from the following process: Set camera exposure with the least dense negative, set it so the red channel is just clipping on the high side(On the NX100 a clipped histogram in camera does not mean a clipped RAW. YMMV). On most average negatives this yields a matrix-metered exposure of 1 1/3 - 2 1/3 stops overexposed. (Side note: the greater the exposure without clipping, the less noise (grain) will be found in the highlights of the finished product). Next I open the RAW in "MakeTIFF" (freeware from the makers of the ColorPerfect plug-in) and convert to a linear TIFF. Open the TIFF in Photoshop, crop and pass to ColorPerfect. White balance on something, adjust levels so that nothing is clipped, OK out of ColorPerfect, save TIFF. Open in Lightroom, tweak color temp, exposure, white and black levels, sharpening etc. Since I began this workflow I have had no "split tone color casts" that take forever to correct. The only thing I am not 100% satisfied with so far is a bit too much red/orange saturation that I haven't tracked down yet, but suspect it may be due to the backlight I am using to scan with.

Here is a recent (quite underexposed) Portra 400 shot:

Portra400_DSLR

If anyone wishes to upload a DSLR scanned RAW somewhere I'll be happy to run it through my workflow to see how it comes out.
 
Last edited by a moderator:
OP
OP
ericdan

ericdan

Member
Joined
Feb 28, 2014
Messages
1,359
Location
Tokyo
Format
35mm RF
I've tried this on another few images.
In Photoshop I compressed the tonal range to get 5% black points and 95% white in the highlights. Added black, mid-tones and white points. adjusted any obvious color casts at those points by twisting the curves in each channel.
Results are here:

shibuya.jpg
umbrellas.jpg
Any thoughts on how these look? Is that a decent representation of Superia 800 and Portra 400 respectively?
 
Photrio.com contains affiliate links to products. We may receive a commission for purchases made through these links.
To read our full affiliate disclosure statement please click Here.

PHOTRIO PARTNERS EQUALLY FUNDING OUR COMMUNITY:


Ilford ADOX Freestyle Photographic Stearman Press Weldon Color Lab Blue Moon Camera & Machine
Top Bottom