Salvage work prints that are a bit too dark

Do-Over Decor

A
Do-Over Decor

  • 1
  • 1
  • 73
Oak

A
Oak

  • 1
  • 0
  • 58
High st

A
High st

  • 10
  • 0
  • 89
Flap

D
Flap

  • 0
  • 0
  • 34

Recent Classifieds

Forum statistics

Threads
199,226
Messages
2,788,181
Members
99,836
Latest member
Candler_Park
Recent bookmarks
0

L Gebhardt

Member
Joined
Jun 27, 2003
Messages
2,363
Location
NH
Format
Large Format
My normal printing flow is to get a print looking correct when it’s wet. I then apply dry down compensation and make the final print(s). this leaves me with one print that’s too dark when dry. When paper was much cheaper I didn’t think much about the waste of this print, but now I’m wondering if there’s a good way to salvage it. I can think of two options, bleaching it back, and preventing dry down by preventing the print from shrinking as it dries (I have heard taping the wet print to glass works, but never tried it). Anyone have a system that works for them? This is for fiber based papers.
 

Don_ih

Member
Joined
Jan 24, 2021
Messages
7,861
Location
Ontario
Format
35mm RF
Farmer's reducer would lighten the highlights and midtones but barely touch the black, so whether or not that works will depend on the particular character of the print.
 

ooze

Member
Joined
Nov 22, 2004
Messages
428
Location
Istanbul/Düsseldorf
Format
Multi Format
Bleaching back works, but it can also be hit and miss, and I find it a bit of a hassle. Personally, I wouldn't bother with it on regular basis. But you could use bleaching back to subsequently sepia tone the print, as I find that a slightly darker print works best with sepia.

I've never heard (nor tried) that preventing the shrinking of paper also prevents its dry down. It would be interesting to hear from those who can confirm this.
 

Vaughn

Subscriber
Joined
Dec 13, 2006
Messages
10,123
Location
Humboldt Co.
Format
Large Format
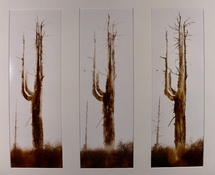
Play with them. Bleach the print completely and re-develop with Dektol on a brush.

A quick pic of three 'extra' prints I decided to play with...prints were about 7"x19".
 

Attachments

  • P1000871.jpg
    P1000871.jpg
    1.4 MB · Views: 93

Philippe-Georges

Subscriber
Joined
Apr 11, 2005
Messages
2,680
Location
Flanders Fields
Format
Medium Format
Play with them. Bleach the print completely and re-develop with Dektol on a brush.

A quick pic of three 'extra' prints I decided to play with...prints were about 7"x19".

By "Dektol on a brush" do you mean that the Dektol redevelopment is done with a brush thus not emerging the print in a bath (or is it some kind of a slang expression)?
 

Vaughn

Subscriber
Joined
Dec 13, 2006
Messages
10,123
Location
Humboldt Co.
Format
Large Format
Exactly -- bleach the image all the way (it can always still be seen), then re-develop selectively with Dektol on a brush. Sometimes some of the sky would darken behind some branches I was working on -- a light re-bleaching would whiten the sky back up. Way too much fun! Some sepia toning, too going on.
 

GregY

Member
Joined
Apr 12, 2005
Messages
3,503
Location
Alberta
Format
Large Format
Depending on the range of tones, I'd either try selective bleaching (à la Jay Dusard) or full immersion (in a much weaker solution)... it's not that much of a hassle. I've never gone to the extent of bleaching back completely. If it's the print just before....it shouldn't be an extreme case. In the case of large prints i've had it figured out with larger test strips.
 
Last edited:

pentaxuser

Member
Joined
May 9, 2005
Messages
20,021
Location
Daventry, No
Format
35mm
Play with them. Bleach the print completely and re-develop with Dektol on a brush.

A quick pic of three 'extra' prints I decided to play with...prints were about 7"x19".

Vaughn, is the brown effect achieved simply by brushing on Dektol? I never thought Dektol was capable of this effect as a developer

Thanks

pentaxuser
 
Joined
Sep 10, 2002
Messages
3,596
Location
Eugene, Oregon
Format
4x5 Format
It's the shrinkage of the emulsion that causes dry-down. I'm not sure there is a significant change in the paper dimensions when the paper base dries, although it seems to become thinner. At any rate, when wet, the emulsion is swollen with water. As it dries it shrinks and the silver particles all get closer together, hence blocking a bit more light from getting to and reflecting back from the paper base. I don't think taping the print to a piece of glass will help.

Overall bleaching in a weak ferricyanide/bromide solution works, and I have used that on occasion for brightening a print overall or removing a bit of fog. The downside is that it is a bit finicky and the bleaching can be uneven. Give it a try and see if you get satisfactory results. The print would otherwise end up in the trash anyway, right?

Also, selective bleaching of the lighter areas of a print often helps the overall impression. It depends on the print.

Best,

Doremus
 

MattKing

Moderator
Moderator
Joined
Apr 24, 2005
Messages
53,265
Location
Delta, BC Canada
Format
Medium Format
Vaughn, is the brown effect achieved simply by brushing on Dektol? I never thought Dektol was capable of this effect as a developer

Thanks

pentaxuser

A re-halogenating bleach and re-develop workflow means that the original silver halide is replaced by the silver halide supplied by the re-halogenating bleach.
As the image tone is largely based on which halogen is employed, you can change that tone by picking the right re-halogenating bleach.
 

Philippe-Georges

Subscriber
Joined
Apr 11, 2005
Messages
2,680
Location
Flanders Fields
Format
Medium Format
A re-halogenating bleach and re-develop workflow means that the original silver halide is replaced by the silver halide supplied by the re-halogenating bleach.
As the image tone is largely based on which halogen is employed, you can change that tone by picking the right re-halogenating bleach.
So, using the bleach for AGFA’s Diadirect would not change the colour?
 

MattKing

Moderator
Moderator
Joined
Apr 24, 2005
Messages
53,265
Location
Delta, BC Canada
Format
Medium Format
So, using the bleach for AGFA’s Diadirect would not change the colour?

Depends on the bleach and paper/presentation medium combination. Different types of re-halogenating bleaches will have different effects.
 

pentaxuser

Member
Joined
May 9, 2005
Messages
20,021
Location
Daventry, No
Format
35mm
Thanks, Matt. We await Vaughn's response on the type of re-halogenating bleach which might prompt a general question of what types of re-halogenating bleaches can be made with what ingredients to achieve this brown look. I had always assumed, wrongly it would seem, that all such bleaches were simply a set ratio of Ferri and Potassium Bromide

pentaxuser
 

Sirius Glass

Subscriber
Joined
Jan 18, 2007
Messages
50,411
Location
Southern California
Format
Multi Format
I suggest switching to Dektol and develop the paper for a standard two minutes. That will help you remove one variable to help you find the proper print exposure.
 
OP
OP
L Gebhardt

L Gebhardt

Member
Joined
Jun 27, 2003
Messages
2,363
Location
NH
Format
Large Format
I suggest switching to Dektol and develop the paper for a standard two minutes. That will help you remove one variable to help you find the proper print exposure.
I'm not sure if your comment was intended for me, or about the bleaching and redeveloping a print discussion in the later comments about Vaughn's technique. In case you intended it for me, the prints are developed for a set time and the exposure is as I want it while the print is wet. Once I'm satisfied with the appearance of the wet print I subtract a predetermined amount of expose from a new print with the knowledge that it will dry down to the appearance of the first print. That first print is also kept and washed where it will dry down too dark. I was looking for a way to retroactively correct that so as to end up with an extra framable print.
 
  • jtk
  • jtk
  • Deleted

Sirius Glass

Subscriber
Joined
Jan 18, 2007
Messages
50,411
Location
Southern California
Format
Multi Format
I'm not sure if your comment was intended for me, or about the bleaching and redeveloping a print discussion in the later comments about Vaughn's technique. In case you intended it for me, the prints are developed for a set time and the exposure is as I want it while the print is wet. Once I'm satisfied with the appearance of the wet print I subtract a predetermined amount of expose from a new print with the knowledge that it will dry down to the appearance of the first print. That first print is also kept and washed where it will dry down too dark. I was looking for a way to retroactively correct that so as to end up with an extra framable print.

Yes it was intended as a suggestion to you.
 

albada

Subscriber
Joined
Apr 10, 2008
Messages
2,175
Location
Escondido, C
Format
35mm RF
Perhaps a steam iron, containing no water, could dry out a print fast enough that you could evaluate prints when dry instead of wet. You'll probably need to dry it face-down on ordinary cloth or lintless microfiber cloth.
EDIT: A print you want to keep will still need a proper wash after the above quick-dry.

Mark
 

MattKing

Moderator
Moderator
Joined
Apr 24, 2005
Messages
53,265
Location
Delta, BC Canada
Format
Medium Format
A handheld hair dryer or large microwave is a great aid to quick drying of preliminary tests or prints.
 

Vaughn

Subscriber
Joined
Dec 13, 2006
Messages
10,123
Location
Humboldt Co.
Format
Large Format
Thanks, Matt. We await Vaughn's response on the type of re-halogenating bleach which might prompt a general question of what types of re-halogenating bleaches can be made with what ingredients to achieve this brown look. I had always assumed, wrongly it would seem, that all such bleaches were simply a set ratio of Ferri and Potassium Bromide

pentaxuser

Hello!

Sorry packing up the van with workshop supplies , my eBike, and working on getting cameras ready to load (holders themselves loaded after dark tonight).

I used the standard bleach that comes with Kodak Sepia Toner. One of the factors that gets different amount of warmth in the redevelopment is the amount of redevelopment that is allowed to happen. "Under developing" with Dektol gives a warmer tone. The print is on tilted glass with a water hose to control development in a few different ways...wash off quickly for warmth, leave the devloper on the paper longer for a richer black, water used as a barrier, etc.

There was some back-and-forth. Bleach, brush-work, slight re-beaching, rince, more developing, etc. With a final sepia toning at the end. Color reproduction of the above image is not great.

I have fun way into the morning hours -- the most "unstraight" photograph work I have done...😉
 
Joined
Sep 10, 2002
Messages
3,596
Location
Eugene, Oregon
Format
4x5 Format
I'm not sure if your comment was intended for me, or about the bleaching and redeveloping a print discussion in the later comments about Vaughn's technique. In case you intended it for me, the prints are developed for a set time and the exposure is as I want it while the print is wet. Once I'm satisfied with the appearance of the wet print I subtract a predetermined amount of expose from a new print with the knowledge that it will dry down to the appearance of the first print. That first print is also kept and washed where it will dry down too dark. I was looking for a way to retroactively correct that so as to end up with an extra framable print.
I've found that using a drydown factor, as you do and as Fred Picker and his Zone VI literature for his drydown timers advocated, was only a rough approximation. I find that I can't really decide on the final subtle changes and manipulations to a print unless I evaluate a print that has already dried. Even then, selenium toning often changes the print enough that I need to go back and reprint another a bit differently to account for the toner. Prints dry-down very differently depending on lots of different factors, such as overall tonal distribution and, really critical, how important the white and near-white values are on the print.

In any case, I have learned to be patient while waiting for my prints to dry. I speed things up by hanging them on clips on my magnetic white board over the darkroom heater, which speeds up drying a bit. In the summer, I'll take prints outside and let them dry in the heat and sun a bit before taking them back to the darkroom.

The light you use for evaluating the prints is important too. I try to simulate what I consider "ideal" display lighting, keeping in mind that real-life display conditions are often darker (so I'll err on the side of a bit lighter print values in the shadows).

At any rate, by the time I get to the "almost keeper" stage, drydown has been taken into account. If I have a print like your pre-drydown prints that is simply too dark overall, it ends up in pieces in the trash. I do use bleaching for a lot of things, but not to salvage a really too dark print that I could make better and more consistently just by printing another.

Best,

Doremus
 
OP
OP
L Gebhardt

L Gebhardt

Member
Joined
Jun 27, 2003
Messages
2,363
Location
NH
Format
Large Format
I've found that using a drydown factor, as you do and as Fred Picker and his Zone VI literature for his drydown timers advocated, was only a rough approximation. I find that I can't really decide on the final subtle changes and manipulations to a print unless I evaluate a print that has already dried. Even then, selenium toning often changes the print enough that I need to go back and reprint another a bit differently to account for the toner. Prints dry-down very differently depending on lots of different factors, such as overall tonal distribution and, really critical, how important the white and near-white values are on the print.

In any case, I have learned to be patient while waiting for my prints to dry. I speed things up by hanging them on clips on my magnetic white board over the darkroom heater, which speeds up drying a bit. In the summer, I'll take prints outside and let them dry in the heat and sun a bit before taking them back to the darkroom.

The light you use for evaluating the prints is important too. I try to simulate what I consider "ideal" display lighting, keeping in mind that real-life display conditions are often darker (so I'll err on the side of a bit lighter print values in the shadows).

At any rate, by the time I get to the "almost keeper" stage, drydown has been taken into account. If I have a print like your pre-drydown prints that is simply too dark overall, it ends up in pieces in the trash. I do use bleaching for a lot of things, but not to salvage a really too dark print that I could make better and more consistently just by printing another.
This has all come about since I've been experimenting with how to sneak shorter printing sessions in. So I've been printing one or two negatives a night and evaluating the prints the next day. With good notes I can pick back up where I left off and make some tweaks the next day if needed.

I agree the dry down factors are not 100% perfect, but it's usually very close to right. For those really critical white values I sometimes will print just a small section of the image and dry in the microwave. As you noted selenium toning also comes into play. I used to tone right after fixing, but in order to speed up the printing lately have been saving them for a separate session. I hope that doesn't turn out to be a mistake.

You are definitely right that the light in the darkroom is critical. I use a fairly dim bulb to avoid prints that are too dark for my normal viewing conditions.
 
Photrio.com contains affiliate links to products. We may receive a commission for purchases made through these links.
To read our full affiliate disclosure statement please click Here.

PHOTRIO PARTNERS EQUALLY FUNDING OUR COMMUNITY:


Ilford ADOX Freestyle Photographic Stearman Press Weldon Color Lab Blue Moon Camera & Machine
Top Bottom