They don't look like drying marks to me...
Anyway, you could try the following:
* make a new layer as a copy from the image
* desaturate the layer to make it monochrome
* invert the layer so it becomes negative
* then set the layer mode to 'overlay'
* dial back the layer's opacity until the sky evens out
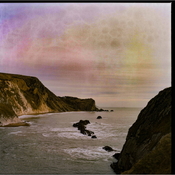
This is what did with your left-side image:
The crude transitions in the sky are because of the dramatic tonal expansion that was done initially to make the emphasized example and then further exacerbated by the insufficient 8-bit color depth; if you're working in 16-bit space (as you really should be), this shouldn't be a problem.
With the actual image, you'll have to experiment a bit and maybe work with an additional adjustment layer to emphasize the effect, so you can more easily see what you're doing. Here's a crude attempt without doing that and just eyeballing the outcome:
Note that in these examples I didn't mask out the cliffs or the sea, which 'for real' I would do since those areas are not noticeably affected, so I'd rather not touch them. I also didn't apply a curve adjustment to the image to bring the contrast back where it was originally; the overlay method essentially compresses the whole thing and you have to reconstruct the tonality a little after that's been done. Including these two steps in a quick & dirty fashion results in this:
However, a few caveats:
* the problem is fairly subtle to begin with. Maybe just adjust the curves to flatten the sky even further a little bit, and just live with it. If you intend to print these, make proofs and see if the problem is emphasized; if not, try to ignore it...
* It's a complex problem in terms of geometry and the way it forms an integral part of the image. I don't think it really can be fixed entirely.
* as said, these are not drying marks, but rather signs of foaming which tend to correlate to process control issues. Troubleshoot your color development process, as that's where the cause lies.