Previously I have received a "no-longer needed" CZJ Flektogon 35/2.4 from a boy. Late CZJ lenses, aka with modern rubber focusing ring made during 1970s, is more deliciated when compare to former zebra or leather versions.
Please note that *Plastics* are used inside this series especially the aperture open/close mech. Servicing therefore needs special caution in order not to break or damage any of them. Don't use any aggressive solvents or lubricants, like acetone, acidic oils, lighter fluid/naphtha on servicing otherwise you might melted or deformed them . I only use graphite powder and never oiled no any of these plastic parts .
Those days, DDR/East Germany wasn't rich as before (the "Zebra" version time) and things have started going downhill. It is not uncommon to see a damaged/broken plastic levers or parts inside because of poor materials. I have started seeing this happen since 1990s when it was just approx 20 yrs from this model production in 1970s. And so today when one purchasing a late CZJ Flektogon 35/2.4 I would highly recommend to pay special attention to this.
Once the pins were wear out they will lost their correctness in aperture size. Although we could use plastic model's putty to reshape it , still it is not as good as from factory. I am sorry I can't give any advices in 's 3D printing as it is not an area I am familiar with, but I believe people could work it out and share their findings later.
**Here I haven't included all pics. This topic is make for people who previously have experience in servicing/dissembling lens instead of a guide to first-timer DIYers. For first-timer DIYer I would recommend to practice with other models to learn more first. **
The lens should be opened from 3 screws from the back
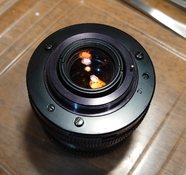 (fig 1)
Pulling out and you will instantly see the plastics parts. Normally they should be complete with no oil on. You can see how they are linked to each other.
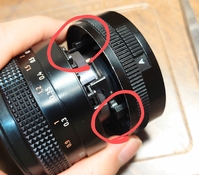 (fig2)
A few from the bottom part and that's how it looks like:
The fluted one is for controlling the aperture size , while the kicker one is for open/close the aperture.
Technically if you didn't remove the smaller screws from the back the Ap. ring won't falls out.
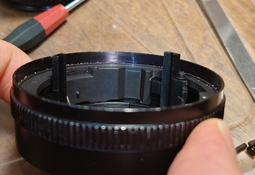 (fig3)
Unscrew these 3 screws and you can take out the main unit from the lens:
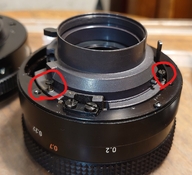 (fig 4)
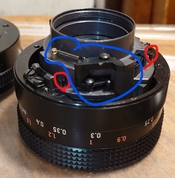 (fig 5)
* One of the red screw is just the back of the previous image.
Note the blue circled parts are also plastic, be careful when taking taken them out.
This pic is generally how the aperture operates :
You press / long plastic bar linked from the metal pin (Ap. ring side, or lens body's end ) -> the inside spring compress and pull to perform the Close action, and thus the aperture will closed to specific size .
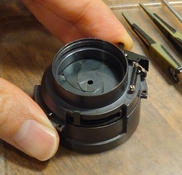 (fig 6)
There is a gap on the barrel holder , and when you further dissembled the large Ap blades holding ring has a small+shorter cut. This cut belongs to here, and helps you to adjust the largest Ap size in opening.
The adjustment can be done by slight loosing the retaining ring from the front of the barrel .
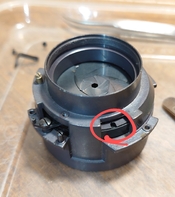
This is how when the retaining ring (upper) taken out and how internal looks like :
The Main Unit, is just like a cup
Ap blades on the lowest layer (2 pin on the same side, facing top) ,
Big Ap Positioning Ring on top of it
Inner-Small Ap Action Ring with lever inside .
An Ap size controlling ring (Part A, with small spring connecting to the small Ap Action Ring insde)
The Ap size selector ring (as part B) with lever to connect external Ap selector (fluted plastic part previosuly mentioned)
Retaining ring (just below the the front eletment)
The previous-mentioned plastic part is the key to perform opening of the blades , which it does (without spring) showing here:
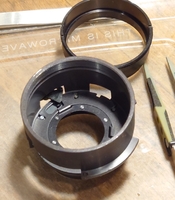 (fig 7)
The Ap size controlling ring (part A)
From the bottom you can see:
A slit, where for keeping its fixed position by the Main unit . The MU has a pin going horizontally through it. You can see from earlier pics (from outside to inside, fig 4, next to right screw )
A pin for holding the small sping
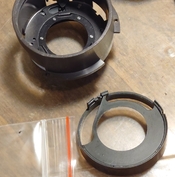 ( fig 8)
Here comes the hardnest part:
During dissembling, unhook the spring from the Inner-Small Ap Action Ring with lever first.
And in assembling, you have to secure the spring at this pin first before putting it pack .
The normal way should be like this :
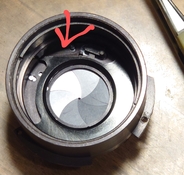 (fig 9)
The you can put on the Ap size selector ring (not pictured) , re-assemble the metal lever with 2 screws , which are intended for connecting external Ap selector (fluted plastic part previously mentioned)
Please note that *Plastics* are used inside this series especially the aperture open/close mech. Servicing therefore needs special caution in order not to break or damage any of them. Don't use any aggressive solvents or lubricants, like acetone, acidic oils, lighter fluid/naphtha on servicing otherwise you might melted or deformed them . I only use graphite powder and never oiled no any of these plastic parts .
Those days, DDR/East Germany wasn't rich as before (the "Zebra" version time) and things have started going downhill. It is not uncommon to see a damaged/broken plastic levers or parts inside because of poor materials. I have started seeing this happen since 1990s when it was just approx 20 yrs from this model production in 1970s. And so today when one purchasing a late CZJ Flektogon 35/2.4 I would highly recommend to pay special attention to this.
Once the pins were wear out they will lost their correctness in aperture size. Although we could use plastic model's putty to reshape it , still it is not as good as from factory. I am sorry I can't give any advices in 's 3D printing as it is not an area I am familiar with, but I believe people could work it out and share their findings later.
**Here I haven't included all pics. This topic is make for people who previously have experience in servicing/dissembling lens instead of a guide to first-timer DIYers. For first-timer DIYer I would recommend to practice with other models to learn more first. **
The lens should be opened from 3 screws from the back
 (fig 1)
Pulling out and you will instantly see the plastics parts. Normally they should be complete with no oil on. You can see how they are linked to each other.
 (fig2)
A few from the bottom part and that's how it looks like:
The fluted one is for controlling the aperture size , while the kicker one is for open/close the aperture.
Technically if you didn't remove the smaller screws from the back the Ap. ring won't falls out.
 (fig3)
Unscrew these 3 screws and you can take out the main unit from the lens:
 (fig 4)
 (fig 5)
* One of the red screw is just the back of the previous image.
Note the blue circled parts are also plastic, be careful when taking taken them out.
This pic is generally how the aperture operates :
You press / long plastic bar linked from the metal pin (Ap. ring side, or lens body's end ) -> the inside spring compress and pull to perform the Close action, and thus the aperture will closed to specific size .
 (fig 6)
There is a gap on the barrel holder , and when you further dissembled the large Ap blades holding ring has a small+shorter cut. This cut belongs to here, and helps you to adjust the largest Ap size in opening.
The adjustment can be done by slight loosing the retaining ring from the front of the barrel .

This is how when the retaining ring (upper) taken out and how internal looks like :
The Main Unit, is just like a cup
Ap blades on the lowest layer (2 pin on the same side, facing top) ,
Big Ap Positioning Ring on top of it
Inner-Small Ap Action Ring with lever inside .
An Ap size controlling ring (Part A, with small spring connecting to the small Ap Action Ring insde)
The Ap size selector ring (as part B) with lever to connect external Ap selector (fluted plastic part previosuly mentioned)
Retaining ring (just below the the front eletment)
The previous-mentioned plastic part is the key to perform opening of the blades , which it does (without spring) showing here:
 (fig 7)
The Ap size controlling ring (part A)
From the bottom you can see:
A slit, where for keeping its fixed position by the Main unit . The MU has a pin going horizontally through it. You can see from earlier pics (from outside to inside, fig 4, next to right screw )
A pin for holding the small sping
 ( fig 8)
Here comes the hardnest part:
During dissembling, unhook the spring from the Inner-Small Ap Action Ring with lever first.
And in assembling, you have to secure the spring at this pin first before putting it pack .
The normal way should be like this :
 (fig 9)
The you can put on the Ap size selector ring (not pictured) , re-assemble the metal lever with 2 screws , which are intended for connecting external Ap selector (fluted plastic part previously mentioned)
Last edited:


