Hello!
I have decided to post how I made a simple monorail view camera for the (un)likely case that some youngster would like to use glue to join parts instead of sniffing it or to just give others some ideas how to do a simple yet functional camera. I am by no means a seasoned engineer or a camera maker but I'll describe my experience building this little thing.

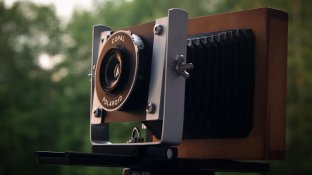
Here is what the finished product looks like in my case.
Lets start with the rail! Some of you have perhaps noticed cheap macro rails from the east filling the auctions sites. Well, they are pretty versatile. I got my hands on a 260mm (if my memory is correct) rail that has a tripod thread on the topside too. Useful feature since you can flip the rail, use the upper thread (now lower) to mount it on a tripod and use the former bottom sliding thingy as the base for the lensboard (or rear standard, if you like the front to be stationary). I have seen monorails done by joining pieces of wood and using threaded rods and other trickery but this is ideal for the mechanically less able person.
I made the back to accept a Graflex roll holder made for 4x5 cameras. It is made out of Baltic Birch and is essentially a sliding lid box. You can nostalgia about woodshop with mr. Whatshisname now. Only that the lid is the roll holder in my case, but nobody, I mean bloody nobody can stop you from making it accept 4x5 DDS holders. If you don't want to bother with cutting the groove or just don't have a tablesaw or a router (like me) or your neighbor who has one hates your guts then you can march to the nearest Home Depot or whatever hardware store is nearby and demand to see their assortment of aluminum profiles. They come in plenty of shapes, thicknesses and dimensions and you can make a lot of parts for your newest kludge, er, camera from it but more about that later on. Btw, you can glue aluminum to wood easily by roughing the parts that come in contact slightly with a piece of sandpaper and contact cement them together like there is no tomorrow. It holds very well.
Now, if you live in the US of A (no offense, please!), you have a wonderful thing called Craigslist and your fleabay is filled to the brim with camera goodies; I am unfortunate to live far-far away in a place with no analog camera aftermarket, so I have to get more exotic parts overseas and that costs me an arm and a leg. This means it is time to find a lens and bellows. Google around a lot and find out if that bargain lens you found is any good or does it even cover your desired format. Ideally, you want something with a working shutter. AFAIK you need to place the rearmost nodal point as far from the film plane in mm as is the focal length in mm to achieve infinity focus; so if your lens is 75mm, make it able to go as near to the film plane.
And you want bellows that are light-tight. There is always the option of making the bellows yourself and you can google about it but if you can get your hands on light-tight bellows that are big enough then you are lucky. You can just glue them to the wooden back if you like and that is pretty much what I did.
Old folding cameras are an excellent source for lenses and bellows but be wary, shutters might be sticky, lenses ridden with fungus and haze and bellows have more pinholes than there are stars in the sky. Basically, scavenge around until you find something.
For the front standard, I used a piece of aluminum and bent it into a lovely U-like shape and cut 3 slits in it. One for horizontal shift and swing, other two for vertical shift and tilt. You can see on the picture what is going on. If you don't have the means to just mill out the slits, drill a series of holes and file the suckers down into one big gap.
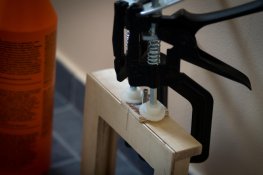
I attached the back to the rail by simply taking a piece of plywood, cut it into desired shape, make a hole in it and put a screw through the hole; then I glued it on the bottom of the back but you can give your camera back movements by duplicating what I did with the front. And the macro rail has ever so convenient slit running through it so i can move the back about as much as I desire. It is locked by a wingnut and a washer. The sophisticated assembly is shown here:

Now, you probably want to focus it, too. If you opted for a 4x5 DDS, kudos! Take an old holder (or new, I don't mind) and cut a hole through the septum, so that you could still insert a sheet of film. Use diffusing gel (I can't tell you the Lee catalog number since I can't remember which one I had at my disposal) instead of the film and reinforce with plexiglass if necessary. Voila! Instant focusing screen with correct registration and distance. Now, if you opted for more exotic solution like I did then you can just again take a piece of plywood roughly the thickness of your roll holder or whatever you are using and cut an opening the size and placement of the frame. Mill down if necessary (that Graflex holder had registration distance of 5mm, but the plywood was 6) area around the opening and attach a piece of ground glass or diffusing gel. Now you can focus.
That is pretty much it. Simple but it works. If you have any questions or if you don't like what I did, please feel free to comment!
-Vallo
I have decided to post how I made a simple monorail view camera for the (un)likely case that some youngster would like to use glue to join parts instead of sniffing it or to just give others some ideas how to do a simple yet functional camera. I am by no means a seasoned engineer or a camera maker but I'll describe my experience building this little thing.

Here is what the finished product looks like in my case.
Lets start with the rail! Some of you have perhaps noticed cheap macro rails from the east filling the auctions sites. Well, they are pretty versatile. I got my hands on a 260mm (if my memory is correct) rail that has a tripod thread on the topside too. Useful feature since you can flip the rail, use the upper thread (now lower) to mount it on a tripod and use the former bottom sliding thingy as the base for the lensboard (or rear standard, if you like the front to be stationary). I have seen monorails done by joining pieces of wood and using threaded rods and other trickery but this is ideal for the mechanically less able person.
I made the back to accept a Graflex roll holder made for 4x5 cameras. It is made out of Baltic Birch and is essentially a sliding lid box. You can nostalgia about woodshop with mr. Whatshisname now. Only that the lid is the roll holder in my case, but nobody, I mean bloody nobody can stop you from making it accept 4x5 DDS holders. If you don't want to bother with cutting the groove or just don't have a tablesaw or a router (like me) or your neighbor who has one hates your guts then you can march to the nearest Home Depot or whatever hardware store is nearby and demand to see their assortment of aluminum profiles. They come in plenty of shapes, thicknesses and dimensions and you can make a lot of parts for your newest kludge, er, camera from it but more about that later on. Btw, you can glue aluminum to wood easily by roughing the parts that come in contact slightly with a piece of sandpaper and contact cement them together like there is no tomorrow. It holds very well.
Now, if you live in the US of A (no offense, please!), you have a wonderful thing called Craigslist and your fleabay is filled to the brim with camera goodies; I am unfortunate to live far-far away in a place with no analog camera aftermarket, so I have to get more exotic parts overseas and that costs me an arm and a leg. This means it is time to find a lens and bellows. Google around a lot and find out if that bargain lens you found is any good or does it even cover your desired format. Ideally, you want something with a working shutter. AFAIK you need to place the rearmost nodal point as far from the film plane in mm as is the focal length in mm to achieve infinity focus; so if your lens is 75mm, make it able to go as near to the film plane.
And you want bellows that are light-tight. There is always the option of making the bellows yourself and you can google about it but if you can get your hands on light-tight bellows that are big enough then you are lucky. You can just glue them to the wooden back if you like and that is pretty much what I did.
Old folding cameras are an excellent source for lenses and bellows but be wary, shutters might be sticky, lenses ridden with fungus and haze and bellows have more pinholes than there are stars in the sky. Basically, scavenge around until you find something.
For the front standard, I used a piece of aluminum and bent it into a lovely U-like shape and cut 3 slits in it. One for horizontal shift and swing, other two for vertical shift and tilt. You can see on the picture what is going on. If you don't have the means to just mill out the slits, drill a series of holes and file the suckers down into one big gap.
I attached the back to the rail by simply taking a piece of plywood, cut it into desired shape, make a hole in it and put a screw through the hole; then I glued it on the bottom of the back but you can give your camera back movements by duplicating what I did with the front. And the macro rail has ever so convenient slit running through it so i can move the back about as much as I desire. It is locked by a wingnut and a washer. The sophisticated assembly is shown here:

Now, you probably want to focus it, too. If you opted for a 4x5 DDS, kudos! Take an old holder (or new, I don't mind) and cut a hole through the septum, so that you could still insert a sheet of film. Use diffusing gel (I can't tell you the Lee catalog number since I can't remember which one I had at my disposal) instead of the film and reinforce with plexiglass if necessary. Voila! Instant focusing screen with correct registration and distance. Now, if you opted for more exotic solution like I did then you can just again take a piece of plywood roughly the thickness of your roll holder or whatever you are using and cut an opening the size and placement of the frame. Mill down if necessary (that Graflex holder had registration distance of 5mm, but the plywood was 6) area around the opening and attach a piece of ground glass or diffusing gel. Now you can focus.
That is pretty much it. Simple but it works. If you have any questions or if you don't like what I did, please feel free to comment!
-Vallo


