Vivaldi
Member
- Joined
- Dec 19, 2006
- Messages
- 11
- Format
- 35mm RF
I have just started trying to make tricolor gum prints and Im hoping some of you with experience might be able to help guide me in the right direction.
My first few tricolor gum prints seem to be mostly yellow, even though I am using calibrated correction curves for each color. For example, bushes and leaves on trees are yellow in the print rather than green. I believe the QTR separation negatives are accurate in color separation, because the magenta, yellow, and cyan colors seem to be going in the right places in the print, but my third and last printing with the Cyan layer seems to mostly come off in the wash, even though it has been previously calibrated properly as a single color. My printing order is Yellow, followed by Magenta, and Cyan is last. I am not sure what variable I should be changing at this point to make a color correction.
The following is an outline of my process workflow so far:
I am making digital separation negatives using QTR with an Epson 3800 by inverting an RGB file in photoshop, splitting channels, converting each channel to gray gamma 1.8, applying my adjustment curve in QTR, and printing digital negatives on OHP transparency for Yellow, Magenta, and Cyan. The adjustment curves for each color were made with a stepwedge as outlined in Ron Reeders new book on Digital Negatives, August 2010 (This is a fabulous book!)
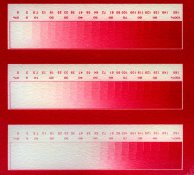
Using a Stoeffer 21 step wedge, I determined a basic UV exposure of 10 minutes for Yellow, 10 minutes for Magenta, and 10 minutes for Cyan using a fluorescent tube lightbox purchased from Bostic and Sullivan. My paper is Lanaquarelle with bloom gelatin sizing. The chemicals are from the Bositc and Sullivan Gum Kit, including potassium dichromate 10%, and 14 degree baume gum Arabic. I know the paper is sized properly because the highlight areas clear without any difficulty.
All watercolors were purchased at Daniel Smith and used as follows in my mix:
Quinadricone Rose (PV 19) - 0.5 grams pigment, 6 ml gum, and 6 ml K Dichromate
Pthalo Blue RS (PB 15) - 0.5 grams pigment, 6 ml gum, and 6 ml K Dichromate
Hansa Yellow Medium (PY 97) - 0.5 grams pigment, 6 ml gum, and 6 ml K Dichromate.
Average humidity at each printing was 60%
Questions:
1. Since the third cyan layer seems to come off in the wash in spite of 10 minutes of UV exposure, do I increase the UV Exposure time for Cyan? How much?
2. Or should I increase the amount of cyan pigment in my mix for the third layer? How do I determine how much?
3. Is it common practice to use different concentrations of pigment for each color layer or do most gum printers use the same concentrations of pigment for each color layer?
Thanks in advance for any ideas
My first few tricolor gum prints seem to be mostly yellow, even though I am using calibrated correction curves for each color. For example, bushes and leaves on trees are yellow in the print rather than green. I believe the QTR separation negatives are accurate in color separation, because the magenta, yellow, and cyan colors seem to be going in the right places in the print, but my third and last printing with the Cyan layer seems to mostly come off in the wash, even though it has been previously calibrated properly as a single color. My printing order is Yellow, followed by Magenta, and Cyan is last. I am not sure what variable I should be changing at this point to make a color correction.
The following is an outline of my process workflow so far:
I am making digital separation negatives using QTR with an Epson 3800 by inverting an RGB file in photoshop, splitting channels, converting each channel to gray gamma 1.8, applying my adjustment curve in QTR, and printing digital negatives on OHP transparency for Yellow, Magenta, and Cyan. The adjustment curves for each color were made with a stepwedge as outlined in Ron Reeders new book on Digital Negatives, August 2010 (This is a fabulous book!)
Using a Stoeffer 21 step wedge, I determined a basic UV exposure of 10 minutes for Yellow, 10 minutes for Magenta, and 10 minutes for Cyan using a fluorescent tube lightbox purchased from Bostic and Sullivan. My paper is Lanaquarelle with bloom gelatin sizing. The chemicals are from the Bositc and Sullivan Gum Kit, including potassium dichromate 10%, and 14 degree baume gum Arabic. I know the paper is sized properly because the highlight areas clear without any difficulty.
All watercolors were purchased at Daniel Smith and used as follows in my mix:
Quinadricone Rose (PV 19) - 0.5 grams pigment, 6 ml gum, and 6 ml K Dichromate
Pthalo Blue RS (PB 15) - 0.5 grams pigment, 6 ml gum, and 6 ml K Dichromate
Hansa Yellow Medium (PY 97) - 0.5 grams pigment, 6 ml gum, and 6 ml K Dichromate.
Average humidity at each printing was 60%
Questions:
1. Since the third cyan layer seems to come off in the wash in spite of 10 minutes of UV exposure, do I increase the UV Exposure time for Cyan? How much?
2. Or should I increase the amount of cyan pigment in my mix for the third layer? How do I determine how much?
3. Is it common practice to use different concentrations of pigment for each color layer or do most gum printers use the same concentrations of pigment for each color layer?
Thanks in advance for any ideas