Question for anyone with an RH designs Analyser Pro

Dog Opposites

A
Dog Opposites

  • 2
  • 3
  • 113
Acrobatics in the Vondelpark

A
Acrobatics in the Vondelpark

  • 6
  • 5
  • 197
Finn Slough Fishing Net

A
Finn Slough Fishing Net

  • 1
  • 0
  • 109
Dried roses

A
Dried roses

  • 14
  • 8
  • 205
Hot Rod

A
Hot Rod

  • 5
  • 0
  • 119

Recent Classifieds

Forum statistics

Threads
197,471
Messages
2,759,575
Members
99,514
Latest member
cukon
Recent bookmarks
1

rpavich

Member
Joined
Aug 24, 2015
Messages
1,521
Location
West virginia, USA
Format
35mm
I'm taking delivery of an Analyser Pro tomorrow and so I've been familiarizing myself with how it works for several days; I've been watching videos, searching forums for questions, etc.
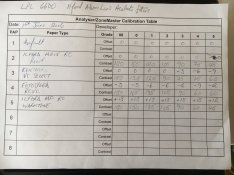
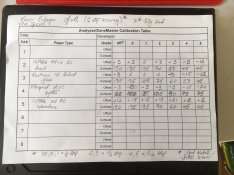
The one thing I haven't seen is this; what do the paper channels signify? I see that it has paper channels (I think) numbered from 2 to 8 but for the life of me, I cannot see what these represent.

When it comes and I turn it on, what is the default paper that it's set for?

Do the other settings (non-default) correspond to something or are they just extra slots for the user to populate with his/her paper brands/types?

FWIW; I'm mostly using Ilford MG IV paper though I do have some Adorama brand and some Oriental also.
 

Svenedin

Member
Joined
Mar 19, 2016
Messages
1,191
Location
Surrey, United Kingdom
Format
Med. Format RF
The paper channels are for setting the default settings for different types of paper. Different papers have different speeds (how long they need to be exposed) and different responses to contrast filters. The default is "pap 2" (I don't know why) and the machine is pre-set for Ilford MGIV. All the other channels have the Ilford settings by default but you can programme them for different papers. To programme the other channels takes quite a long time making and reading test strips. I have done it for 4 different papers. You may be able to find calibration settings you can enter for different papers but it depends on your own enlarger and filtration so the best results are by doing your own calibration.
 
OP
OP
rpavich

rpavich

Member
Joined
Aug 24, 2015
Messages
1,521
Location
West virginia, USA
Format
35mm
The paper channels are for setting the default settings for different types of paper. Different papers have different speeds (how long they need to be exposed) and different responses to contrast filters. The default is "pap 2" (I don't know why) and the machine is pre-set for Ilford MGIV.
Thanks, that gets me started at least.

BTW: if you have any good tips you've gleaned from using it, don't hesitate to throw them my way, that would be helpful too.
 

Svenedin

Member
Joined
Mar 19, 2016
Messages
1,191
Location
Surrey, United Kingdom
Format
Med. Format RF
I will. At work just now. Added some more to my original reply. The default will probably be ok for you to get started with MGIV and you can add "offset" figures if it needs a tweak without doing a full calibration run.
 
OP
OP
rpavich

rpavich

Member
Joined
Aug 24, 2015
Messages
1,521
Location
West virginia, USA
Format
35mm
I will. At work just now. Added some more to my original reply. The default will probably be ok for you to get started with MGIV and you can add "offset" figures if it needs a tweak without doing a full calibration run.
Ahh...thank you. That did help.
I appreciate it...I'm very excited to use this. I just printed a bunch of post cards to send out and thought I'd done a bang up job and after coming home from work the next day I realized just how dull and ill-printed they were, embarassing really because I'd already sent a bunch out to the recipients. Having something that can help get to a good working print would be a boon for me, my experience at this point is limited. I'm going to start by taking negatives that I've already printed and do a print using the analyser and compare to see how much it will improve my prints.
 

mr rusty

Member
Joined
Sep 7, 2009
Messages
827
Location
lancashire,
Format
Medium Format
I've replied to your PM. For anyone else, I have been using an analyser for 3-4 years and can hopefully answer any user experience questions anyone has
 

klownshed

Member
Joined
May 3, 2012
Messages
441
Location
Dorset, UK
Format
Multi Format
Does anybody use an analyser Pro with RH StopClock Pro for split grade printing?

I have an analyser Pro that I got when I purchased a StopClock pro but haven't used it for split grade printing, but this thread got me wondering whether it would be helpful with split grade printing? From what I can work out it's main purpose is as a device to eliminate the test strip.
 
OP
OP
rpavich

rpavich

Member
Joined
Aug 24, 2015
Messages
1,521
Location
West virginia, USA
Format
35mm
One more question; how is it used to check my developing times for my negs?
I see that it can be used for that, what is the procedure and what am I shooting for density-wise?
 

Ozxplorer

Member
Joined
Aug 29, 2004
Messages
228
Location
Gold Coast, Australia
Format
Multi Format
G'day... You might find all the information you need here: http://www.rhdesigns.co.uk/darkroom/Analyser_Pro_UM_v64.pdf
To get the best out of this unit you will need to invest time firstly with the manual then calibrating it to suit your needs. Once done it is a breeze to use including grade determination, split grade printing, negative density readings & burning in... Controls the safe lights too! Fred
 
OP
OP
rpavich

rpavich

Member
Joined
Aug 24, 2015
Messages
1,521
Location
West virginia, USA
Format
35mm
G'day... You might find all the information you need here: http://www.rhdesigns.co.uk/darkroom/Analyser_Pro_UM_v64.pdf
To get the best out of this unit you will need to invest time firstly with the manual then calibrating it to suit your needs. Once done it is a breeze to use including grade determination, split grade printing, negative density readings & burning in... Controls the safe lights too! Fred
Thanks Fred!

I'm chomping at the bit for the UPS guy to show up but first I have to make it through a sleepless night!
 

paul_c5x4

Member
Joined
Apr 22, 2009
Messages
1,942
Location
Ye Olde England
Format
Large Format
One more question; how is it used to check my developing times for my negs?
I see that it can be used for that, what is the procedure and what am I shooting for density-wise?

You use the probe to select a white point, then a black point. By cycling through the grades, you can decide what tones you want the selected points to print at. You can also increase/decrease the calculated exposure in steps of 1/12th of an f stop (the step size can be altered in the menu). Selecting a different paper will also affect how and where on the tonal curve the selected points will print. If you have over/under cooked your negatives, the analyser function will let you know if it will print well at G2 or need something much harder/softer. I'd suggest looking up Barry Thornton's excellent articles on personal film speeds and development times.

I will often use the probe to "read" several different areas to get a feel for where the tones will print on the papers I've programmed in - It sounds complicated, but once you start using the probe & timer, you will find it very easy. It doesn't make the test strip redundant, and I would still encourage you to do one when working. Even more so when doing split grade printing.

For making quick working prints, the Analyser Pro takes much of the guesswork out of getting a half decent print first time.
 
Last edited:
OP
OP
rpavich

rpavich

Member
Joined
Aug 24, 2015
Messages
1,521
Location
West virginia, USA
Format
35mm
You use the probe to select a white point, then a black point. By cycling through the grades, you can decide what tones you want the selected points to print at. You can also increase/decrease the calculated exposure in steps of 1/12th of an f stop (the step size can be altered in the menu). Selecting a different paper will also affect how and where on the tonal curve the selected points will print. If you have over/under cooked your negatives, the analyser function will let you know if it will print well at G2 or need something much harder/softer. I'd suggest looking up Barry Thornton's excellent articles on personal film speeds and development times.

I will often use the probe to "read" several different areas to get a feel for where the tones will print on the papers I've programmed in - It sounds complicated, but once you start using the probe & timer, you will find it very easy. It doesn't make the test strip redundant, and I would still encourage you to do one when working. Even more so when doing split grade printing.

For making quick working prints, the Analyser Pro takes much of the guesswork out of getting a half decent print first time.
Thanks Paul, much appreciated!
 

klownshed

Member
Joined
May 3, 2012
Messages
441
Location
Dorset, UK
Format
Multi Format
Sorry, got confused between the Analyser and ZoneMaster II. I have the ZoneMaster which can plug in to the StopClock to send the times.

But I've not really used the ZM. I've tried it out but can't really see how to incorporate it into my split grade printing process without making life more complicated. I;m sure I'm missing something though.

I'd be interested to hear how you use an Analyser Pro or StopClock Pro with ZM for split grade printing... :smile:
 
OP
OP
rpavich

rpavich

Member
Joined
Aug 24, 2015
Messages
1,521
Location
West virginia, USA
Format
35mm
Ok, it came and i spent abot 2 pleasurable hours making prints...what a blast!

I reprinted the post cards and they came out much better than previously printed.

I also took a couple of recently printed negs and gave them a whirl...boy am i impressed! Decent working prints and not one test strip.

The operation is pretty intuitive and burning is easy to understand, though i couldn't figure out how to set up dodging.

I only left a filter in the enlarger while measuring twice! :smile:
 

Svenedin

Member
Joined
Mar 19, 2016
Messages
1,191
Location
Surrey, United Kingdom
Format
Med. Format RF
I'm glad you like it. I waste far less paper using my analyser. It usually gets an acceptable print straight off but I will often make several tweaks. The only time it gets it wrong is if I have chosen the wrong measurement points. F-stop printing is far more logical. I write the details of exposure time, filter grade, paper type and lens stop gently in soft pencil on the back of the print. Then I can make extra copies another time even more easily.
 
OP
OP
rpavich

rpavich

Member
Joined
Aug 24, 2015
Messages
1,521
Location
West virginia, USA
Format
35mm
I'm glad you like it. I waste far less paper using my analyser. It usually gets an acceptable print straight off but I will often make several tweaks. The only time it gets it wrong is if I have chosen the wrong measurement points. F-stop printing is far more logical. I write the details of exposure time, filter grade, paper type and lens stop gently in soft pencil on the back of the print. Then I can make extra copies another time even more easily.
Thanks, ill make that a habit, good idea.
 

Svenedin

Member
Joined
Mar 19, 2016
Messages
1,191
Location
Surrey, United Kingdom
Format
Med. Format RF
PS: I have calibration figures for both a condenser (LPL) enlarger using Ilford above lens acetate filters and a diffuser enlarger (Kaiser) with a multigrade head. I have figures for Kentmere Select (gloss), Fotospeed (oyster), Ilford MGIV (pearl) and Ilford MG warm tone (pearl). All RC. I found there are big differences between the 2 different enlargers and also between papers. Ilford warm tone for example is nearly 1.5 stops slower than standard MGIV at certain grades.
 
OP
OP
rpavich

rpavich

Member
Joined
Aug 24, 2015
Messages
1,521
Location
West virginia, USA
Format
35mm
PS: I have calibration figures for both a condenser (LPL) enlarger using Ilford above lens acetate filters and a diffuser enlarger (Kaiser) with a multigrade head. I have figures for Kentmere Select (gloss), Fotospeed (oyster), Ilford MGIV (pearl) and Ilford MG warm tone (pearl). All RC. I found there are big differences between the 2 different enlargers and also between papers. Ilford warm tone for example is nearly 1.5 stops slower than standard MGIV at certain grades.
Hey, those would be good to have... right?
I'm using a condenser head and ilford MGIV pearl paper.

I found that just making an offset really helped the ilford postcard paper even though it was MGIV also.


IF you wanted to PM me those offsets that would be great. (or post them here)
 
Last edited:
OP
OP
rpavich

rpavich

Member
Joined
Aug 24, 2015
Messages
1,521
Location
West virginia, USA
Format
35mm
Whew!
That first calibration was brutal! I must have ruined 20 pieces of paper for various reasons; forgetting things, pushing the wrong button, forgetting where I was and having to start over...more than a few reasons.
But....I finally got a good set of test strips.

This is Ilford MGIV Post card paper in Pearl. So far I only have the exposure offsets, not the contrast numbers yet. I had to rest my back...I've been at it for 3 hours straight.
IMG_0364.jpg IMG_0365.jpg
 

Svenedin

Member
Joined
Mar 19, 2016
Messages
1,191
Location
Surrey, United Kingdom
Format
Med. Format RF
Well done. It's a bit of a marathon isn't it! These are my figures just to illustrate the difference between different enlargers and different filter systems. It really shows that calibration is vital to get the best from the machine.
 

Attachments

  • IMG_1145.JPG
    IMG_1145.JPG
    821.9 KB · Views: 291
  • IMG_1146.JPG
    IMG_1146.JPG
    805.6 KB · Views: 261

mr rusty

Member
Joined
Sep 7, 2009
Messages
827
Location
lancashire,
Format
Medium Format
forgetting things, pushing the wrong button, forgetting where I was and having to start over

been there, done that. :smile: It's worth it in the end!! You do have to be extremely methodical
 
OP
OP
rpavich

rpavich

Member
Joined
Aug 24, 2015
Messages
1,521
Location
West virginia, USA
Format
35mm
been there, done that. :smile: It's worth it in the end!! You do have to be extremely methodical
Ok...I'm stuck.

I did the step wedge part of if for contrast and I'm not quite sure what I pick for comparison. I THINK that I pick the first light patch that matches the "zone VIII" (lighter) patch, and then pick the darkest patch that corresponds to the "zone III" patch on the patch swatch. Then I take the difference in steps and multiply by 15 to get the contrast.

Does this look normal?
I have descending figures: 150, 150, 135, 105, 90, 75, 60.

Here is a picture of what I got; 00 is on the left, 5 is to the right end.
IMG_0366.jpg


EDITED TO ADD: YES, I GUESS HAVING DESCENDING NUMBERS IS NORMAL.

I just printed a postcard picture and it turned out nice.

Wow...what a work out.
 
Last edited:

R.Gould

Member
Joined
Apr 22, 2010
Messages
1,752
Location
Jersey Chann
Format
Multi Format
Before you get to confused go to the RH designs website where you will find the settings for most common papers, some from users who have calibrated the analyser for themselves, this includes the offset for MGIV, plus there are videos that make calibration simple, 99% of the time the published settings are spot on,I have been using the analyser/pro for at least 10 years and have only had to calibrate mine once, for Foma Varient, If you ever use the Adox remake of the Agfa paper just dial in the settings for Agfa, they are spot on, use them myself, so my best advice is before starting go to RH designs site
 

Svenedin

Member
Joined
Mar 19, 2016
Messages
1,191
Location
Surrey, United Kingdom
Format
Med. Format RF
Your figures make sense to me and seem fine. I found the RH designs figures (R Gould mentions) to be very close indeed to my own calibration figures when I was using a condenser enlarger with Ilford above lens acetate filters (but there were no figures for some of my papers). However, when I moved to my Kaiser diffuser/condenser enlarger with a multigrade head there was a big difference. Stick with it. You are doing well and your test strips look really good.

Attached pic: test strips for Ilford MGIV, pearl. My old (now given away) LPL condenser with Ilford above lens (filter drawer) multigrade filters.
 

Attachments

  • IMG_1147.JPG
    IMG_1147.JPG
    561.8 KB · Views: 333
Last edited:
Photrio.com contains affiliate links to products. We may receive a commission for purchases made through these links.
To read our full affiliate disclosure statement please click Here.

PHOTRIO PARTNERS EQUALLY FUNDING OUR COMMUNITY:


Ilford ADOX Freestyle Photographic Stearman Press Weldon Color Lab Blue Moon Camera & Machine
Top Bottom