PrintSizer - A darkroom printing calculator for Android (beta)

Diner

A
Diner

  • 0
  • 0
  • 10
Gulf Nonox

A
Gulf Nonox

  • 0
  • 0
  • 8
Druidstone

A
Druidstone

  • 4
  • 1
  • 54
On The Mound.

A
On The Mound.

  • 1
  • 0
  • 40
Ancient Camphor

D
Ancient Camphor

  • 5
  • 1
  • 47

Forum statistics

Threads
197,798
Messages
2,764,522
Members
99,477
Latest member
BS Taylor
Recent bookmarks
0

dkonigs

Subscriber
Joined
Sep 17, 2009
Messages
355
Location
Mountain View, CA
Format
Multi Format
I recently started working on an Android app that serves as a printing adjustment calculator. Specifically, it allows you to quickly and easily determine the difference in print exposure times when changing the height of your enlarger.

mGPxKCF.png
ppBr9a1.png


Its capable of working in two modes: calibrated and uncalibrated.

In uncalibrated mode, it simply uses the following formula which I've seen posted around these parts before:
new_time = old_time * (new_magnification + 1)2 / (old_magnification + 1)2

In calibrated model, you give it the height (negative-to-print distance) of your enlarger and exposure time for two matching test exposures at the extremes of your usual printing size range. It then uses the above formula (from both ends) to estimate a midpoint exposure and interpolate the height-to-exposure-time curve for your specific enlarger. It then uses that curve to calculate the new exposure when you change the height of your enlarger. (Those test exposures can be made via actual darkroom work, or via a good enlarger meter. As I have an RH Analyser Pro, I obviously prefer the latter.)

The signup link for the beta version is here:
https://play.google.com/apps/testing/org.logicprobe.printsizer

And the store page is here:
https://play.google.com/store/apps/details?id=org.logicprobe.printsizer

Since this app is entirely open-source as well, the code and some basic descriptions of how it works can be found here:
https://github.com/dkonigsberg/printsizer

(This is actually my first Android app, so I'm hoping it'll motivate me to keep adding more features and perhaps develop other apps in the future as well.)

The inspiration for this project came out of seeing a certain heavily promoted iPhone app, and wondering how it actually worked. (I'm not an iPhone user, nor do I intend to become one.) Despite that app having extensive documentation and promotion on why its useful and what it does, there was almost nothing on how its math actually worked. So I took a whole bunch of measurements with my darkroom equipment, spent a lot of time looking up various formulas, and think I managed to figure it out. Or at least I figured out an approach that seems to get similar results. As I only have one enlarger, there's obviously a limit to how much experimental testing I can really do.

I'd love to make it possible to use a smartphone's ambient light sensor to calibrate the app, but unfortunately its measurements are not repeatable enough (and perhaps also not accurate enough) to be useful at the light levels typical for printing. Its possible it might work better if I opened up the lens aperture all the way, but my enlarger is brighter than average.

In the future, I'd like to also add the ability to convert exposures between different paper stocks. From my reading of paper datasheets and the actual definition of paper ISO(P)/ISO(R), that absolutely seems do-able.
 

MattKing

Moderator
Moderator
Joined
Apr 24, 2005
Messages
52,139
Location
Delta, BC Canada
Format
Medium Format
Bookmarked for when my darkroom is up and running.
Thanks for this work.
 
OP
OP
dkonigs

dkonigs

Subscriber
Joined
Sep 17, 2009
Messages
355
Location
Mountain View, CA
Format
Multi Format
I've just released a new major beta update, which now includes paper profiles!
NQRf6CP.png
hzfzEkq.png


The idea is that you can now also convert exposures between different paper stocks, based on their relative specifications. Furthermore, since the profiles contain contrast range information, it can also recommend equivalent contrast grades. So the above screenshots show that, in addition to a small exposure change, Grade 2 on Ilford's old MGIV RC is actually equivalent to Grade 1 on their new (V) RC paper.

Since its a pain to have to actually hunt down this information, I've also done the grunt work of building a large database of "stock" paper profiles for every paper I could find data for:
aibTA4E.png
ILi5A2a.png


Things are coming along nicely with the app. There are still some bugs I need to iron out with the enlarger/paper profile editors (that only happen during device rotation, or maybe backgrounding the app for a long time), but otherwise its working well.

I'm also in the process of rewriting the algorithm I use for actually computing enlarger profiles, to one that works better with the exposure curves of condenser enlargers. (not going into too much detail on that here)

In any case, one thing I could absolutely use to help refine things is more data. If anyone has a condenser enlarger (or even just a variety of different enlargers) and a high-quality enlarger meter (i.e. RH Analyser Pro, or anything similar with repeatable and consistent readings), then I'm very interested in getting a measured profile of exposure times on your enlarger. (That means measuring the same focused light, across a large range of column heights, at ~10cm increments.)
 

mmerig

Member
Joined
Oct 9, 2012
Messages
202
Location
Teton Valley
Format
Medium Format
Some time ago, I needed accurate magnification data that depended on film height above the easel. I have measurements for this, plus exposure data using an RH Designs Analyzer Pro. The enlarger is an Omega DII with separate condensers. I fit curves for 50-mm, 105-mm, and 150-mm lenses. I can include the exposure data too if you are interested. I think the exposure observations followed the inverse-square law well enough, but I have not looked at it in detail for a while.

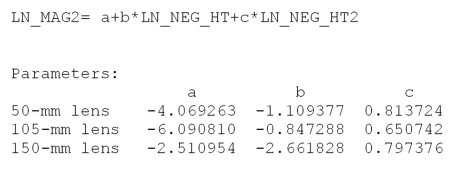
Finding the basic curve function for negative height was a little bit tricky, so I estimated the lens height using the iris location on the barrel, assuming that was close to the front nodal point, and related that to negative height and magnification. Skipping a lot of detail here, the basic equation is:

LN_MAG2= a+b*LN_NEG_HT+c*LN_NEG_HT2

where: LN is the natural log, MAG is magnification, NEG_HT is negative (i.e., film) height, and a, b, and c are estimated parameters
Essentially, the curve in original units is close to a parabola, if magnifications less than 1 are included, and the vertex is at 1:1. It is linear in log space with some squaring.

The fit is nearly perfect (R-squared > 0.9999). The curve error is about 1 mm, which is as close as I can measure the height itself. There is more error around 1:1 mag, as the lenses are hard to focus at this magnification. I would rather have left out the second term (b*LN_NEG_HT) because it is less theoretical, but the curve fits much better with it, and the b-parameter is highly statistically significant (p < 0.0002) for the 50 mm and 150 mm curves, but less so for the 105-mm (p = 0.155). From an empirical, ordinary-least-squares point of view, the second term should be included when the higher-order, third term is included.

Here are the results with a point estimate at mag = 2 for each focal length:
Parameters.JPG

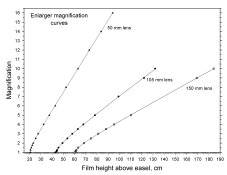
Here is a graph showing the observed points and fit curves for the three lenses:

Enlarger Curves.jpg

Getting film-height observations between 120 and 160 cm for the 150-mm lens was inconvenient, so I skipped them.

The equation can be transformed back into the original units, but I find it easier to use the linear equation and convert the observed data into logs of the observations and squares of the logs.

Intuitively, I think there may be a much-simpler equation that fits just as well or better, but this one worked very well so I stuck with it. It's easy enough to do the calculations I need in a spreadsheet.

Perhaps the most important, practical aspect is that for a wide range of magnifications, the line is nearly straight, and the equation is much more complex than it needs to be for most uses.

I hope this helps. I could post the exposure stuff too.
 
OP
OP
dkonigs

dkonigs

Subscriber
Joined
Sep 17, 2009
Messages
355
Location
Mountain View, CA
Format
Multi Format
Some time ago, I needed accurate magnification data that depended on film height above the easel.

I actually figured this part out relatively early in the whole process of working on this project.

The formula for magnification-to-height is:
h = (f*(m+1)^2)/m
Where:
h = negative height above the baseboard
f = focal length of the lens
m = magnification


Flipping this formula around, gave me:
m = (sqrt(h * (h - 4*f)) - (2 * f) + h) / (2 * f)

Now the "ideal" relationship between magnification and exposure time is given by the formula:
Tnew = Told * (Mnew + 1)2 / (Mold + 1)2
Where:
Told = original print exposure time
Mold = original print magnification
Tnew = new print exposure time

Tnew = new print magnification

The challenge is that enlargers don't always follow this ideal formula. So what my app tries to do, is to approximate the "actual" relationship based on data from a couple of test exposures.

Anyways, what I'm looking for is more test data to better refine and validate the methods my app is using to accomplish that. So far my only data sources are from my own enlarger (with an RH Analyser), a friend's enlarger (with less accurate/reliable meters), and comparisons against another app that's trying to accomplish the same goal.

So here's the process I'm looking to gather data on:
For a given lens and aperture, repeat the following steps across a wide range of heights from near the bottom of the enlarger column to near the top:
  • Note the negative-to-baseboard distance
  • Focus the enlarger (can be done with an actual negative)
  • Remove the negative (unless its one with a large solid color you can find at any height), and make sure there are no filters or anything else in the light path. Putting the carrier back in will help reduce light spill.
  • Use your enlarger meter to measure the exposure time.
  • Write down the height and time numbers
  • Move the head up ~10cm, and repeat
With data from about a half-dozen enlarger heights, I can then plot the "actual" height-to-exposure curve for that enlarger. Then, I can see how closely the various methods at my disposal are able to predict the values of those intermediary points.

Finally, if I can get measurements from a real negative at two different heights on the same enlarger, I can see how accurately I can predict the new exposure time when going from one to the other.
 

mmerig

Member
Joined
Oct 9, 2012
Messages
202
Location
Teton Valley
Format
Medium Format
Can you please tell me where you found the formula for negative height to magnification?

Also, your re-arranged (flipped-around) formula has some un-paired parentheses. I played around with it a little, but could not get it to match real data - not even close - with the options I tried, but I did nit try that hard..

Thanks.
 
OP
OP
dkonigs

dkonigs

Subscriber
Joined
Sep 17, 2009
Messages
355
Location
Mountain View, CA
Format
Multi Format
Can you please tell me where you found the formula for negative height to magnification?

Also, your re-arranged (flipped-around) formula has some un-paired parentheses. I played around with it a little, but could not get it to match real data - not even close - with the options I tried, but I did nit try that hard..

Thanks.

There are no missing parenthesis in that formula. I literally copy-pasted it from my post into a program, and it compiled with no complaints. I then double-checked, and it exactly matches the un-flipped-around version.

That being said, if you'd like to visualize it, here's the same formula in an online graphing calculator:
https://www.desmos.com/calculator/qchcufphdz

When I tried comparing my numbers to your graph, they were actually very close. The small amount of error could either be due to measurement errors, or the fact that the formula doesn't take into account the "principal point separation" of the lens (which I've seen at least one post make mention of). This extra variable is often hard to track down, but doesn't seem to go beyond +/- 5mm at most (so its only a small correction to the height result).

While I've found these formulas in many scattered forum posts, they're also quite concisely written and illustrated in the book "Way Beyond Monochrome."
The book's website is:
http://www.waybeyondmonochrome.com/WBM/Welcome.html

And if you look at this supporting PDF:
http://www.waybeyondmonochrome.com/WBM/Library_files/TemplatesEd2.pdf
You can find them on pages 5 and 6.

The flipped around versions might not look identical to mine, but produce exactly the same results. (just possibly with different irrelevant input constraints)
 

mmerig

Member
Joined
Oct 9, 2012
Messages
202
Location
Teton Valley
Format
Medium Format
There are no missing parenthesis in that formula. I literally copy-pasted it from my post into a program, and it compiled with no complaints. I then double-checked, and it exactly matches the un-flipped-around version.

That being said, if you'd like to visualize it, here's the same formula in an online graphing calculator:
https://www.desmos.com/calculator/qchcufphdz

When I tried comparing my numbers to your graph, they were actually very close. The small amount of error could either be due to measurement errors, or the fact that the formula doesn't take into account the "principal point separation" of the lens (which I've seen at least one post make mention of). This extra variable is often hard to track down, but doesn't seem to go beyond +/- 5mm at most (so its only a small correction to the height result).

While I've found these formulas in many scattered forum posts, they're also quite concisely written and illustrated in the book "Way Beyond Monochrome."
The book's website is:
http://www.waybeyondmonochrome.com/WBM/Welcome.html

And if you look at this supporting PDF:
http://www.waybeyondmonochrome.com/WBM/Library_files/TemplatesEd2.pdf
You can find them on pages 5 and 6.

The flipped around versions might not look identical to mine, but produce exactly the same results. (just possibly with different irrelevant input constraints)

Your are correct- Even though I copied and pasted your equation directly, somehow I missed how two of the parentheses matched-up. After fixing it, I get reasonably close numbers now. Thank you.

But the discrepancies are beyond measurement errors, which are close to a mm. I don't think they matter much for your purposes, but I needed precise magnification estimates because I am using the field of views, partly based on the magnification values, with a terrain model of the photographed scenes. As you say, your transformed equation looks different than the one on Way Beyond Monochrome (which I have),so what you posted looked unusual.

For my work, I started with a simpler formula, (m = (lens ht above easel - focal length)/focal length, and as I recall, I saw a systematic error with formula results and observations. I corrected as best I could as to where the front nodal point was (within a few mm at worst); this is related to the principal point separation you mention above, and I knew this for one of my lenses. All I could think of at the time was that focal length is not really constant across a wide range of distances, so I used my actual measurements and fit the curve to them, and did not try to rectify the problems with the published equations. Another factor is that the equations are for thin lenses, and the multi-element lenses commonly used may not model the same -- I am not sure about this though, and it has been months since I did the observations and really thought about this.

As I am sure you know, super-precise magnification is not that important for exposure calculations. I do have exposure-to-negative height data around somewhere. When I get time, I will post it, or send it as a file to you if you like. I also have calibration curves for three Ilford papers (similar to what Ilford has, but different enough). I am shifting to the new Ilford Multi-grade paper, so will have a curve for that too.

Thanks again for taking the time to correct me, and I will do the best I can to get you some data.
 
OP
OP
dkonigs

dkonigs

Subscriber
Joined
Sep 17, 2009
Messages
355
Location
Mountain View, CA
Format
Multi Format
As I am sure you know, super-precise magnification is not that important for exposure calculations. I do have exposure-to-negative height data around somewhere. When I get time, I will post it, or send it as a file to you if you like. I also have calibration curves for three Ilford papers (similar to what Ilford has, but different enough). I am shifting to the new Ilford Multi-grade paper, so will have a curve for that too.

Thanks again for taking the time to correct me, and I will do the best I can to get you some data.

Thanks! I'd love to collect as much data as I possibly can. Right now I can only validate my code against my own enlarger, and numbers from another app with similar functions.

I've actually done calibration for a few paper/filter setups myself (Ilford RC MGIV and the new MG V) for my RH Analyser Pro. While this calibration is absolutely important when setting up an enlarger meter, I'm not entirely sure if its important for the purposes of this app. For what this app does, its really the difference between papers that matters more than the absolute sensitivity. So while you could absolutely contrive circumstances where there would be more variation than different datasheet numbers would imply, I'm not sure how likely that is under the typical situation. (As far as contrast, I currently only use it to recommend grade changes between paper stocks, so a similar situation.)
 
OP
OP
dkonigs

dkonigs

Subscriber
Joined
Sep 17, 2009
Messages
355
Location
Mountain View, CA
Format
Multi Format
Just released a new beta update (v0.3.0), which now includes the ability to calculate burn/dodge exposures! I've included the ability to specify a burn/dodge amount in seconds, as a percentage, or in stops. I figure everyone has their preferred method, sometimes even varying from case to case, so it made sense to include them all.

CxH0kml.png


Still may have a few kinks to work out around improving the user experience when switching between them in the input dialog (not shown here), but overall everything seems to be in place now.

My plan with this project from here on out is to spend some time cleaning up the remaining rough edges (some of which are things you might not even notice as an average user, but Google Play will still warn me about), and then to get a public release out. I don't think there are any more features that need to be there for that first release, unless anyone here has suggestions I haven't thought of yet.
 
Photrio.com contains affiliate links to products. We may receive a commission for purchases made through these links.
To read our full affiliate disclosure statement please click Here.

PHOTRIO PARTNERS EQUALLY FUNDING OUR COMMUNITY:


Ilford ADOX Freestyle Photographic Stearman Press Weldon Color Lab Blue Moon Camera & Machine
Top Bottom