Yes, I know, they're gimmicky, visually jarring, and all that. Still, I have some 35mm exposures from my Holga where there sprocket holes and rebate are also exposed. And I'd like to print some of these (in color). Could it be as simple as placing the 35mm frame into a 120 holder? I think I'd want to mask off the top and/or bottom edges, but how? Black construction paper and tape, or is there a more clever way, perhaps? Also -- not sure how to phrase this -- but will the light bleeding through the open holes cause any exposure problems? I'm using glassless carriers in an Omega C760 enlarger. Thanks.
-
Welcome to Photrio!Registration is fast and free. Join today to unlock search, see fewer ads, and access all forum features.Click here to sign up
You are using an out of date browser. It may not display this or other websites correctly.
You should upgrade or use an alternative browser.
You should upgrade or use an alternative browser.
Printing Sprocket Holes
-
A
- Thread starter bvy
- Start date


Recent Classifieds
-
For Sale RB67 and Graflex odds & ends
- Started by OrientPoint
-
For Sale New Old Stock Case for 120/220 Rolleflex 3.5F
- Started by binglebugbob
-
For Sale 4 vintage 35mm metal film canisters: Ilford, Kodak, Ansco, Adox
- Started by Jon Shiu
-
Sold SOLD! RW Vacuum Fidelity Elite 4x5 (5 units) & 8x10 (4 units) Film Holders
- Started by B.S.Kumar
-
Sold Cable Release Adapters for Leica, Nikon, Yashica, Rollei
- Started by Jon Shiu
Forum statistics
If you can use a glass carrier, or sheet of glass it is better. That keeps the film form flexing and going out of focus. Also, easier to mask.
Jon
Jon
- Joined
- Feb 9, 2010
- Messages
- 9,559
- Format
- 4x5 Format
You're doing dirty borders, no sense making them clean. Use the cheapest chipboard like Diane Arbus, maybe the edges of a box of paper. Then when they go to print your retrospective there will be no way to duplicate the result perfectly.
Use two sheets of thin, good quality, clear glass. At least one sheet can be anti-newton glass if you can get it. Anti-newton is not strictly necessary but helpful.
Use two pieces of thin, opaque material like construction paper. Cut them into two "L" shapes, like corners of a picture frame. Position them to mask off the negative. Use tape to carefully tape everything down, if necessary.
Make a "glass sandwich" with your film and carefully trap it in the gate of your enlarger.
Don't let your enlarger slam shut or else... "CRACK!"
I have two sheets of clear glass, 6" x 6", which I bought just for the purpose.
The sprocket holes and outside edges of the aperture where there is no film shouldn't cause trouble unless you have too much light spillage. That's what the masking is for.
Carefully done, those areas will just come out "dead black" like the way a contact sheet looks.
Last edited by a moderator:
Holga negatives - flat - masked - ???
Nooo, nooo. Eschew a negative carrier altogether. Just push the strip into the gaping maw of the enlarger. Or as Bill suggests, make a carrier from ripped cardboard.
Now as for the enlarging lens, you need something like a plastic Isco lens, maybe a Fedar or Testrite. But even these have too many elements. I mean, how many elements does a Holga have? One, right. So it must be with the enlarging lens. So either remove the retaining rings from the lens and get rid of all those pesky extra elements (leave behind a positive one). Or just take a star drill and break out those superfluous surfaces - the scratches on the left-behind element will just add to the je ne sais quoi.
Hmmm ... maybe that third cup of espresso at breakfast was a mistake ...
I have also tried this effect, but I use a glass-carrier for medium-format and having adjustable film guides to hold 35mm film in the centre of the field. The carrier also has built-in masking devices on all four sides. Does the Omega have no masking arms? I appreciate Meopta and De Vere even more these days!
If you can replace the top part of the neg-carrier with a piece of thin polycarbonate (sold as secondary glazing, by the square metre/foot) it would help enormously to keep the film flatter, as the curve is usually "up" in the centre of the strip. Masking could then be black paper taped to the top of the plastic. If you are doing this as an infrequent thing, then there is no point seeking out thin and difficult to work with optical glass to make the carrier - and I won't mention the non-Carl Zeiss abilities of the Holga lens
If you can replace the top part of the neg-carrier with a piece of thin polycarbonate (sold as secondary glazing, by the square metre/foot) it would help enormously to keep the film flatter, as the curve is usually "up" in the centre of the strip. Masking could then be black paper taped to the top of the plastic. If you are doing this as an infrequent thing, then there is no point seeking out thin and difficult to work with optical glass to make the carrier - and I won't mention the non-Carl Zeiss abilities of the Holga lens
Last edited by a moderator:
For the roll you just developed of mine, I'm planning on using my 6x6 carrier and tape some black cardstock on the sides to mask it down a little. I might use the other enlarger and use the glass carrier, but I don't know if I need to. I'm not that concerned with flatness and the same quality I am with other rolls. (yes, I'm doing them as B&W and also using "other" methods for color).
OP
OP
Thanks, Bethe, everyone. I think I will look at glass carriers, actually, although I appreciate that if I'm careful and the film isn't too curled, that I might be able to get away with a 6x6 carrier and some clever masking.
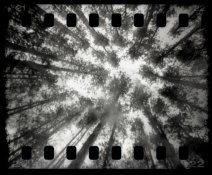
Yes, I do have the "non-Carl Zeiss" Holga (!). But actually, I probably have just as much 35mm from pinhole and homemade cameras, where the exposure also cover the edges. I uploaded an example (Tri-X, in this case, from a homemade pinhole camera) to show an example of what I'm trying to print.
Yes, I do have the "non-Carl Zeiss" Holga (!). But actually, I probably have just as much 35mm from pinhole and homemade cameras, where the exposure also cover the edges. I uploaded an example (Tri-X, in this case, from a homemade pinhole camera) to show an example of what I'm trying to print.
Attachments
Go to the glass shop or hardware store and get two pieces of glass as worker suggested. It should cost a couple of bucks. If you want to mask, great, but you won't really need to. A little stray light isn't going to reduce the contrast noticeably on a holga  All that said, try the med format carrier. It might make the edges less focussed, but is that really a big deal here? It may enhance the look you want. The best way to learn about photography isn't asking a bunch of people on the internet the best way to do something, but trying it yourself and seeing what happens......at least that is true for me!
All that said, try the med format carrier. It might make the edges less focussed, but is that really a big deal here? It may enhance the look you want. The best way to learn about photography isn't asking a bunch of people on the internet the best way to do something, but trying it yourself and seeing what happens......at least that is true for me!Go to the glass shop or hardware store and get two pieces of glass as worker suggested. It should cost a couple of bucks.
Exactly what I did. Two pieces 6" x 6", edges sanded, cost $12.00.
OP
OP
Go to the glass shop or hardware store and get two pieces of glass as worker suggested. It should cost a couple of bucks. If you want to mask, great, but you won't really need to. A little stray light isn't going to reduce the contrast noticeably on a holga
Okay -- I'll try the glass sandwich. I didn't quite understand the first time through. As far as asking questions, you're preaching to the choir. A little bit of research informs my experimentation. But your point is taken -- less talk and more action...
Don't forget to check that the flat pieces of glass, which are suggested, can replace the usual neg carrier without getting crunched or cracked by whatever mechanical arrangement positions and locates the standard carrier.
If there are grooves or castings to line-up with grooves in the normal (often alloy or steel) carrier then they would need to be safe for bearing down on the glass too. Some enlargers use the weight of the lamphouse to hold the neg-carrier securely and might crack the glass if the pressure is not evenly supported.
If there are grooves or castings to line-up with grooves in the normal (often alloy or steel) carrier then they would need to be safe for bearing down on the glass too. Some enlargers use the weight of the lamphouse to hold the neg-carrier securely and might crack the glass if the pressure is not evenly supported.
- Joined
- Feb 9, 2010
- Messages
- 9,559
- Format
- 4x5 Format
Exception to the rule, you can take a sharp negative and create a unique pictorial effect with a simple lens at the enlarger.
I have two shots, 4x5 prints, from a Ricohflex TLR where I printed using a simple lens and the mood is awesome. Note, I used crisp borders, and no edge markings for the prints, so there was no telltale sign of lousy optics. I always blamed the camera for the soft edges, until I found the original negatives which are sharp as a tack (relatively considering the character of Ricohflex optics).
I have two shots, 4x5 prints, from a Ricohflex TLR where I printed using a simple lens and the mood is awesome. Note, I used crisp borders, and no edge markings for the prints, so there was no telltale sign of lousy optics. I always blamed the camera for the soft edges, until I found the original negatives which are sharp as a tack (relatively considering the character of Ricohflex optics).
Okay -- I'll try the glass sandwich. I didn't quite understand the first time through.

Don't forget to check that the flat pieces of glass, which are suggested, can replace the usual neg carrier without getting crunched or cracked by whatever mechanical arrangement positions and locates the standard carrier.
If there are grooves or castings to line-up with grooves in the normal (often alloy or steel) carrier then they would need to be safe for bearing down on the glass too. Some enlargers use the weight of the lamphouse to hold the neg-carrier securely and might crack the glass if the pressure is not evenly supported.
Yes! Careful! My Beseler's stage is flat and only held shut only by spring pressure. My Omega's stage is held shut by the weight of the lamphouse and condenser. It's heavy! If I let the stage close SLOWLY it's all right. If I let the springs snap or the condenser come crashing down it WILL shatter the glass.
OP
OP
Thanks, worker. One question: In your diagram, are you applying tape directly to the film? I hadn't thought of that. (Certainly it's not the emulsion side...)
I believe my Omega (like yours) uses the weight of the head/lamp to hold the carrier in place. I'll heed your words of caution!
I believe my Omega (like yours) uses the weight of the head/lamp to hold the carrier in place. I'll heed your words of caution!
Use tape at your discretion. The emulsion would be face down on the glass so the tape would only contact the base.
If you don't think you need it, don't use it. If you do need it use drafting tape or Permatex or similar. I suppose painter's tape would work in a pinch.
I wouldn't use Scotch tape or ordinary masking tape.
The way I drew it was just for purpose of illustration. Locate the tape where you think it best. Maybe only on the edges.
I've done it on the Beseler a couple of times. No problem there. Just close the gate slowly.
I've only tested it on the Omega. I seriously cringed as I lowered the lamp onto the glass... slowly... but it does work. Just be damn careful!
Just thought of this: Maybe, you could use a donut of cardboard or poster board between the top sheet of glass and the lamp/condenser to act as padding.
Last edited by a moderator:
| Photrio.com contains affiliate links to products. We may receive a commission for purchases made through these links. To read our full affiliate disclosure statement please click Here. |
PHOTRIO PARTNERS EQUALLY FUNDING OUR COMMUNITY:  |