Print drying rack, any ideas, anyone?

Rebel

A
Rebel

  • 0
  • 0
  • 18
Watch That First Step

A
Watch That First Step

  • 0
  • 0
  • 23
Barn Curves

A
Barn Curves

  • 0
  • 0
  • 20
Columbus Architectural Detail

A
Columbus Architectural Detail

  • 1
  • 1
  • 19
img421.jpg

H
img421.jpg

  • Tel
  • Apr 26, 2025
  • 1
  • 2
  • 32

Forum statistics

Threads
197,484
Messages
2,759,792
Members
99,514
Latest member
cukon
Recent bookmarks
0

dphphoto

Member
Joined
Jan 1, 2004
Messages
349
Location
Knoxville, T
Format
Multi Format
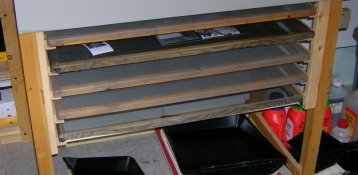
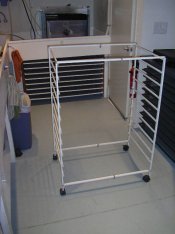
Hi all. I'd like to build a simple print drying rack, large enough to hold at least 10 or 12 16X20's. I've searched around the internet and can't seem to find any plans. Does anyone have any ideas?
My carpentry skills aren't the greatest, but we're not talking fine furniture here. I was thinking of a wood frame, with slots to hold the racks, finished with marine paint, and using window screens (?). It wouldn't need wheels, but maybe levelling feet would be nice.
If anyone has any ideas, please let me know. Thanks, Dean
 

unregistered

Member
Joined
May 4, 2006
Messages
290
Format
Multi Format
That's basically what I use, although I had the screens custom made so I could get maximum amount of usage for the different size of prints (8x10 to 20x24). They ended up about 6' long and 27" wide. I then got some metal "U" shaped aluminum, which the screen edges would slide in, and attached those to wood legs, spaced about 3 inches apart (its all hard to describe). The unit fits under the sink. When I want quicker drying, I put a box fan on one end and turn it on to circulate the air more. Don't need the leveling...nothing going to roll off :smile:
 

Curt

Member
Joined
Sep 22, 2005
Messages
4,620
Location
Pacific Nort
Format
Multi Format
Really Really simple? In college I got some fiberglass window screening and stretched out between two chairs. When done I just cleaned it, dried it, then rolled it up and stored it away.
 

agGNOME

Member
Joined
Aug 22, 2005
Messages
217
Location
New Orleans,
Format
Multi Format
Really simple construction: go to any art crafts store and buy sets of wood canvass stretcher boards in any common dimensions you like. They have 45 degree angles at the ends; piece together and staple with a staple gun (even a regular stapler is strong enough).
Buy a roll of fiberglass screen at hardware or home improvement store...cut to size, stretch and staple to boards. That should get you started; you can design a rack to suit your needs.
 

Monophoto

Member
Joined
Aug 27, 2004
Messages
1,690
Location
Saratoga Spr
Format
Multi Format
I built a set - really quite simple. Bought some 1x2" clear pine, and sawed it in half to make two pieces of 1x1" (actually 3/4" by 3/4"). Used those to make a rectangular frame. I used a butt joint reinforced with a metal plate (from the hardware store) on the bottom, but if you are persnickety you could use a lap joint. Sanded lightly, and then applied several coats of polyurethane varnish. Finally, used a staple gun to attach fiberglass screening to the frame, and put some rubber "feet" on the bottom. The individual screen frames were sized to allow four 11x14" prints to be layed out on the screen without actually lying over the wooden frame (ie, the inside dimensions of the frame were 22" by 18" or greater).

Then, I made a rack that fits under my sink. I bought some pine "outside corner guard" moulding that I attached to the legs of the sink to form tracks that the screens slide into. Here's a picture of what the final setup looks like.
 

Attachments

  • Print drying small.jpg
    Print drying small.jpg
    40.3 KB · Views: 1,298

Paul Howell

Subscriber
Joined
Dec 23, 2004
Messages
9,499
Location
Scottsdale Az
Format
Multi Format
agGNOME said:
Really simple construction: go to any art crafts store and buy sets of wood canvass stretcher boards in any common dimensions you like. They have 45 degree angles at the ends; piece together and staple with a staple gun (even a regular stapler is strong enough).
Buy a roll of fiberglass screen at hardware or home improvement store...cut to size, stretch and staple to boards. That should get you started; you can design a rack to suit your needs.

I did the same thaing but then hot glued 1 inch spacers so I can stack them on my patio. In the dry desert air double wt prints will dry in a 1/2 hour or so. When not in use they store in my utility room.
 

ann

Subscriber
Joined
Sep 10, 2002
Messages
3,337
Format
35mm
made something similar to monophoto, except for the screens, just got some from Home Depot and made the rack to fit the specific size.

every few years you can replace the fiber glass, easy and slick as can be
 

Eric Mac

Member
Joined
Oct 16, 2004
Messages
118
Location
City by the
Format
35mm RF
You could go to your local neighborhood hardware store and see if they have any unclaimed repaired window screens. I got 3 or 4 for the price of the repair.

Eric
 

agGNOME

Member
Joined
Aug 22, 2005
Messages
217
Location
New Orleans,
Format
Multi Format
Paul Howell said:
I did the same thaing but then hot glued 1 inch spacers so I can stack them on my patio.

Good idea with the spacers. For drying I place three screens across the top ledges of a bath tub, and above I added a second curtain rod that allows another three screens to be suspended.
 

ron mcelroy

Member
Joined
Dec 13, 2003
Messages
60
Location
memphis
Format
4x5 Format
Okay I'll offer a different solution. I made the frames of my drying screen out of 1/2inch PVC water pipe and 90 degree elbows. I assembled the frames with PVC glue and then used the same glue to attach nylon window screen. The frames are stored on wire stretched between the legs of a table in the darkroom. I take them outside a couple of times a year and wash them without worrying whether the frames will warp.
 

djkloss

Subscriber
Joined
Oct 17, 2004
Messages
731
Location
Cambridge Springs, PA
Format
Multi Format
I made mine out of wooden screen window frames and staple the screen to them. (using nylon screening - not the metal kind -) I put hinges on them and mounted them on the wall so they'd be horizontal and put an s-hook on the end of a cord hanging from the ceiling which holds them up when in use, and they lay down vertically when not in use.
 

firecracker

Member
Joined
Jan 22, 2005
Messages
1,950
Location
Japan
Format
35mm
Monophoto said:
I built a set - really quite simple. Bought some 1x2" clear pine, and sawed it in half to make two pieces of 1x1" (actually 3/4" by 3/4"). Used those to make a rectangular frame. I used a butt joint reinforced with a metal plate (from the hardware store) on the bottom, but if you are persnickety you could use a lap joint. Sanded lightly, and then applied several coats of polyurethane varnish. Finally, used a staple gun to attach fiberglass screening to the frame, and put some rubber "feet" on the bottom. The individual screen frames were sized to allow four 11x14" prints to be layed out on the screen without actually lying over the wooden frame (ie, the inside dimensions of the frame were 22" by 18" or greater).

Then, I made a rack that fits under my sink. I bought some pine "outside corner guard" moulding that I attached to the legs of the sink to form tracks that the screens slide into. Here's a picture of what the final setup looks like.

Mine is similar to this, too. I used 1x1"s (spruce) for the frames/screens, and 1x4"s for the rack. Each screen is big enough to put a 16x20" sized print (or two 11x14"s), and I have six of them in total. I could make more if I needed.

To make this you don't need any exceptionally high carpentry skills (I don't have any), but you just come up with a design and a few tools such as a hand saw, a screw-gun, and a sanding device.

Also I have one huge left-over aluminum window-frame that I got from a local window-frame shop for free. Maybe you can check the store(s) near you and see if they have something to throw away first. :smile:
 

Mike A

Member
Joined
Jan 14, 2005
Messages
320
Location
Yorkville, I
Format
ULarge Format
This is what I use,Dead Link Removed they stack up nicely and can be put together in nothing flat.

Mike
 

Ed Sukach

Member
Joined
Nov 27, 2002
Messages
4,517
Location
Ipswich, Mas
Format
Medium Format
I once saw some really interesting plans for a drying "rack" in Camera and Darkroom.

It was constructed of a common "window shade" roller mechanism, with the standard shade cut and nylon window screening substituted in its place, with a stretcher bar and hook. The shade was mounted to work horizontally over the bench. In use, simply draw the shade out and hook it to the opposite wall - or whatever. When the prints are dry, simply unhook it and retract the screening out of the way.

You know .... I've gotta try that!!
 

Paul Howell

Subscriber
Joined
Dec 23, 2004
Messages
9,499
Location
Scottsdale Az
Format
Multi Format
that is really nifty idea and is it cheap, cheaper than the canvas strecher and fiberglass screen that I used. Do they stack on top of the other?
 

kdanks

Member
Joined
Nov 26, 2005
Messages
48
Location
Burley, New
Format
35mm RF
I've never come across window screens here in the UK, so I'm wondering what I could use instead. From the descriptions above it sounds like a flexible material with a fine mesh. Is it as thin and flexible as net curtain material?

Kevin
 

firecracker

Member
Joined
Jan 22, 2005
Messages
1,950
Location
Japan
Format
35mm
kdanks said:
I've never come across window screens here in the UK, so I'm wondering what I could use instead. From the descriptions above it sounds like a flexible material with a fine mesh. Is it as thin and flexible as net curtain material?

Kevin

The window screen material I use is fiber-glass, not nylon for sure, and it's very cheap and widely available here in Japan.
 

Bob Carnie

Subscriber
Joined
Apr 18, 2004
Messages
7,734
Location
toronto
Format
Med. Format RF
Hi There

I went to a window glass company and had them make me screens to the sizes I want, I would suggest if you want to hang 16 x20 prints I would make the inside of the screen 20 x 40.This will allow you to put 2 16x20s at once on each screen . I use a bottom and top with the emulsion up for drying. Make as many as you need.

Go to a building supply store, that has the closet shelving units. they are approximately 30inches x up to 8 ft long, they make smaller sizes as well. With a hack saw you can custom fit them into odd spaces.
You can then attach them to a free wall starting at the bottom and building up every 16inches or so. they have arms for support along the length of the shelving, the shelving is thick wire covered with plastic , it is lightweight and easy to install. Depending upon your space you could store as many prints as you like. My set up can handle up to 40-50 16x20s at a time.
Two prints are squeeged up at a time on the rack and it is then placed on the shelving units. By spacing the screen sandwiches out you can easily dry over night as many prints as your wall or space can handle.

I found that making a stacking drying system *one set of prints directly over another set of prints* did not give the prints room to breathe. One it did not dry the prints properly and sometimes if the humidity was high an extremely long time to get prints ready for finishing with some of the prints showing ugly water marks and excessive waviness.
 

JBrunner

Moderator
Moderator
Joined
Dec 14, 2005
Messages
7,432
Location
PNdub
Format
Medium Format
I have a runners with window screens made to size fit under one of my benches, much like other have mentioned, but I also have screens just a little smaller that fit inside the screens, that sit on top of the print as it dries, and they come out pretty flat.

After I totally flatten them in my dry mount press, they seem to stay that way better than before I did it this way.
 

ROL

Member
Joined
Oct 27, 2005
Messages
796
Location
California
Format
Multi Format
Dean,

All the above suggestions will get you there - it's just not rocket science. You can make screens up yourself, but take it from personal experience doing more than 1 or 2 and trying to get them flat will probably convince you otherwise. However, if you'd like an easy solution, I would offer you the setup I made before I designed my darkroom, below cost. It consists of 24 X 30 inch Calumet Zone VI Drying Screens and a wheeled, movable ClosetMaid enameled metal rack. The rack is made up of 2 separate drawer racks ordered from Home Depot and combined in such away to fit the 30 inch width of the screens. This "ladder" structure holds 11 screens total. The whole thing is light enough (a few lbs.) to be moved either by rolling or picking it up to any location you wish. My darkroom needs were satisfied before I ever used the setup. No part of it was ever used and the screens (3 boxes of 4 screens - 12 total) are still in their original boxes. The screens, though not cheap, are on a par with what regular pre-made fiberglass window screens (which the Zone VI actually are) of that size would cost. I will offer you the 3 boxes of screens at cost ($44 X 3 = $132) and throw the rack in for free (it was around $50) - you pay shipping.

PM or email ben@rangeoflightphotography.com , if interested - Ben
 

Attachments

  • IMGP0912.jpg
    IMGP0912.jpg
    56.7 KB · Views: 453
  • IMGP0913.jpg
    IMGP0913.jpg
    54.6 KB · Views: 307

Louis Mutch

Member
Joined
Jan 17, 2005
Messages
17
Location
Mississippi,
Format
Multi Format
Just string a wire and get some cloths pins. I have been hanging my prints for a couple of years now and it works for me. Don't forget to weight the bottom with cloths pins to minimize curling.
 

jeroldharter

Member
Joined
Nov 6, 2005
Messages
1,956
Location
Wisconsin
Format
4x5 Format
If I were to use screens again, I like the setup by ROL below.

However, they are a pain. You have alot of surface area to keep clean and dust free. I have had print surfaces embossed with the pattern of the screen. Putting wet 16 x 20 prints on the bottom screens is annoying. You can pull the screen out but some dust gets into the air. The screen rack takes up floor space.

I gave up on them and now use a vinyl covered clothelines with clamps and have no problems any more. I reclaimed about 12 square feet of floor space in the process.
 

hortense

Member
Joined
Jun 17, 2004
Messages
611
Location
Riverside, C
Format
Large Format
If you're cramped for space try hinging them to the wall so they can hange by a chain. I used fiber screen in a frame.
 
OP
OP
dphphoto

dphphoto

Member
Joined
Jan 1, 2004
Messages
349
Location
Knoxville, T
Format
Multi Format
Thanks to everyone for their suggestions. I like the sweater rack, would never have thought of it myself.
I have a week off next week and no real vacation plans. I'll pursue this project, and if I come up with something I'll post the results. Dean
 
Photrio.com contains affiliate links to products. We may receive a commission for purchases made through these links.
To read our full affiliate disclosure statement please click Here.

PHOTRIO PARTNERS EQUALLY FUNDING OUR COMMUNITY:


Ilford ADOX Freestyle Photographic Stearman Press Weldon Color Lab Blue Moon Camera & Machine
Top Bottom