Print dryer - get the @#$%! Canvas off?

Waiting

A
Waiting

  • 0
  • 0
  • 6
Westpier

A
Westpier

  • 0
  • 0
  • 10
Westpier

A
Westpier

  • 0
  • 0
  • 11
Morning Coffee

A
Morning Coffee

  • 3
  • 0
  • 50

Recent Classifieds

Forum statistics

Threads
197,578
Messages
2,761,386
Members
99,406
Latest member
filmtested
Recent bookmarks
0

M Carter

Member
Joined
Jan 23, 2013
Messages
2,147
Location
Dallas, TX
Format
Medium Format
Inherited one of those canvas flipper-dryers... played with it a bit for flattening prints, looks pretty handy so far.

Many people recommend washing the canvas - has anyone ever removed the canvas from one? Mine looks more dusty-grungy than chemical stained, but could use a wash. Got any tips for me? I fiddled with it a bit but it looks like disassembly time!

Bonus question: what's best practices for fiber paper? Should it be cool when the print is placed? Temp and time? I'm not into glossy so I'll be emulsion-up. I might experiment with blotter paper of a fresh sheet of canvas between the paper and the canvas, the canvas on one side has a pill or two that might transfer to the prints.
 

adelorenzo

Member
Joined
Mar 10, 2012
Messages
1,421
Location
Whitehorse, Yukon
Format
4x5 Format
I'm not sure about yours but on mine the wire frames just pop out of the sides of the dryer. Then you can thread the canvas off them.

Any time I tried the "glossy side down" technique the print just stuck to the metal. Maybe I'm doing something wrong but it always had to be face up for me with any paper.

I stopped using mine because I'm worried about print contamination.
 

Sirius Glass

Subscriber
Joined
Jan 18, 2007
Messages
50,155
Location
Southern California
Format
Multi Format
I have an Arkay Drum Print Dryer and the canvas apron was stained. I bought a new one from Joboman@aol.com, Dave and Norma Smith. I had to remove both sides to change out the canvas apron.
 

Rick A

Subscriber
Joined
Mar 31, 2009
Messages
9,852
Location
Laurel Highlands
Format
8x10 Format
Kodak no longer supplies glossing agent for ferrotyping prints, however you can use "Renaissance" brand of wax to polish the plates for a nice finish. I never turn the heat up above medium on my dryers, and only long enough to warm them up prior to drying. I turn them off and squeegee the print onto the plate face down for glossy, face up for a more natural finish. The canvas should be easy enough to remove and wash. I would stretch the canvas back on the machine while wet and let dry as it may shrink some.
 

bdial

Subscriber
Joined
Jan 2, 2005
Messages
7,443
Location
North East U.S.
Format
Multi Format
+1 on what Rick suggests for the canvas, if you dry it first it may be very difficult to fit back onto the print dryer.
 

Sirius Glass

Subscriber
Joined
Jan 18, 2007
Messages
50,155
Location
Southern California
Format
Multi Format
Car wax works well too!
 

hgaude

Member
Joined
Jun 26, 2010
Messages
57
Location
San Antonio
Format
35mm
Bonus question: what's best practices for fiber paper? Should it be cool when the print is placed? Temp and time? I'm not into glossy so I'll be emulsion-up. I might experiment with blotter paper of a fresh sheet of canvas between the paper and the canvas, the canvas on one side has a pill or two that might transfer to the prints.

I keep looking at getting one of these dryers but getting a canvas texture in the emulsion has held me back... very curious to hear if this happens to you. I've read threads both ways of course...:whistling:
 

Sirius Glass

Subscriber
Joined
Jan 18, 2007
Messages
50,155
Location
Southern California
Format
Multi Format
I keep looking at getting one of these dryers but getting a canvas texture in the emulsion has held me back... very curious to hear if this happens to you. I've read threads both ways of course...:whistling:

The canvas surface does not affect the emulsion surface. Mat paper remains mat and glossy paper remains glossy. I hope this relieves you anxieties.
 

hgaude

Member
Joined
Jun 26, 2010
Messages
57
Location
San Antonio
Format
35mm
The canvas surface does not affect the emulsion surface. Mat paper remains mat and glossy paper remains glossy. I hope this relieves you anxieties.

Good to know... When I hang fiber, the clips leave permanent marks, so thats what made me wonder. I've been using the tape on glass method, but I wouldn't mind not losing a few mm off each edge of the prints :smile:
 

Alex Muir

Member
Joined
Dec 23, 2009
Messages
407
Location
Glasgow, Scotland
Format
Medium Format
If I recall correctly, you should avoid putting Ilford Multigrade FB Warmtone paper in this type of drier as it tends to stick. I've used other Ilford papers with no problem. I got the canvas imprint with Foma Chamois paper, but this may have been down to overheating it. I've had the shrunken apron effect, so thanks to Rick A for the tip. In a recent post elsewhere, it was suggested that you should allow the print to dry naturally until it is almost dry, then finish it in the heated drier for a perfectly flat result. I haven't tried this yet as I tend to work at night, and the prints have dried fully by the time I get back to them. I'm going to timetable my next session to allow me to give it a try. For glazing, I thought you needed a separate chrome plated sheet that sits on the dryer surface? The basic surface on these things isn't usually smooth enough to achieve complete contact between print and drier. You tend to get an uneven/incomplete glaze. I haven't spent much time trying it as early results were very disappointing.

Alex.
 
OP
OP
M Carter

M Carter

Member
Joined
Jan 23, 2013
Messages
2,147
Location
Dallas, TX
Format
Medium Format
I'm not sure about yours but on mine the wire frames just pop out of the sides of the dryer. Then you can thread the canvas off them.

Any time I tried the "glossy side down" technique the print just stuck to the metal. Maybe I'm doing something wrong but it always had to be face up for me with any paper.

I stopped using mine because I'm worried about print contamination.

On mine, the metal arms don't seem like they pop out, they're pretty firmly attached inside... and then the tail-end of the canvas is tucked into the side of the machine with no visible way to slide it out. Looks like the thing has to be taken apart?
 

Attachments

  • dryer.jpg
    dryer.jpg
    64.3 KB · Views: 111

Sirius Glass

Subscriber
Joined
Jan 18, 2007
Messages
50,155
Location
Southern California
Format
Multi Format
If I recall correctly, you should avoid putting Ilford Multigrade FB Warmtone paper in this type of drier as it tends to stick. I've used other Ilford papers with no problem.

If you really want a photograph to stick in a drum print dyer, just put the emulsion side to the stainless steel drum and you will dedicate you life to getting the drum clean and functional. :laugh:
 

Rick A

Subscriber
Joined
Mar 31, 2009
Messages
9,852
Location
Laurel Highlands
Format
8x10 Format
On mine, the metal arms don't seem like they pop out, they're pretty firmly attached inside... and then the tail-end of the canvas is tucked into the side of the machine with no visible way to slide it out. Looks like the thing has to be taken apart?

Yes, the four screws come out, then carefully pull the bail out, and the canvas will slide out of the track. There is a small diameter rod that holds the canvas in the track that will slide out at same time, if you just get it started coming out, pull the inner rod and the canvas will just pop out.. Remember which way the stitching goes for replacement. Sliding the canvas back into the track is a PITA, but get one end started, then insert the small rod back in to help guide the canvas into position.
 

Ghostman

Member
Joined
Dec 5, 2011
Messages
504
Location
Switzerland
Format
Multi Format
I would think that one needs to be careful about what chemicals you use to clean the canvas and to make sure that every single residual trace of soap is rinsed out.
 
OP
OP
M Carter

M Carter

Member
Joined
Jan 23, 2013
Messages
2,147
Location
Dallas, TX
Format
Medium Format
OK - here's the DEFINITIVE DISASSEMBLY according to me!

(You really don't want to remove all the screws - you'll stand a good chance of breaking the power wire, which is fragile and held with a single solder joint which bears the load of the spring tension! Pull both sides and nothing will keep the heat wires in tension, I think you'd have a mess on your hands??)


Lay a towel down so you don't scratch the chrome plates - open both canvas flaps and turn the power-knob side away from you. TAKE A PICTURE or make a sketch of how the arms looks when it's all closed up.

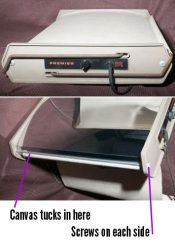
CAREFULLY pop out one end of the chrome sheet that is facing up. A wide, thin putty knife works best for this. Work it between the aluminum channel and the seam and gently pop the sheet out where it tucks into the frame. The other side will pop out - it's held in by tension. Set it aside.

Now you'll see the assembly - two plastic end caps (one with power cord and knob), and two straight aluminum extrusions that hold the canvas ends and heating element wires. FROM HERE ON, be extra careful not to damage the wires. Be aware the wire from the knob is soldered to the heating wire - it's all held in place with that solder joint as the bearing point, so don't bust anything!

The metal arms are held in with speed nuts. Carefully pry the speed nuts off the arms, and pull the arms out - the springs will pop off.

The springs are held to the plastic sides with molded posts and speed nuts - leave these alone.

Remove the two screws on the plastic side facing you - they're tight since they're just drilled into the extrusion channel. A power screwdriver is your friend. DON'T BOTHER removing the other panel side with the power cord and knob. Leave that stuff be (or clean the contacts of the heat control if needed).

Lift a metal arm up and work it out of the canvas seam. Now you can slide the other side of the canvas out of the extrusion - there's a long metal rod tucked into it. It should slide out easily. Now do the same steps to the other canvas. Blow any dust out of the casing at this point, since we're doing things the proud-of way.

My metal arms had some surface rust and staining. I gave them a light sanding and a coat of Crystal Clear (acrylic spray paint). The stuff dries very fast, you can mess with it while you're rinsing the canvas.

Wash the canvas however you see fit - DON'T DRY IT! Don't let it dry! I actually used liquid shampoo, and then water with a splash of bleach (really, go easy on the bleach). Use a scrub brush for tough stains. I sort of treated rinsing mine like a fiber print and gave it an "archival wash" - lots of running water rinse, lots of water changes. Let it soak while you clean or paint the arms. if you spray the arms with Crystal Clear, hit 'em with a blow dryer when they're dry to harden and cure the clear so you can futz with it.

When you're ready to re-assemble, wring them out, then wrap each one in a towel, roll it up, and squeeze as much water out as you can. Don't put the arms back in yet.

Place the narrow canvas seam in its slot in the extrusion channel - get the first couple inches in, and then insert the rod and work it into the seam and on into the slot. Gently get the whole thing centered. The rod should disappear into the extrusion. One side of mine took some monkeying with, the stitching at the end of the canvas was rough and blocking the rod. Profanity can really help here. Do both sides, pay attention to how the seams face (though mine ended up upside-down, I don't see it making a difference.

Replace the plastic side and screw it back in - it may help to not fully tighten the screws just yet - my metal plate wasn't really "square" to the whole assembly.

Work an arm into a large seam - it's not hard. Then tuck the ends of the arms into the plastic end and attach the springs. Be careful here, since the ends of the springs are on those plastic posts. One of my springs seemed a turn or two short and was a bear to get on, and yeah, the post broke. I had to run a bolt through the case.

When both arms are attached, push the speed nuts back on. if they're loose, give one a squish with a screwdriver to deform it enough to hold.

Getting the metal plate back on is a little sporty. Tuck one side into the extrusion, and then position the other side. With your fingertips, "squeeze" the "shoulder" of the plate to try to get the thin metal lip to tuck into the extrusion. (Don't cut yourself, the metal's fairly sharp). One you get a bit of the lip into its channel, grab your putty knife and push the rest of the lip down - it'll snap into place.

Close the whole thing up, adjusting the canvas for centering. Tighten the 2 screws if needed. Turn the heat to medium (I assume drying the canvas too fast will promote shrinkage, but I don't know nothin' bout no laundry). (Or birthin' no babies). Make sure it's heating up, not smoking or bursting into flames with gouts of plastic smoke. if so, you might have jacked something up inside.

The bottom of the dryer is usually about half as hot as the top (something about physics and heat rising I guess) so turn the thing over from time to time. And - keep in mind the seams are not gonna get warm - they won't be dry when the main canvas parts are, so leave the thing closed for a day or so and make sure they're dry before opening. Shrinkage, man - no shrinkage!
 
Last edited by a moderator:
OP
OP
M Carter

M Carter

Member
Joined
Jan 23, 2013
Messages
2,147
Location
Dallas, TX
Format
Medium Format
To be honest, I'm not sure that's very good advice.

Perhaps not - though I use shampoo for canvas projects when i want to pre-wash, it's not very harsh and seems to soften the fabric (and mainly I have daughters and there's bottles all over they "test drove" I guess - I use the damn stuff for hand soap by the darkroom sink, it does get the chem smells off your hands - I should wash my car with it). I had about 1/4 cup bleach in 3-4 gallons water to rinse the soap out.

I think in reality it's moot though - washed for minutes and then soaked for an hour or so, running water, water changes, etc. There's no aroma at all, even when heated. Not even "clean sheets" kind of smell. The soap got the dust off the top surface, the bleach brightened it up a hair, but (other than that coat of gray dust from storage) if the goal is getting chemistry out, it's the long & turbulent rinse that should be the key here. If chlorine at that level is a worry, there's probably more from tap water in there.
 

Sirius Glass

Subscriber
Joined
Jan 18, 2007
Messages
50,155
Location
Southern California
Format
Multi Format
Bleach even strong bleach should not be a problem as long as it is thoroughly removed in the rinsing.
 

john_s

Subscriber
Joined
Nov 19, 2002
Messages
2,119
Location
Melbourne, A
Format
Medium Format
I have used chlorine bleach on mine several times over the years without a problem. I think it's effective in removing traces of gelatine as well as making it look a lot better.

I did read once that an enzyme cleaner is better as it deals with the gelatine more gently. I can't find the link, but it was a post by Edward Zimmerman on the pure-silver list, my guess over ten years ago.
 
Photrio.com contains affiliate links to products. We may receive a commission for purchases made through these links.
To read our full affiliate disclosure statement please click Here.

PHOTRIO PARTNERS EQUALLY FUNDING OUR COMMUNITY:


Ilford ADOX Freestyle Photographic Stearman Press Weldon Color Lab Blue Moon Camera & Machine
Top Bottom