Preflashing graded paper for reversal processing

Hydrangeas from the garden

A
Hydrangeas from the garden

  • 2
  • 1
  • 34
Field #6

D
Field #6

  • 4
  • 1
  • 57
Hosta

A
Hosta

  • 12
  • 8
  • 118
Water Orchids

A
Water Orchids

  • 5
  • 1
  • 69
Life Ring

A
Life Ring

  • 4
  • 2
  • 60

Recent Classifieds

Forum statistics

Threads
197,909
Messages
2,766,736
Members
99,500
Latest member
Neilmark
Recent bookmarks
1

DonF

Member
Joined
Jul 19, 2016
Messages
285
Location
Saint Charles, Il
Format
Large Format
I've been shooting Arista Edu #2 graded RC paper in my 4x5 cameras for some time. I reversal process the paper using potassium dichromate bleach and sodium sulfite clearing bath. I shoot at ISO 3 and develop to completion for both first and second development. The graded Arista paper is rated at P400.

The results have generally been quite good using both traditional lenses and pinholes, except for the excessive contrast. I decided to explore preflashing the paper before exposing in the camera to see if I could bring up the shadow detail and reduce the contrast.

In the studio, I used my Graflex Super Graphic and set up a test subject, s simple roll of birch bark. Lighting was 2-2400ws Speedotron flash heads on either side of the camera illuminating the subject at 45 degrees from each side. Distance from each 11 inch polished reflector to the subject was 30 inches.

As my light meters are all overwhelmed with that level of illumination, I ran some test prints:

image070web.jpg

I settled on f/32 as the exposure for the preflash tests.

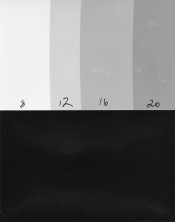
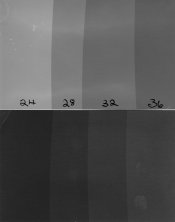
Using a test strip, I set my Beseler Dual Dichro 23C enlarger to 22 inches from the bed, with the Dichro head set to 30/30/30. The 35mm enlarger lens was set to f/16. I ran a test strip at 4 second increments and settled on exposures of 0, 8, 12, and 16 seconds of preflash. The results are below:
image069web.jpg


All images are scanned together, BTW.

I didn't see much improvement in shadow detail until the 12 second preflash, with further improvement at 16. Note that the test strip is NOT reversal processed, so darker on the strip means lighter in the shadow areas of the prints.

Based on these tests, I think I'd go with 15 seconds for most shooting.

I was surprised at the level of preflash needed to see improvement in the reversal prints, but this seems consistent with others' experience with reversal processing. I would expect paper negatives to require much less preflashing.

I hope this is helpful.

Regards,

Don
 
Last edited:
OP
OP

DonF

Member
Joined
Jul 19, 2016
Messages
285
Location
Saint Charles, Il
Format
Large Format
Update.

Looking at the first set of preflashed prints, I wasn't convinced I could see any real reduction in contrast.

I reasoned that the amount of preflash must be able to create a discernable brightening of the darkest part of the print AFTER reversal. The reversal process is such that preflashing may create an obvious change in the negative image after first development, but no change in the reversed dmax black level.

I ran another set of test strips, this time reversal-processing one. I started with 8 seconds, the exposure that yielded the first detectable change in the unreversed print (click on the images for full-size). Although there are clear steps in the unreversed print, there is no change across the same set of exposures when reversal processed.

image071.jpg

I then continued to increase the preflash time in four second intervals:

image072.jpg

The first time where there is a clear change in the dmax of the reversal-processed print is at 28 seconds! The corresponding unreversed print is really dark at this exposure - far darker than would ever be used for a paper negative!

I preflashed a full 4x5 sheet and exposed with the identical lighting and setup detailed in my first post.

For comparison, here is a comparison of the 2-second preflashed print (basically no preflash at all) and the 28 second preflashed print:

image073web.jpg


Clearly, the contrast is tamed on the second preflashed print (28 seconds at parameters specified in my first post). I actually think there is too little contrast and might back off to 24 seconds.

The level of preflash required is surprising! However, the reversal chemistry requires overexposing at a lower ISO of 3 than would be used when making a paper negative. The first development, done to completion at 90 seconds in Ilford Multigrade 1+9, is very dense, almost black with little detail. Yet the reversed print after bleaching, fogging, and second development has a well-balanced exposure.

I'll be running additional tests on outdoor scenes at the 28 second preflash level.

Best,

Don F.
 
OP
OP

DonF

Member
Joined
Jul 19, 2016
Messages
285
Location
Saint Charles, Il
Format
Large Format
Here is another test made in a more pleasing natural light setting without the harshness of the strobes. Exposure of both is identical: F/11 at 3 seconds, ISO 3, 4x5 format with a 135mm Schneider lens. I used a Minolta IVF light meter in incident mode. Camera is a Graflex Super Graphic.

The first image was reversal processed with NO preflashing. The second image had 24 seconds of preflash with enlarger settings detailed in my first post. The difference is stunning. The shadow detail in the preflashed image shows much improvement, with reduced contrast and is a much more balanced image.

It seems 24 seconds at my specified enlarger settings is the sweet spot for this reversal process. I am quite pleased with the result.


image076www.jpg
image075www.jpg


Best,

Don F.
 
Last edited:

vdonovan

Member
Joined
Jan 8, 2008
Messages
607
Location
San Francisco
Format
Traditional
OP
OP

DonF

Member
Joined
Jul 19, 2016
Messages
285
Location
Saint Charles, Il
Format
Large Format
Thanks for the link! Very interesting.

I played around with hydrogen peroxide bleaching some, but the process is too unpredictable for me. I have found nothing works as well as potassium dichromate/sulfuric acid (R9) bleach with a sodium sulfite clearing bath to get rid of the orange tint. It is toxic, but works almost instantly, is predictable in performance, yields very good whites on the finished print, and the bleach is nearly impossible to exhaust. The toxicity can be reduced by adding the clearing solution to the bleach after the bleach becomes unusable.

FYI, my brief process flow is:

90 second development in Ilford Multigrade 1 + 9 (to completion)
Stop bath 15 seconds
Bleach until totally white in potassium dichromate/sulfuric acid R9 bleach, plus an additional 15 seconds.
30 second water rinse (change water after)
60 second clearing in sodium sulfite solution
Brief rinse
Second fogging exposure for 20 seconds under 75 watt daylight LED flood lamp at 12 inches, moving paper continuously
Second 90 second developing in same Ilford Multigrade 1 + 9 (to completion)
Stop bath for 15 second
Fix for 90 seconds in Ilford rapid fixer (light OK after 30 seconds - very little left to fix at this point)
Rinse 90 seconds

I do all under red safelight, except the fogging exposure.

Regards,

Don F.
 
OP
OP

DonF

Member
Joined
Jul 19, 2016
Messages
285
Location
Saint Charles, Il
Format
Large Format
A couple of shots from a field shoot with the Graflex Super Graphic. The paper was preflashed at 24 seconds. For preflash, I set my Beseler Dual Dichro 23C enlarger to 22 inches from the bed, with the Dichro head set to 30/30/30 to attenuate the light. The 35mm enlarger lens was set to f/16.

Daughter Jenni shooting back with her 35mm in first image!

The lighting was quite overcast with light drizzle. Pretty good shadow detail.

image081web.jpg
image084web.jpg
 
Last edited:
OP
OP

DonF

Member
Joined
Jul 19, 2016
Messages
285
Location
Saint Charles, Il
Format
Large Format
I'm continuing experiments with reversal processing pinhole/regular lens exposures on graded enlarger paper.

Based upon some suggestions via my YouTube channel, I decided to modify my processing regimen some. I eliminated the stop bath in favor of a quick rinse with water after the first development, as it is done to completion and there is no danger of over development. The first developer is either Dektol or Ilford Multigrade at the standard dilution. Processing time to completion is about 90 seconds.

After rinsing, I place into the potassium dichromate/sulfuric bleach about twice the time needed to turn the image completely white. At this point, I now turn on the room lights, rinse and place into the sodium sulfite clearing bath. I am now going longer on the clearing bath, as I found uncleared traces of potassium dichromate can cause stains and marks in highlight areas during the second development. 90 seconds seems about right to clear all visible orange staining.

I am now using Iron Out powder as a fogging developer for the second development. Of course, turning on the room lights fogs the paper as well, but the Iron Out chemically fogs the remaining unbleached photo-sensitive areas of the paper and produces exceptionally even tones and rich blacks. Developing in normal room light is an added bonus.

I have been using 1 level measuring tablespoon in 400-500 ml of distilled water. Distilled water is needed, as the Iron Out can react with trace iron in tap water and deplete the active ingredient. The stuff depletes very quickly during development. I am unable to get more than three 4x5 prints through 100ml or so. Using more or a stronger solution does not appreciably extend the life. The reaction during development seems to exhaust the stuff quickly after the first print is processed. I have taken to placing the prints into an empty and rinsed tray and pouring only enough of the prepared developer onto the paper as needed to cover it, then discarding it. The stuff will not keep even overnight after mixing, becoming completely inert by the following day.

I'm extremely pleased with the results, in combination with preflashing.

Regards,

Don


image528_WEB.jpg
image526_Web.jpg
image532_Web.jpg
image535_Web.jpg
 
Last edited:

ludwik

Member
Joined
Sep 18, 2023
Messages
18
Location
Cork, Ireland
Format
4x5 Format
I wonder if there is an alternative to Iron Out?

From its datasheet ingredients:

Citric Acid 1 - 5%
Sodium carbonate 10 - 30%
Sodium hydrosulfite 15 - 40%
Sodium metabisulfite 10 - 30%
Sodium sulfite 1 - 5%

I actually have all of the above chemicals just wonder what would be the best working composition...
 
Photrio.com contains affiliate links to products. We may receive a commission for purchases made through these links.
To read our full affiliate disclosure statement please click Here.

PHOTRIO PARTNERS EQUALLY FUNDING OUR COMMUNITY:


Ilford ADOX Freestyle Photographic Stearman Press Weldon Color Lab Blue Moon Camera & Machine
Top Bottom