Pinhole flare question

Walking Away

Walking Away

  • 0
  • 0
  • 13
Blue Buildings

A
Blue Buildings

  • 0
  • 0
  • 9
Hydrangeas from the garden

A
Hydrangeas from the garden

  • 2
  • 2
  • 88
Field #6

D
Field #6

  • 7
  • 1
  • 88

Forum statistics

Threads
197,937
Messages
2,767,123
Members
99,509
Latest member
Paul777
Recent bookmarks
1
Joined
Feb 11, 2017
Messages
9
Location
Austin TX, USA
Format
Pinhole
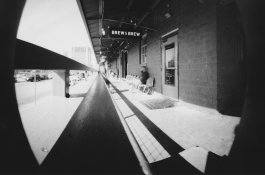
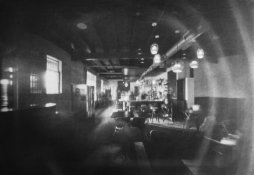
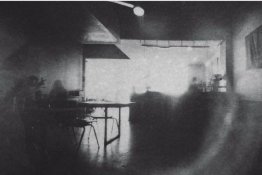
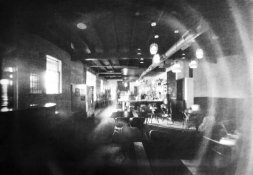
Hi! I've made a number of exposures with a pinhole camera I built. Two in particular stand out. They are both indoor exposures that took about an hour and a half. One of them had a sunbeam coming through a window for about 40% of the exposure. The other one silhouetted subjects against a cafe window.

I'm trying to understand the effect and wondering if it's from my pinhole edge not being perfectly smooth (trying to get advice on that in another thread currently) or the copper being too distorted from when the hole was made. I used a technique similar to dimple and sand using a needle. Also wondering if it has to do with the shininess of the copper. Or if the effect is related at all!

If anyone can help shed some light on this, and whether a more precise pinhole would help, that would be great!

Thanks
Hannah

Edit: I've found another thread that refers to pinhole refraction. This doesn't seem to match the other patterns I found after doing a Google search, and would still like to rule out having anything to improve about how I'm building these.
 

Attachments

  • brew brew.jpg
    brew brew.jpg
    533.2 KB · Views: 375
  • flat track.JPG
    flat track.JPG
    35.7 KB · Views: 359
Last edited:

DWThomas

Subscriber
Joined
Jun 13, 2006
Messages
4,602
Location
SE Pennsylvania
Format
Multi Format
How is the pinhole "plate" mounted? That looks almost like some sort of reflection off a circular retainer or something.

I use 0.002 inch brass shim stock which is almost a knife edge for the hole and even sharper with dimple and sand. I also blacken the brass with BlackenIt (or something close to that name) used in model railroad work. I was using 0.001 inch brass, but have since experienced some problems over time with the plate cracking. Probably the combination of the sanding and the chemical action of the blackening fluid left too little material.

I've no idea what your overall design looks like, but I was surprised how easy it is to get in trouble with really wide angle pinhole cameras. A clamping plate that's too thick or has too small a hole can actually cause vignetting, as can drilling a pinhole in a relatively thick sheet of stock. You need to be able to trace a ray of light from the absolute corners of the film through the pinhole and out into the world without running into anything. It's not like a lens that gathers light over a wide area and focuses it to a point which can sometimes sneak around a partial obstruction.

My 1.3 after tax cents,
 

NedL

Subscriber
Joined
Aug 23, 2012
Messages
3,374
Location
Sonoma County, California
Format
Multi Format
I agree with Dave. That pattern seems too regular and circular and the edges are too sharp to be the typical pinhole diffraction "rainbow". Looks like a reflection from part of the camera to me too. You might have seen "bullseye" diffraction pattern images that look like that on the internet, but those are probably from monochromatic light like a laser.
 

pdeeh

Member
Joined
Jun 8, 2012
Messages
4,765
Location
UK
Format
Multi Format
Just a thought ... I built a lensed box camera and had flare problems from internal reflections (the duct tape that held it together was shiny).
I fixed it by tearing up some old black socks and gluing them in. Then I stopped them shedding fluff and dust onto the film by spraying it with hairspray.
 

ced

Member
Joined
Oct 10, 2011
Messages
866
Location
Belgica
Format
Multi Format
Mybe a description of camera and what goes on in the interior and how the pinhole is held in place.
The flare can also come from too thick a plate and also not very sharp/clean hole and yes darkening the plate on both sides can be pretty useful.
PS. I love this image even with the flare and I am a sucker for detail so took the liberty to tweak it and I love it even more. (keep the pinhole if ever you would like to use it sometime to get this kind of effect).
 

Attachments

  • in.jpg
    in.jpg
    875.8 KB · Views: 260
Last edited:
OP
OP
Hannah Radcliff
Joined
Feb 11, 2017
Messages
9
Location
Austin TX, USA
Format
Pinhole
Mybe a description of camera and what goes on in the interior and how the pinhole is held in place.
The flare can also come from too thick a plate and also not very sharp/clean hole and yes darkening the plate on both sides can be pretty useful.
PS. I love this image even with the flare and I am a sucker for detail so took the liberty to tweak it and I love it even more. (keep the pinhole if ever you would like to use it sometime to get this kind of effect).
I love that you did this :smile: Thank you, it's much better than my original scan. I also kind of love the effect and am hesitant to correct it.
 
OP
OP
Hannah Radcliff
Joined
Feb 11, 2017
Messages
9
Location
Austin TX, USA
Format
Pinhole
Thank you guys for helping me out with this!

I think from what you guys are saying, I've figured out the problem. I'll attach a photo of the design (you guys are so going to laugh at me :pouty:
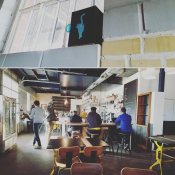
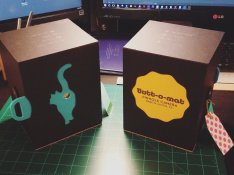
). There are two pieces to it, one that nests on top of the other. They're held together with elastic bands on the sides. Actually fun fact: in one of the attached photos you can see what the cafe looked like where one of the images was captured, while it was happening.

To answer questions about mounting, the pinhole is attached with gaff tape to a piece of mat board, and the shutter is a piece of acrylic that slides over, revealing a hole. This acrylic is a little over 1/8" thick. I made very sure that all the openings behind the lens were large enough to not cause a vignette, but I wasn't careful enough with the front. The effect may come from light reflecting off that acrylic opening. When I use it in EV 13-14 where the shutter is only open for a minute or so, you can actually see it (also attached). I'm planning on using a countersink bit around the acrylic opening to solve that problem, so that might reduce the flare effect, too.

For those more curious about the design, here's a video rendering of the first attempt I did from Fusion 360, it shows how it works:


Also, the back of the copper used for the pinhole is reflective, though the rest of the inside is black mat board and is totally light proof. In another thread someone mentioned a blackening method I'm going to try, or I may try. My first thought when I saw it was that light might be reflecting off the paper back onto the copper, creating the effect. After thinking about it more the acrylic thing makes a lot of sense, but I should still try doing better about blackening the inside.
 

Attachments

  • Motorcycle, Brew Brew.jpg
    Motorcycle, Brew Brew.jpg
    185 KB · Views: 222
  • IMG_20161220_154159.jpg
    IMG_20161220_154159.jpg
    676.4 KB · Views: 203
  • IMG_20161211_032845.jpg
    IMG_20161211_032845.jpg
    664.5 KB · Views: 229
OP
OP
Hannah Radcliff
Joined
Feb 11, 2017
Messages
9
Location
Austin TX, USA
Format
Pinhole
Just a thought ... I built a lensed box camera and had flare problems from internal reflections (the duct tape that held it together was shiny).
I fixed it by tearing up some old black socks and gluing them in. Then I stopped them shedding fluff and dust onto the film by spraying it with hairspray.
Hah! What a great way to use up old lonely left socks :laugh:
 

ced

Member
Joined
Oct 10, 2011
Messages
866
Location
Belgica
Format
Multi Format
I think it is the plastic circle and it probably gets quite a bit of light bouncing off the pinhole plate and the rim of the plastic causing some flare.
 
Photrio.com contains affiliate links to products. We may receive a commission for purchases made through these links.
To read our full affiliate disclosure statement please click Here.

PHOTRIO PARTNERS EQUALLY FUNDING OUR COMMUNITY:


Ilford ADOX Freestyle Photographic Stearman Press Weldon Color Lab Blue Moon Camera & Machine
Top Bottom