Pinhole and Harman Direct Positive Paper

20250427_154237.jpg

D
20250427_154237.jpg

  • 0
  • 0
  • 20
Genbaku Dome

D
Genbaku Dome

  • 2
  • 1
  • 33
City Park Pond

H
City Park Pond

  • 0
  • 1
  • 45
Icy Slough.jpg

H
Icy Slough.jpg

  • 1
  • 0
  • 43
Roses

A
Roses

  • 8
  • 0
  • 126

Recent Classifieds

Forum statistics

Threads
197,500
Messages
2,759,987
Members
99,519
Latest member
PJL1
Recent bookmarks
0

Moizak

Member
Joined
Feb 17, 2012
Messages
11
Format
Multi Format
(I have also posted this in the Paper Negatives group)

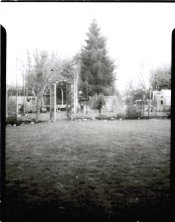
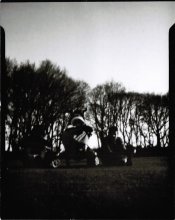
Hello guys, first time posting!

Well, here are my two very first images produced with my homemade pinhole camera and Harman positive paper. Now, I know these are not great so I wanted to post them up and get some advice.


From my understanding, these have been overexposed. These are the factors I am assuming can have affected this:

1) My pinhole size is actually larger than I think it is. (It is approx .5mm which is what I used to calculate my f-stop. Focal length is 120mm so camera is f240). I might change the estimation to .55mm or .6mm

2) The darker portrait oriented image used a digital meter in incedent mode. I set an EI of 3 for the paper and used an online chart to convert the 1sec f8 it gave me to 15mins 18sec at f240

3) The lighter lanscape oriented image was metered using an iPhone app and my iPhone as the light meter. This gave me an exposure of 41 mins!

They were both developed in Ilford PQ at 1:15 for 3 mins at 20degC ( I got this from another post on a forum, not sure who but his pics were great so seemed worth copying)

Is this simply a case of getting my pinhole size wrong? What would be the best scientific method to getting a decent image out of my pinhole camera?


Thanks all in advance.

M

Pinhole 1.jpg

Pinhole 2.jpg
 

Attachments

  • Pinhole 1.jpg
    Pinhole 1.jpg
    1.1 MB · Views: 1,001

Rob Skeoch

Advertiser
Advertiser
Joined
Apr 25, 2005
Messages
1,340
Location
Grand Valley, Ontario
Format
35mm RF
You might have to figure our the metering by going backwards.
You can use the paper ISO of 3 to and keep that constant.
If you come up with an exposure of 30 min. for example, are you able to then rush inside and process the sheet of paper?
Take a look at it and then return to the camera and try and longer or shorter exposure if needed, and retest. In one afternoon you might end up with a couple working images plus the knowledge that on a full sunny day with no clouds the exposure is always the same at 19 min for example.
I don't find using a pinhole an exact science since the lighting often changes during the exposure as clouds move in and out.

-rob
 

Joe VanCleave

Member
Joined
Jan 20, 2004
Messages
678
Location
Albuquerque,
Format
Pinhole
The portrait-oriented images appear to my eye to be pretty close to a good exposure for paper media in daylight. The angle of view of your camera is pretty severe, causing some light falloff in the corner, making judging exposure a bit more difficult. But the center of the image looks pretty close, perhaps just a bit over-exposed; but you might want to do this to compensate for the light falloff in the corners. Some things to think about when using paper as film (either direct positive or negative paper) :

Paper is primarily UV/blue sensitive, with a bit of green sensitivity in some emulsion like multigrade papers. Daylight is predominately UV and blue light. So the sky will almost always appear over-exposed if you have metered for the landscape itself. This is normal.

When metering a scene using a reflective meter, try to avoid pointing the meter at the sky. When judging a paper negative or direct positive print, ignore the density of the sky; it'll almost always be "blown out."

As an experiment, try figuring out how short of an exposure you would need to photography white fluffy clouds in the blue sky. You'll find out the exposure times are perhaps 1/3 to 1/4 of a normally exposed landscape image. So if you expose a scene such that the sky appears "normal," the landscape will be grossly underexposed. This is normal with paper.

Subjects in your images that are brown or reddish toned will require more exposure than shiny metal or water, which easily reflects UV and blue light. Example: brown skin tones, red rock formations, etc. will appear darker unless compensated with more exposure.

Metering: you have to know the ISO (or, more accurately, your Exposure Index) of the paper. Paper doesn't have a rated ISO the same as film, but you can experiment to find what your paper's working Exposure Index is, with your developer. Make a series of exposures of a brightly lit scene (your backyard, say) using various ISO values, then immediately develop them and see your results. The image with the best tonal range will indicate your working Exposure Index.

You can use a camera or simple light meter to get accurate exposure times using pinhole cameras, by metering at your working Exposure Index at a lower f-number, then use this formula to extrapolate for your pinhole camera's f-number:

( Pinhole Camera's f-number / metered f-number) ^ 2 x (metered exposure time in seconds) = Pinhole Camera's exposure time

In my experience, regular photo paper has virtually no reciprocity effect when used as an in-camera film, up to times of about 10 minutes or longer (that's the longest exposure I've done using the above formula). So it's a simple matter of metering the scene, calculate your exposure time and open the shutter.

In working with the Harman DP paper, I've taken to preflashing the paper in order to get better shadow detail. I rate this paper at an Exposure Index of 1.6. Here are several example images, taken using a glass-lensed camera, to show what the paper is capable of. I normally don't shoot this paper in pinhole, rather I prefer paper negatives because they have a better tonal range and shorter exposure times.


ZiaMotorLodge001a by jvcabacus, on Flickr


Corona001a by jvcabacus, on Flickr

~Joe
 
OP
OP

Moizak

Member
Joined
Feb 17, 2012
Messages
11
Format
Multi Format
Rob, Joe, thanks so much for your replies.

Joe, thanks for posting those pics, made me realise you're the one I got the 1+15 in PQ from!!

I think tomorrow will be a day of experimenting. I need to try and work out what the size of my pinhole is first, otherwise I have two variables in f-stop and EI. I might try the scanning route to determine that.

I have read about the preflashing but unfortunately I don't have an enlarger. I have heard of people pre flashing in a box with tracing paper over the top but I'd rather just wait till I have an enlarger.

Will hope for some blue sky's tomorrow and do some experimenting? I may slide the dark slide out bit by bit at intervals and get a pseudo test strip on the paper.

Thanks all for your help. I'll post back with some images tomorrow hopefully.
 
OP
OP

Moizak

Member
Joined
Feb 17, 2012
Messages
11
Format
Multi Format
Ok, so a scan in photoshop tells me I have a .55mm pinhole so I have an aperture of f218. I'll do some test timings tomorrow.

Thanks again guys.
 

Joe VanCleave

Member
Joined
Jan 20, 2004
Messages
678
Location
Albuquerque,
Format
Pinhole
BTW, you don't need an enlarger to preflash. My rig uses a type S-11 light bulb. It's a round, white frosted bulb about the size of a table tennis ball, standard AC base, 7.5watts, available in hardware stores. I mounted it inside of an enclosure where the light exits through a ~4-5mm aperture. Mounted about 30 inches above my darkroom table, my preflash times for Harman's DP paper is about 3.5 seconds. I preflash regular grade 2 RC paper for around 8-9 seconds.

~Joe
 
OP
OP

Moizak

Member
Joined
Feb 17, 2012
Messages
11
Format
Multi Format
Ok, so, I did some testing on yesterday morning, using an aperture of f218. (I didn't bring the test pictures to the office so I can't scan them and show you but will add them tomorrow.)

It was a bright sunny day with the sun in and out from behind high white clouds. I took two readings in my garden, one in direct sunlight and one in the shade, using my incident meter.

Sunshine: EI 3 f8 1/8 sec > factoring by 743 gives 1min 30sec

Shade: EI 3 f8 1/2 sec > factoring by 743 gives 6min 15sec

I took two exposures, in each one I would slide the darks slide out about an inch at a time, the first one at 30sec intervals the second on at 1min 40sec intervals (it was supposed to be 1:30 intervals but one of my kids distracted me at the crucial time!)

The results showed that for a great sky with hazy visible clouds I needed a 30sec exposure but that even upto 2 mins I would have a virtually black foreground with very little detail.

The test strip showed, to my eye, that the correct exposure was somewhere between 3:40 and 5:00. It seemed I was therefore I would be slightly over exposing rating the paper at EI 3 and so I have decided to rerate the paper at EI 4.

The two images above were taken later that afternoon using EI 4. The one of the church I was so happy with I cannot describe :smile:

The second one, obviously woefully underexposed was me trying to be clever. I metered off the sunny side of the face, not wanting to blow that side out but then didn't really sit the kids in the sun enough. I think if I had oriented them a bit better I might have got a decent picture.

I'm going to hopefully get home before the light fades too much and try a couple of portraits this afternoon. I will try and keep the subject in the shade to minimise the contrast.

I will also be putting together a little box like you suggested Joe to be able to preflash the paper. I assume it is just a light tight box with the bulb in and that 4-5mm hole allowing a small pool of light into which you place the paper?

Thanks all.
 

Attachments

  • Pinhole 3.jpg
    Pinhole 3.jpg
    123.3 KB · Views: 368
  • Pinhole 4.jpg
    Pinhole 4.jpg
    145.4 KB · Views: 419

Joe VanCleave

Member
Joined
Jan 20, 2004
Messages
678
Location
Albuquerque,
Format
Pinhole
Moizak: Your results look promising. As for the preflashed setup, the rig I described is suspended 30 inches above my darkroom table, mounted inside a metal soup can (although any similar enclosure would work). To do something similar, you would want the aperture about 30 inches above the paper being flashed; my setup is done inside my darkroom. I found that using an enlarger lens stopped down to F/32 for the preflashed light source was too much light, the exposure times were too short for accurate timing by my primitive Gralab timer, hence the specialty light source with much less intensity.

Ralph: Using a yellow filter with paper negative media is practical with pinhole cameras in brightly daylit exposures because the resulting exposure times are not too long. Harman DP paper in pinhole cameras, even without a filter, become intolerably long in any kind of light other than bright sun, the paper being much slower than negative print paper. Adding a yellow filter extends the exposure times to unwieldy durations with pinhole apertures, hence my recommendation to instead preflashed the paper to control excess contrast.

~Joe
 
OP
OP

Moizak

Member
Joined
Feb 17, 2012
Messages
11
Format
Multi Format
Hey guys.

I've attached the two test exposures I did to this post. The very dark one is obviously the 30sec exposures and the other is the 1:40 exposures.

As I said, nice sky after 30secs but totally unusable for the foreground.

For me, the correct exposure is somewhere between the second and third exposures so between 3:20 and 5 mins but closer to 5 mins. If 6:20 was what I measured for EI 3 then I guesstimated say a half a stop less exposure and came up with an EI of 4 for the paper.

I took another shot this evening and, as another experiment, used the developer I had mixed yesterday and had dev'd 4 prints in. I had mixed up 30ml dev + 450ml water. I know the Harman paper likes good dev, so I wanted to see how fresh.....turns out I can't use the day before's dev. The print was pretty grey although on the plus side the exposure seemed pretty good.
 

Attachments

  • Test 1.jpg
    Test 1.jpg
    112.5 KB · Views: 348
  • Test 2.jpg
    Test 2.jpg
    136.8 KB · Views: 347
OP
OP

Moizak

Member
Joined
Feb 17, 2012
Messages
11
Format
Multi Format
Joe, thanks for that.....any particular soup? :tongue:
 

Joe VanCleave

Member
Joined
Jan 20, 2004
Messages
678
Location
Albuquerque,
Format
Pinhole
Well, I've been using Ilford's PQ liquid concentrate, mixed 1+15, and I only use it for the Harman paper the same day it's mixed, but do save the used mixture for several weeks time for use with paper negatives (I like grade 2 RC glossy for negatives).

My choice of developer was not in any way scientific, it's just what the local camera store keeps in stock. I had purchased a large jug of Ilford Universal paper developer a year or so ago and it didn't last more than half the jug before it went south; I must not shoot enough to warrant the large containers, so I try to purchase smaller containers and use them up before replacement.

My experience with both developers and the Harman paper is almost identical, so I don't think choice of developer is that crucial, only that you mix it fresh, in the appropriate dilution, at a consistent temperature to get repeatable results. The Harman paper has a narrow sweet spot in the various process parameters, so you have to take care to use consistent working habits.

~Joe

PS: Just to add that I don't favor powdered developers because the stock solution has a relatively short shelf life as compared to small containers of liquid concentrate, despite the cheaper cost of the powder. And it's not a good habit to try mixing smaller quantities of powder into stock solutions because the various components in the powder are not uniformly mixed. Unless you make your own home-brewed powdered developers, but that's another story.

PPS: You're on the right track with your tests, but I would advise not to try exposing to retain detail in the sky (unless the sky itself is the primary subject matter). Just let the sky get blown out to white and concentrate on exposing so the principle objects in the landscape are properly exposed. If you do this, you might find the proper exposure index for the Harman paper is slower than ISO 4, based on my experience. Landscapes in 19th century photography typically had blown out skies for the reason that their emulsions had similar blue-sensitivity as contemporary papers like the Harman.
 
Last edited by a moderator:
OP
OP

Moizak

Member
Joined
Feb 17, 2012
Messages
11
Format
Multi Format
Actually Joe, I meant which brand of soup for the preflashing unit :smile:

Nonetheless you have given me some fantastic advice. I used to have a darkroom about 7 years ago but it had to be packed away to storage when we moved and I had moved over to digital. I got the analogue bug a few weeks ago again and went back to storage to retrieve my stuff only to find my dad had had a clear out and given it all away! So I'm running pretty basic at the moment; a pinhole camera and three trays! But that's part of the fun!

I think I'll have to experiment in the darkroom with the chems. It feels like a waste mixing up 30ml of dev for just a couple of prints, I might try mixing 15mls + water next time, see how that lasts, see if I can get 6 prints out of it.

All of this is a step toward getting a nice 5x4 monorail (or a crappy one, I'm on a pretty tight budget). I've only ever shot 35mm and a little 120. I like the idea of slowing down and thinking again.

Thanks again for all your help.

Moiz
 
Photrio.com contains affiliate links to products. We may receive a commission for purchases made through these links.
To read our full affiliate disclosure statement please click Here.

PHOTRIO PARTNERS EQUALLY FUNDING OUR COMMUNITY:


Ilford ADOX Freestyle Photographic Stearman Press Weldon Color Lab Blue Moon Camera & Machine
Top Bottom