Pin registered masking film options?

On the edge of town.

A
On the edge of town.

  • 6
  • 3
  • 95
Peaceful

D
Peaceful

  • 2
  • 11
  • 223
Cycling with wife #2

D
Cycling with wife #2

  • 1
  • 3
  • 95
Time's up!

D
Time's up!

  • 1
  • 1
  • 90

Recent Classifieds

Forum statistics

Threads
198,262
Messages
2,771,946
Members
99,582
Latest member
hwy17
Recent bookmarks
0

MurrayMinchin

Membership Council
Subscriber
Joined
Jan 9, 2005
Messages
5,476
Location
North Coast BC Canada
Format
Hybrid
Hi there,

Back when I was making pin registered sharp & unsharp masks for enlarging 4x5 negatives, I used 5x7 Arista APH film (now called ortho litho?) because of its low cost.

Time and inflation have conspired against me, especially since I'd like to try some of the same techniques on digitally enlarged negatives contact printed up to 14x17 inches. Bigger size = bigger money.

Single emulsion x-ray films seem plausible and appear to be low cost. Do you have any other suggestions?

Thanks in advance!
 
Last edited:

koraks

Moderator
Moderator
Joined
Nov 29, 2018
Messages
21,970
Location
Europe
Format
Multi Format
If by "digitally enlarged negatives" you mean negatives you inkjet print, why would you need to mess with physical masks to begin with? Just do the manipulations in digital space, then output to inkjet as a single negative.
If you must use separate masks, you could also simply inkjet print these.
 
OP
OP
MurrayMinchin

MurrayMinchin

Membership Council
Subscriber
Joined
Jan 9, 2005
Messages
5,476
Location
North Coast BC Canada
Format
Hybrid
If by "digitally enlarged negatives" you mean negatives you inkjet print, why would you need to mess with physical masks to begin with? Just do the manipulations in digital space, then output to inkjet as a single negative.
If you must use separate masks, you could also simply inkjet print these.
I agree that any 'dodge & burn' or local contrast manipulations etc. can be done via computer before the inkjet negative is made, but I am looking to make a physical mask with bullet proof density everywhere but in the areas where I want to introduce max black.

You know how the brush stroke border area of a hand coated ferric-silver print almost always appears to have more density than in the image area? Sure, larger areas of max black in the image can be a bullet proof max black, but I'm talking about "punching down" fine line blacks which affect local contrast in lower to middle print values.

Hmmmmm...then again... your question has made me reassess things.

Perhaps, while grinding away in Capture One, I could introduce another layer which will do the same thing. I could use the Levels sliders to isolate those areas which need a boost in local contrast by completely removing all negative density in fine dark lines in those areas while leaving everything else uneffected. This would achieve what you are suggesting, yes?

Thanks for shaking up my brain...it appears to have an anchor line pulling from my 'olden days' way of thinking. I'll have to mull this over for a while and also try it out.

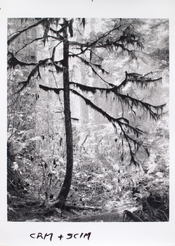
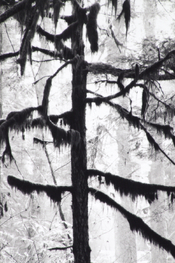
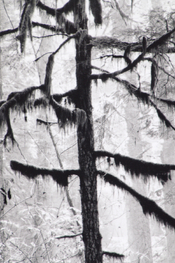
Here's an example enlarged from a 4x5 negative on Ilford Multigrade IV FB from my pin registered masking days. The first detail image shows the print before masking, and the second shows the lifting of shadows (Contrast Reduction Mask) and reintroduction of max black where I wanted it (Shadow Contrast Increase Mask). The second detail thumbnail also got a mask to bring back texture in the distant forest through the fog. Using a softer grade of paper and no masks would have resulted in a mushy print.

_MXT7021.jpeg _MXT7025.jpeg _MXT7023.jpeg
 
Last edited:

koraks

Moderator
Moderator
Joined
Nov 29, 2018
Messages
21,970
Location
Europe
Format
Multi Format
This would achieve what you are suggesting, yes?

There are many ways to skin a cat, especially digitally.

What you appear to be wanting to do is have a bit of a lopsided curve that suppresses certain shadow areas into dmax. Maybe you also want to do that for some shadow areas and not all. The way I'd approach that is make a single adjustment curve that cuts down the shadows. Then, if you want, apply a mask to that adjustment layer and mask it out where you don't want the curve to apply.

it appears to have an anchor line pulling from my 'olden days' way of thinking.

That's the main problem you're facing, yes. In the end, what you get on paper is a full tonal scale from dmax to dmin. There's nothing beyond it on either side. If you have a process involving digital negatives, you should have linearized/calibrated it so you get a predictable output ranging from paper dmax to paper dmin for your digital input. Provided you have that, whatever is on the negative will print on the paper the way you set it up in digital space. You don't need any supplemental masking in the darkroom; everything can be done in Photoshop etc. It's a lot easier and more flexible that way, too. Heck, this is one of the main reasons why people bother with inkjet negatives in the first place.

Here's an example enlarged from a 4x5 negative

Everything you show there you can do with some curve adjustments in digital space. It's faster, more efficient and more flexible than physical masks. Using dynamic adjustment layers, you can fine-tune the effect while immediately seeing what you're doing. You can mask out the adjustment curve selectively. You can have multiple adjustments (curves or otherwise) active at the same time. Once you're happy with the image, you can output it to your calibrated/linearized inkjet negative workflow and make the final print in a single exposure from a single negative. It's easy once you have the linearization done properly. THAT is the tricky bit, and that's why people have spent so much time and effort coming up with several approaches towards that problem, and you still have to dial in a consistent process with an appropriate print exposure time etc.

Basically, in the 'brave new world' of digital negatives you replace working with masks and job-specific adjustments with a consistent printing process that performs *exactly* the same every time so you can shift all the job-specific flexibility back into digital space, where it's a lot quicker, cheaper & easier to perform - and it can be done while sitting behind your desk with some music on and in daylight, too.
 
OP
OP
MurrayMinchin

MurrayMinchin

Membership Council
Subscriber
Joined
Jan 9, 2005
Messages
5,476
Location
North Coast BC Canada
Format
Hybrid
There are many ways to skin a cat, especially digitally.

What you appear to be wanting to do is have a bit of a lopsided curve that suppresses certain shadow areas into dmax. Maybe you also want to do that for some shadow areas and not all. The way I'd approach that is make a single adjustment curve that cuts down the shadows. Then, if you want, apply a mask to that adjustment layer and mask it out where you don't want the curve to apply.


That's the main problem you're facing, yes. In the end, what you get on paper is a full tonal scale from dmax to dmin. There's nothing beyond it on either side. If you have a process involving digital negatives, you should have linearized/calibrated it so you get a predictable output ranging from paper dmax to paper dmin for your digital input. Provided you have that, whatever is on the negative will print on the paper the way you set it up in digital space. You don't need any supplemental masking in the darkroom; everything can be done in Photoshop etc. It's a lot easier and more flexible that way, too. Heck, this is one of the main reasons why people bother with inkjet negatives in the first place.


Everything you show there you can do with some curve adjustments in digital space. It's faster, more efficient and more flexible than physical masks. Using dynamic adjustment layers, you can fine-tune the effect while immediately seeing what you're doing. You can mask out the adjustment curve selectively. You can have multiple adjustments (curves or otherwise) active at the same time. Once you're happy with the image, you can output it to your calibrated/linearized inkjet negative workflow and make the final print in a single exposure from a single negative. It's easy once you have the linearization done properly. THAT is the tricky bit, and that's why people have spent so much time and effort coming up with several approaches towards that problem, and you still have to dial in a consistent process with an appropriate print exposure time etc.

Basically, in the 'brave new world' of digital negatives you replace working with masks and job-specific adjustments with a consistent printing process that performs *exactly* the same every time so you can shift all the job-specific flexibility back into digital space, where it's a lot quicker, cheaper & easier to perform - and it can be done while sitting behind your desk with some music on and in daylight, too.
First off, thanks for your in-depth answers on so many topics...you are a great resource and I just wanted to say I appreciate the time you spend on them.

I'm about as far from techy as anyone can get. It's been a struggle for sure, but the prints in my imagination are worth working towards.

Thanks again.
 

koraks

Moderator
Moderator
Joined
Nov 29, 2018
Messages
21,970
Location
Europe
Format
Multi Format
Hey, I appreciate it - and it's my pleasure, really!
Always feel free to ask and make this more specific; you could e.g. post a scan from a negative (or digital capture) and point out what you'd like to do, so the rest of us can offer strategies on how to do that. Digital editing can be daunting, but once you get the hang of a few of its principles, it turns out to be very powerful indeed. The main keywords are 'layers' and 'masking'. And these work pretty much exactly as they did in the darkroom!
 
Photrio.com contains affiliate links to products. We may receive a commission for purchases made through these links.
To read our full affiliate disclosure statement please click Here.

PHOTRIO PARTNERS EQUALLY FUNDING OUR COMMUNITY:


Ilford ADOX Freestyle Photographic Stearman Press Weldon Color Lab Blue Moon Camera & Machine
Top Bottom