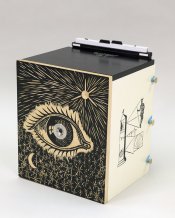
I posted some images in the standard gallery and have had a question or two about the camera. I thought I had posted completed pictures here, however guess I didn't. Camera was made as a 3-D printmaking project. There is a woodcut on the front and three silk screens on three of the sides. Pinhole and tripod socket by Skink. Bill Barber
-
Welcome to Photrio!Registration is fast and free. Join today to unlock search, see fewer ads, and access all forum features.Click here to sign up
You are using an out of date browser. It may not display this or other websites correctly.
You should upgrade or use an alternative browser.
You should upgrade or use an alternative browser.
Photos of 8 X 10 pinhole camera
-
A
- Thread starter nsurit
- Start date


Recent Classifieds
-
For Sale FS: Carl Zeiss T* Triotar Lupe 5X
- Started by B.S.Kumar
-
For Sale Canon EF 28-70mm f/2.8 L Macro Zoom Lens with Canon Shade
- Started by davela
-
For Sale Zeiss Super Ikonta 531/2 (6x9cm)
- Started by retina_restoration
-
For Sale 8ply Rising Museum Mat Mounting Board 8 Sheets
- Started by oficinouno
-
For Sale Elmar 3,5cm / 3.5 with hood, VOOLA and SBLOO finder
- Started by Laurent
Forum statistics

very cool
You look very proud and I think that I would be proud too...
DWThomas
Subscriber
That's quite a nice piece of work, intriguing to look at as well as use.
I confess to some thoughts about stepping up to 8x10 myself. But so far I've been working with either 4x5, for which I have a dozen holders owned since dinosaurs roamed the earth, or roll film. That allows me to go out and take a dozen or more shots on a major trek. If I do a big one, I'd like to use 8x10 holders, for which the going rate is a bit off-putting -- but then, it's a hobby, so it might still happen! (I've been looking at ePrey occasionally.) I figure this year I will try and hone in on the paper negative process which has been a little dodgy for me so far, and maybe next year do some heavy construction.
Your results definitely offer some inspiration.
I really like the chevy... the light leak is minimal not very noticeable. What a great looking camera! The one I'm working on will be incredibly boring compared to this work of art!
- Joined
- Jun 21, 2003
- Messages
- 29,810
- Format
- Hybrid
love your camera ( and the work made from it ! )
the woodcuts and silk screens are beautiful ...
the eye means so many different things,
all seeing, all knowing, window to the world
and it also keeps away evil spirits ..
very cool !
john
the woodcuts and silk screens are beautiful ...
the eye means so many different things,
all seeing, all knowing, window to the world
and it also keeps away evil spirits ..
very cool !
john
Beautiful, Bill!
Question... (though I think the answer is no...) Does the graphic on the side depict the actual angle of view of your camera? The reason I ask is that even though when I built my camera I knew intellectually and theoretically what its specifications were, I found it really helpful to sketch the angle of view along the top of the box. It is one thing to stand behind a camera with the understanding that you have 133 degrees coverage, but it immensely more helpful to have actual sight lines to follow in the field.
Great work. It is very inspiring.
Cheers,
Tom
OP
OP
The angle of view is almost exactly the same as a 28mm on my 35mm camera, so I use one of my spare bodies and lenses to estimate where I need to be. So far it has worked pretty well. Bill Barber
So when does the manufacturing start? Will I see these at Freestyle???
Very cool. Nicely done.
Very cool. Nicely done.
OP
OP
As is said, "Time is money" and this took a little time to construct. It was however a really fun project and "Time does fly when you are having fun." The design is simple and the most difficult part was probably finding the metric drill bit to drill the hole for installing the pinhole and tripod socket. Both holes consist of a larger hole drilled part of the way into the wood, with another sized one drilling through the wood. Each of these need to be fairly precise. The only thing I might change would be to put a tripod socket of the side so I could comfortably make a horizontal shot.
It's a beautiful piece of work, Bill!
Must make some wonderful photos 
OP
OP
8 exposures last week and 8 more loaded this week. I've been pleased with some and not so much with others. It does, however depend more on the guy behind the camera than the camera. I would assert that designing and building one from the ground up gives one a little more of a relationship with the "box" than buying it off the shelf. I do have a few "off the shelf" pinholes. This project has had me travel down some paths I might not have traveled were it not for the project. It also has me having fun on the journey.
8 exposures last week and 8 more loaded this week. I've been pleased with some and not so much with others. It does, however depend more on the guy behind the camera than the camera. I would assert that designing and building one from the ground up gives one a little more of a relationship with the "box" than buying it off the shelf. I do have a few "off the shelf" pinholes. This project has had me travel down some paths I might not have traveled were it not for the project. It also has me having fun on the journey.
Agreed, the whole definitely becomes greater than the sum of its parts. Building from scratch, (even with my rudimentart tools and skills) you are responsible for your camera's strengths as well as its weaknesses. Even the way you load and expose your film becomes part of that camera's unique signature.
Can't wait to see more images from your beautiful camera.
OP
OP
I just posted two new images in the standard gallery. These were done after some attempts were made at stopping the light leaks. Bill Barber
It's a little hard to see on the lighter-toned print, but more obvious on the other. It's not really all that bad, but I'm sure you are looking for better results. I can't really see the back on your pictures of he camera so don't know what to say. A bail back would probably fix things, but it's a radical design shift for your beautiful camera. Tighter elastics? Black felt on rails? As I said, it's not too bad, Bill.
Cheers,
Tom
Cheers,
Tom
Agree with Tom, almost invisible on the lighter print. Those negatives must look amazing. I like the fence posts and barn... great depth.
OP
OP
I've used a double thickness of foam (originally started with one) and bent it in the middle in a V shape to put it in the corners. Originally (on first layer) butted the bottom and side. Seemed to improve, but not fix. I'm still thinking it through. Don't think it is the rubber bands. I'm thinking about putting a piece of masonite on top of the holder and then attaching the rubber bands. Equalizing the pressure and protecting the back side of the holder while exposing the other side. I'm think the back side may be where the light leak is occuring from possible distortion from the rubber bands.
BB
BB
That makes sense. I never thought of elastic-induced distortion. Instead of using rubber bands directly on my holders, I completely enclosed the back of my camera and slid the holders through a slot. I know the open back concept works, as in your camera and the Zero Image 4x5s, but I was thinking "multi-task" and wanted a box I could store a box or two of film in when I'm not shooting. Mine works for both purposes but is not nearly as good looking as your setup.
OP
OP
This one I'm sure is more of a "one off" than a "prototype." Next 'One off" will have some design changes. BB
Bill, I am envious of your skills. It looks professionally made. My cameras all look like the result of long fights. We should get together and compare notes. Next time I head south for the beach, I'll let you know. Judy in Wichita Falls.
OP
OP
Oh, I think it has more to do with having an instructor with high expectations of his students and knowing they will come through. It was a fun project using new skills. It is also fun to use. If you are going to be in Corpus, let me know and bring your camera.
ter-riffic camera you crafted!!!
craff, art, whimsy, personality, functionality and more...
you show there is an art to making things that make art, that are art themselves...umm, umm...and to think i was an english minor...that never graduated. ☺
i look forward to seeing the images you will make with it.
breathe, relax and enjoy.
laugh more, smile more...i do whenever i get near a mirror.
smiling gecko, aka kenneth
| Photrio.com contains affiliate links to products. We may receive a commission for purchases made through these links. To read our full affiliate disclosure statement please click Here. |
PHOTRIO PARTNERS EQUALLY FUNDING OUR COMMUNITY:  |