Paper negative enlarger prototype

Recent Classifieds

Forum statistics

Threads
198,726
Messages
2,779,998
Members
99,692
Latest member
kori
Recent bookmarks
0

NedL

Subscriber
Joined
Aug 23, 2012
Messages
3,388
Location
Sonoma County, California
Format
Multi Format
.. the jeep is kind of slate colored it was like a giant grey card....
:D Excellent! Mine's white I should have thought about that!

Wow I'm really impressed with the detail from 35mm-sized paper negatives! That's great!

Would it be possible to use a filter under the enlarger lens? I made a simple holder that holds a filter under the lens of my enlarger, just a piece of insulated solid copper wire, bent to form a "U" shape that the filter rests on. If you have a green filter that you use on a camera, you could try putting it under the lens for part of the exposure and it should tame the contrast quite a bit.

Great stuff, keep going!!
 
OP
OP
bergytone

bergytone

Member
Joined
Sep 8, 2014
Messages
168
Location
Grand Haven,
Format
Multi Format
blindpig, here's a front view of the "opaque projector" I crudely drew in the dimensions of the slot in the light tubes and the desired light projection on the view area. With a tiny negative like the 35mm in the top, even illumination is easy. A big negative (like 6 x9 ) is a different story. My design is like a miniature version of yours. My angles might be a bit more obtuse than yours... that was a function of the lens I am using. I wasn't ready to buy a nice expensive 150mm lens until I proved the concept first. So my light box is just a bit more squashed. And as Joe V mentioned about eliminating the reflections and glare, my strong side angles mean the lens never sees the direct reflection off the glossy RC paper. And you had commented on glass reflections, well, for this first test and with a tiny negative, I'm using a glassless negative holder.

attachment.php


and no comments on "number 5 alive" from the movie 'short circuit'
number 5.jpg
 

Attachments

  • front view.JPG
    front view.JPG
    280 KB · Views: 554
Last edited by a moderator:

Joe VanCleave

Member
Joined
Jan 20, 2004
Messages
677
Location
Albuquerque,
Format
Pinhole
A filter holder under the enlarger lens is how I use my 4x5 Beseler. That last photo of the Vivitar enlarger frame appears to show a filter holder next to the lens.

As for the problem with light falloff when printing from larger negatives, both of my condensor enlargers have a second bellows, between the negative and light source above, that needs to be adjusted for different sizes. I'm not sure how you could adjust for this with your light source.

I'm really excited about this project, looking forward to more progress.

~Joe
 

blindpig

Member
Joined
Dec 5, 2013
Messages
123
Location
Nixa,Mo.
Format
Multi Format
Eric, I agree with Joe it appears you have a filter holder below the lens on your enlarger and like Ned and the others I use below the lens contrast filters.You'd just need to swing it under the lens and put the filter on top. I'm thinking you could fabricate a"box" to set on top of your existing negative carrier area which would be several inches tall with another negative carrier on top.this added distance might allow the proper light angles to give you a more even coverage on the larger negatives.If this crops off some of the light you may have to open up the negative opening as it is now.I think glassless negative carriers is the way to go.
Your 35mm paper negs are a pretty slick idea.Keep up the good work.
Don
 
OP
OP
bergytone

bergytone

Member
Joined
Sep 8, 2014
Messages
168
Location
Grand Haven,
Format
Multi Format
Yeah, you guys are right, there is a 'safelight red' filter below the lens from the original vivitar enlarger. I can take out the red filter and drop in the ilford multigrade filters. Is there any chance that these filters will distort the image? Or is it the case that if they are close to the lens the effects will be minimal? I'll give it a try, see what happens.

The 35mm paper negative worked pretty well, but without sprockets advancing the paper after each shot was much like using roll film without a red window. The take up spool in the Nikon is a slip type, and didn't move the paper at all, as it relies on the toothed wheel to move the film. So I had to first manually wind the paper onto the take up spool in the darkroom until it was fully pulled out of the cassette. Then, to take a shot I had to cock the shutter, trip the shutter and then use the cassette rewind lever to pull it back into the cassette an estimated single frame. You can see by the picture of the negatives I advanced it a little too much, but I didn't want any overlapped shots. I didn't even have to push the little rewind release button, since the toothed wheel isn't really in use.

I think with careful winding I can get 20 shots on a strip of paper. The only problem is possible double exposures, so like an old 620 Hawkeye, you've got to remember to advance the paper negative after each exposure.
 

blindpig

Member
Joined
Dec 5, 2013
Messages
123
Location
Nixa,Mo.
Format
Multi Format
This may be way out there but maybe you could cut the paper narrow enough to fit between the sprocket holes and attach the paper to a roll of perforated 35 mm film.Never tried it ,don't know if it's even possible but thought I'd throw it out there.Might be too thick to pass the pressure plate but without attempting it wouldn't ever know....
 

TheToadMen

Subscriber
Joined
Sep 18, 2012
Messages
3,570
Location
Netherlands, EU
Format
Pinhole
... The 35mm paper negative worked pretty well, but without sprockets advancing the paper after each shot was much like using roll film without a red window. The take up spool in the Nikon is a slip type, and didn't move the paper at all, as it relies on the toothed wheel to move the film. ...

Maybe you could cut of a film leader from an exposed film roll and tape it to the paper negative for better loading?
 

blindpig

Member
Joined
Dec 5, 2013
Messages
123
Location
Nixa,Mo.
Format
Multi Format
Oh! I forgot to give my take on the Multigrade filters below the lens.They are designed for this purpose and seem to work very well IMHO.
That said any thing introduced in the image path could affect the results adversely but in this case think you'd be hard pressed to see the difference and the advantage of having some contrast control is worth any small loss in sharpness.
 
OP
OP
bergytone

bergytone

Member
Joined
Sep 8, 2014
Messages
168
Location
Grand Haven,
Format
Multi Format
blindpig, I did cut the paper narrower than the sprocket teeth. I think you might be on to something. I could tape it onto a section of film like roll film is taped to the backing paper. The combo would be awful thick, and you're right, it might not pass through the pressure plate right. It also would also limit the amount of shots I could get on a 'roll' since it would be so much thicker. As it is, I think I can roll up about 35 inches of paper alone in the cassette, good enough for about 18 exposures if advanced properly.

Talk about backwards from regular roll film... paper negative with a film backing.... what? Seems nuts, but if the camera can pass it, it will work. I've got some bulk ilford 35mm roll film that expired in '76 that I can use for this test. I use it now as a fixer test material!

I will give the filters under the lens a test. I thought they were really designed to be used in the light box of a condenser enlarger. in the filter tray. I haven't had a lot of time to poke around in the dark room lately, but I'll try to get something tomorrow night. Thanks for the input everyone!
 

TheToadMen

Subscriber
Joined
Sep 18, 2012
Messages
3,570
Location
Netherlands, EU
Format
Pinhole
I could tape it onto a section of film like roll film is taped to the backing paper. The combo would be awful thick, and you're right, it might not pass through the pressure plate right.

You could also just use a short film leader and tape it to the paper negative, more like 220 roll film.
That should be easier to load and lesser or no problems with the pressure plate.
 

joan65_es

Member
Joined
Mar 20, 2008
Messages
5
Format
35mm RF
[Negatiu paper, i la part Estesa A Una ampliadora convencional. No hi ha moreNegative paper, i la part Estesa A Una ampliadora convencional. Sentit moreAttach = complet] 150.530 [/ attach] [attach = complet] 150.531 [/ attach]
 

Attachments

  • negPlatans_001.jpg
    negPlatans_001.jpg
    297.9 KB · Views: 229
  • AmplitPlatans_001.jpg
    AmplitPlatans_001.jpg
    357.6 KB · Views: 272

NedL

Subscriber
Joined
Aug 23, 2012
Messages
3,388
Location
Sonoma County, California
Format
Multi Format
Negatiu paper, i la part Estesa A Una ampliadora convencional. No hi ha moreNegative paper, i la part Estesa A Una ampliadora convencional. Sentit more
I cannot tell if this was made with a conventional enlarger, or with a modified conventional enlarger, but it looks like it worked!
Welcome to APUG!
 

NedL

Subscriber
Joined
Aug 23, 2012
Messages
3,388
Location
Sonoma County, California
Format
Multi Format
Ned, please explain what is going on with this post.... Is this another example of a paper negative enlarger? I'd love to see more details.

I'm not 100% sure about this, I used google translate and the post is in Catalan. But I think joan65_es made a still life paper negative, put it into his normal diffusion enlarger ( you can see a normal looking enlarger with a diffusion head in the 2nd post ), and produced that nice print. The print has very good range of tones and looks smooth. I know Joe VanCleave and others have done this. I've never tried it -- I always imagined it would be hard to focus... But it makes some sense that paper texture might not show through much: the paper itself should diffuse the light. It probably helped to use a diffusion head.

It's amazing how many different things are possible to explore in photography!
 

RalphLambrecht

Subscriber
Joined
Sep 19, 2003
Messages
14,644
Location
K,Germany
Format
Medium Format
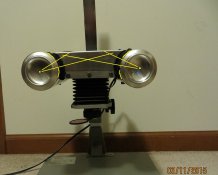
I have just finished a prototype of a paper negative enlarger. Inspired by member 'blindpig''s version of an opaque projector that he posted last year, I decided to try my hand at making one. Here's what it looks like:


attachment.php
attachment.php
attachment.php


I started with an old Vivitar enlarger (the one I used in high school) and used it's easel and lens holder with bellows. I wanted to be able to enlarge my paper negatives from the 6x6 or 6x9 vintage folders I've been playing with, as contact prints from them lose some sharpness, and are kind of small.

The light sources are made from energy drink cans and pepsi cans carefully cut up. (that energy drink tastes awful by the way) I had to cut the ends out to fit the lamp socket, and cut the other end out so I could get the bulb in and out. The nice thing about aluminum cans is that they are easy to work with, and they can be jammed inside each other for a perfect light tight fit.

attachment.php
attachment.php
attachment.php


I used aluminum sheet to make the 'light box'. The aluminum I used must be some grade of aircraft aluminum, as it was very hard to bend up. There's an upper and a lower section, with the lower section being glued to the bellows from the Vivitar.

attachment.php
attachment.php
attachment.php


I painted the inside black and used automotive grade black silicone to caulk up the joints to make it light tight. The initial tests were very exciting. I am using my Omagar 80mm enlarger lens, which limits the size of the print I can make. It's nice, because it screwed right into where the vivitar 50mm lens was. The negative is placed right onto the top opening, and a piece of glass is used to keep it flat. I was impressed that with a piece of white paper in the opening, the resulting projected image was pretty evenly white.

I put a text doc on the top with fine print (the back of the Ilford Multigrade filter box) and enlarged it to 8x10 size and I could see the letters were sharp and crisp. Putting some paper negatives up there projected them beautifully, and I think this is going to produce nice prints. Contrast of the image seemed normal.

Can't wait to see how it works... the proof's in the printing
 

removed account4

Subscriber
Joined
Jun 21, 2003
Messages
29,833
Format
Hybrid
It's amazing how many different things are possible to explore in photography


I'm with you !

there is a lot of fun to be had .. not suggesting the "conventional" isn't fun,
but sometimes taking a meandering path opens ones eyes to the possibilities
that can be done with the conventional and make one's experience even more
fun .... or.. not. lots of fun to be had no matter the route one takes
 

paul ron

Member
Joined
Jan 22, 2004
Messages
2,706
Location
NYC
Format
Medium Format
nice job! love the concept.
 

ic-racer

Member
Joined
Feb 25, 2007
Messages
16,542
Location
USA
Format
Multi Format
Looks like it works. But why paper negatives? The resolution and tonal range are less than conventional negative film, or is that the desired effect?
 
OP
OP
bergytone

bergytone

Member
Joined
Sep 8, 2014
Messages
168
Location
Grand Haven,
Format
Multi Format
I'm not sure the resolution of paper is really less than negative film... can you see the "grain" of paper? I posed this question a while back on the forum.
And I think you're right about tonal problems with paper. Multigrade paper has contrast issues due to it's sensitivity to various colors of light. They can be somewhat compensated for, but yes, I guess it's an effect that is desired.

The main reason I've been playing with it is that for some of these vintage cameras the cost of film is crazy just to get 8 shots. I've figured out how to roll up paper with a backing sheet, and make a roll of paper negatives. I happened to have a 400 foot roll of 5" wide photo paper, and I can slit it to 120 size pretty easily.

But, it is kind of a novelty, and the pinhole crowd loves paper negs. I just wanted a way to make enlargements from some smaller paper negatives. It certainly won't replace my 35mm film! But for my 4x5 pinhole it is a cost effective way to play around and experiment.
 

blindpig

Member
Joined
Dec 5, 2013
Messages
123
Location
Nixa,Mo.
Format
Multi Format
IC, paper negs are sharp and can be enlarged a great deal without apparent loss of quality,bergytone will find out when he uses his reflective enlarger more.I'm happy with mine and have just finished a 4X5 sliding box camera intended for just paper negatives both with lenses and a pinhole for added fun. You ought to give it a try,ya might like it.
 

ic-racer

Member
Joined
Feb 25, 2007
Messages
16,542
Location
USA
Format
Multi Format
Ok, seems like a good project. Might be something to try in a 220 film back also.
 
Photrio.com contains affiliate links to products. We may receive a commission for purchases made through these links.
To read our full affiliate disclosure statement please click Here.

PHOTRIO PARTNERS EQUALLY FUNDING OUR COMMUNITY:


Ilford ADOX Freestyle Photographic Stearman Press Weldon Color Lab Blue Moon Camera & Machine
Top Bottom