Optimum pinhole size

Dog Opposites

A
Dog Opposites

  • 1
  • 1
  • 92
Acrobatics in the Vondelpark

A
Acrobatics in the Vondelpark

  • 6
  • 4
  • 167
Finn Slough Fishing Net

A
Finn Slough Fishing Net

  • 1
  • 0
  • 100
Dried roses

A
Dried roses

  • 13
  • 7
  • 190
Hot Rod

A
Hot Rod

  • 5
  • 0
  • 113

Recent Classifieds

Forum statistics

Threads
197,465
Messages
2,759,475
Members
99,514
Latest member
galvanizers
Recent bookmarks
0

rbrigham

Member
Joined
Sep 7, 2008
Messages
125
Location
London
Format
Large Format
Hi

Looking over various pinhole math I get wildly varying
Results
What formula should I use

I have a 21 mm focal length and will be using colour film lit with flash
Subject distance will be about 5-10'

What size pinhole should I use ?
And why

Thanks
Robin
 

Jim Jones

Subscriber
Joined
Jan 16, 2006
Messages
3,745
Location
Chillicothe MO
Format
Multi Format
I would use a 0.15mm diameter pinhole. This was calculated in Pinhole Designer with a user constant of 1.4, derived through research and experimentation. Pinhole photography is not a matter of mathematical precision; personal preferences are important. Different subjects may work best with slightly different diameters. In wide-angle cameras the diameter may be increased for improved off-axis performance with degraded center sharpness. Others may prefer slightly smaller or larger diameters based on other science or actual photography. The magic and mystery of pinhole photography may be frustrating to those who believe in exact answers to any question. To others, a little quirkiness adds pleasure to photography.
 
Joined
Mar 18, 2005
Messages
4,945
Location
Monroe, WA, USA
Format
Multi Format
How powerful is your flash unit?

A Vivitar 285HV on full manual (GN 120) using 400 speed film at 7.5 feet requires f/32.

A Sunpak 622 Super on full manual (GN 200) using 400 speed film at 7.5 feet requires f/53.

A Meggaflash PF200 type A-19 flashbulb (GN 420 at 1/30 sec or less) using 400 speed film at 7.5 feet requires f/112.

A Meggaflash PF300 type A-23 flashbulb (GN 550 at 1/30 sec or less) using 400 speed film at 7.5 feet requires f/147.

That last PF300 flashbulb option would seem to match up closely with Jim's recommendation for a 0.15mm pinhole size, since 21mm divided by 147 is 0.143mm. Unfortunately those PF300 bulbs sell at Cress Photo by the case lot (48 bulbs) for USD$630.00 per case, or $13.13 per bulb. Apparently scientists, railroad photographers and spelunkers are the major users of these still-in-production modern flashbulbs.

The problem here is that for a pinhole camera 5-10 feet away is a lot (unless you have access to some big-boy studio flash units)...

Ken
 
Last edited by a moderator:
OP
OP

rbrigham

Member
Joined
Sep 7, 2008
Messages
125
Location
London
Format
Large Format
thanks for the replies guys

I know there's a bit of trial and error
but was a bit confused as to why the various online formula and calculators
give quite different results
as my pinhole to film is fixed in this instance
I have ordered a collection of sizes and will see what works best
I can't discuss the actual job but I'm sure you will all be interested
when it's been signed off
it's almost as crazy as the guy who did a wet plate stop Frame animation

Ralph thanks for the offer I have emailed you

Ken re. lighting

I'm very fortunate to have over 60'000 j of lighting
mostly made buy the English company Strobe
I have 2 of their swimming pool lights that have 4x 5' 5000j flash tubes on them
and various other 10'000j and 5000j lights
I have only got 14'000j of flash packs to power them up with but I can borrow more if I need it


we have run tests with tri x which came out great but a bit soft hence the initial question
and portra 400 which came out very contrasty with odd colour and is clearly well under exposed
and soft which I guess is down to the pinhole separating the wave lengths of different colours
vs tri-x general ability to cope with everything
we are testing again today so will use a lot more light as it's colour that we will ultimately be using
probably kodak vision3 500t which has similar properties to the portra 400


thanks

robin
 

dorff

Member
Joined
May 31, 2011
Messages
443
Location
South Africa
Format
Multi Format
There are usually two different approaches for pinhole sizing, resulting in different apertures. The highest contrast is achieved with a slightly larger aperture than the aperture for highest resolution. They differ by about 30% in size, IIRC. The f-stops will be constant, meaning you have to calculate the diameter of the pinhole from the "focal length". I am not near my resources at present, but if you don't find help between the other posters here, drop me a PM and I'll scan and email you the relevant stuff. The higher contrast formula is usually favoured, as higher contrast is usually visually more appealing than lower contrast with higher resolution. It does depend a lot on taste and circumstances, though. For wide-angle, you may experience dark corners with the "optimum" f-stop, so using a larger aperture might help at the expense of resolution and contrast. What size negative are you capturing? 35 mm? Then how can you accommodate such a short register? Unless you use a rangefinder, probably. Still, 21 mm is very short, and you might battle to get even enough illumination. Colour neg film will be better than slide film, no doubt.
 
Joined
Mar 18, 2005
Messages
4,945
Location
Monroe, WA, USA
Format
Multi Format
I'm very fortunate to have over 60'000 j of lighting mostly made buy the English company Strobe.

Sounds like that'll do! You're good to go then. Let us know how the project turns out...

:smile:

Ken
 

dorff

Member
Joined
May 31, 2011
Messages
443
Location
South Africa
Format
Multi Format
The highest contrast is achieved with a slightly larger aperture than the aperture for highest resolution.

Me bad, it is actually the other way round, and the f-stops are not quite constant.

The formula (based on contrast) is:

d = 1.56 * sqrt (f * L)

where f = focal length in mm, L = wavelength in mm, d = pinhole diameter in mm. For normal purposes, L is taken to be 555 nm, or 0.000555 mm.

The "ideal" f-stop increases with focal length.

In your case, with a focal length of 21 mm, the diameter should be 0.17 mm. This corresponds to an f-stop of 125, i.e. very close to f/128. For such a small aperture, the best would be to have it laser cut. If that isn't an option, consider a thin but sturdy metal foil. I have used copper tape with success. It can be found in craft shops, under stained glass consumables. Dent it with a ballpoint pen or other neatly round object, then pierce with a fine needle, against a slightly yielding backing such as hard rubber or wood.

"Way Beyond Monochrome II" has a chapter on pinhole photography. If you do not have the book yet, it is an excellent resource and worth every dollar.
 

Jim Jones

Subscriber
Joined
Jan 16, 2006
Messages
3,745
Location
Chillicothe MO
Format
Multi Format
I second the recommendation for Way Beyond Monochrome II. While it is about black and white photography, it covers the basics of photography that also apply to color, and is one of the most inspiring photographic books that I own. Its chapter on pinhole photography is more reliable than many other published sources. For much information on pinhole photography, look for Eric Renner's Pinhole Photography, available from http://www.pinholeresource.com/ and online booksellers. Two fine online resources are Dead Link Removed and http://www.f295.org/Pinholeforum/forum/Blah.pl.
 

StoneNYC

Member
Joined
Aug 5, 2012
Messages
8,349
Location
Antarctica
Format
8x10 Format
Does one need to make the ball point pen indent? Or is that just for ease of adding a hole?

I recently did this with 11x14 x-ray film with a very "unsharp" image. What confuses me is, the exposure came out fairly correctly, so how off can I be and still get an image that's correctly exposed but not fully in focus?

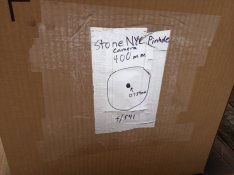
Lens stats (and "lens")

ImageUploadedByTapatalk1391307934.879647.jpg

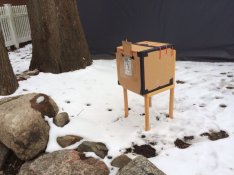
"Quadpod"

ImageUploadedByTapatalk1391307948.078368.jpg

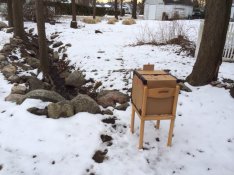
What I was shooting

ImageUploadedByTapatalk1391307961.981125.jpg

This is before stripping one side of the emulsion but gives you an idea of the exposure.

ImageUploadedByTapatalk1391307971.597176.jpg

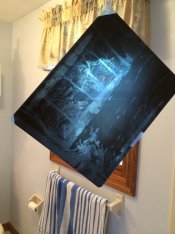
Final image

ImageUploadedByTapatalk1391308010.318827.jpg

Thanks for any help.
 

StoneNYC

Member
Joined
Aug 5, 2012
Messages
8,349
Location
Antarctica
Format
8x10 Format
I should mention, the exposure was 6 minutes and I used a 70nm singer needle to make the hole, the hole should technically be 0.739mm but I figured 0.700 would be good enough, plus with movement of pushing it in I probably made it bigger anyway? Am I wrong? Should I go to the 80nm (0.800mm) needle?
 

DWThomas

Subscriber
Joined
Jun 13, 2006
Messages
4,601
Location
SE Pennsylvania
Format
Multi Format
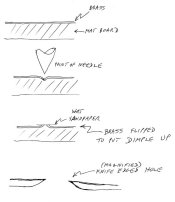
What is the hole in? It is good to have a knife edge around the pinhole. Piercing most materials by pushing in a needle pushes up bits and pieces around the hole. Likewise, if the material is thick (let's define that as a thickness approaching a significant percentage of the intended hole diameter), one is producing a cylinder which is also problematic.

The classic approach is to press a dimple into a sheet of thin brass shim stock and then sand it with real fine wet-or-dry sand paper used wet. In short, the needle doesn't really set the hole size. So far the best results I've gotten were using the dimple and sand method on 1-mil (0.001 inch) brass shim stock.


_Pinhole_Fab_2.jpg
 
Last edited by a moderator:

StoneNYC

Member
Joined
Aug 5, 2012
Messages
8,349
Location
Antarctica
Format
8x10 Format
What is the hole in? It is good to have a knife edge around the pinhole. Piercing most materials by pushing in a needle pushes up bits and pieces around the hole. Likewise, if the material is thick (let's define that as a thickness approaching a significant percentage of the intended hole diameter), one is producing a cylinder which is also problematic.

The classic approach is to press a dimple into a sheet of thin brass shim stock and then sand it with real fine wet-or-dry sand paper used wet. In short, the needle doesn't really set the hole size. So far the best results I've gotten were using the dimple and sand method on 1-mil (0.001 inch) brass shim stock.


View attachment 81335

I used foil tape. The kind for metal duct work. So it's fairly thin.
I did pray paint the back with flat black paint (inside the whole box).

Maybe I'll sand the back and thin it out and try again with the pen dent trip.
 

StoneNYC

Member
Joined
Aug 5, 2012
Messages
8,349
Location
Antarctica
Format
8x10 Format
I used foil tape. The kind for metal duct work. So it's fairly thin.
I did pray paint the back with flat black paint (inside the whole box).

Maybe I'll sand the back and thin it out and try again with the pen dent trip.

Would it be smarter to add the hole from the back so the light is perfectly round on the inside?
 

winger

Subscriber
Joined
Jan 13, 2005
Messages
3,975
Location
southwest PA
Format
Multi Format
I agree with Dave about sanding a dimple. I usually use parts of soda cans for my pinholes and then color the inner side using a black sharpie. They may not be as thick as brass shims, but they've worked for me so far. I have a loupe with a measuring scale in it (in mm) and have used that to see how round and the size of the pinholes.


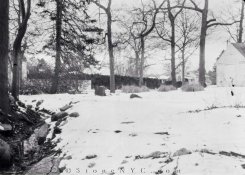
This one was done on Arista lith film (first version, IIRC) using a 0.50mm pinhole (root beer can) 5 inches from the film plane on 4x5. I had better results with the lith than with paper negs (thickness an issue?), but the exposure is off a bit in this one.
 

Attachments

  • imgc950-2sm.jpg
    imgc950-2sm.jpg
    387.5 KB · Views: 112
Last edited by a moderator:

StoneNYC

Member
Joined
Aug 5, 2012
Messages
8,349
Location
Antarctica
Format
8x10 Format
I agree with Dave about sanding a dimple. I usually use parts of soda cans for my pinholes and then color the inner side using a black sharpie. They may not be as thick as brass shims, but they've worked for me so far. I have a loupe with a measuring scale in it (in mm) and have used that to see how round and the size of the pinholes.


This one was done on Arista lith film (first version, IIRC) using a 0.50mm pinhole (root beer can) 5 inches from the film plane on 4x5. I had better results with the lith than with paper negs (thickness an issue?), but the exposure is off a bit in this one.

Way clearer than my image, but I fail to understand how soda can metal is thinner than foil tape... I'll work on it when I get home on Monday.
 

winger

Subscriber
Joined
Jan 13, 2005
Messages
3,975
Location
southwest PA
Format
Multi Format
Way clearer than my image, but I fail to understand how soda can metal is thinner than foil tape... I'll work on it when I get home on Monday.

Soda cans are thinner than the brass shims that many people use. I have no clue whether they are thinner or thicker than the foil tape. And thinner, but really stiff would be a good thing, too, as then the edges of the pinhole wouldn't be as much of a tunnel - which might be an issue if it gets really thick.
 

DWThomas

Subscriber
Joined
Jun 13, 2006
Messages
4,601
Location
SE Pennsylvania
Format
Multi Format
Back in about 2000-ought-06 I did a pinhole lensboard for my old B&J Press 4x5 using soda can sidewall. It measured 0.004 inch thick. Of course, soda cans have gotten to where they need the soda inside to stand up, they may be thinner these days. (Lucky we can't see light through them! :laugh: )

I then used 0.002 inch brass for the SQ-A body cap pinhole. And since have been using 0.001 inch brass which is admittedly a bit touchy to handle. I have also used chemical blackening on the last few (vs. black marker) and believe that is better. Some of those marker pens can leave small blobs here and there.
 
Photrio.com contains affiliate links to products. We may receive a commission for purchases made through these links.
To read our full affiliate disclosure statement please click Here.

PHOTRIO PARTNERS EQUALLY FUNDING OUR COMMUNITY:


Ilford ADOX Freestyle Photographic Stearman Press Weldon Color Lab Blue Moon Camera & Machine
Top Bottom