

So I'm getting used to using Vuescan, after using Nikon Scan for many years. Use Nikon LS9000.
Noticed something weird. It's not a big problem, but I'm wondering what's going on.
When I do preview scan of a frame from Hasselblad negatives, Vuescan shows faint image outside of the black border. (I like to include black border of neg in my scans. I adjust buffer setting in Vuescan, so border doesn't affect exposure.)
It's kind of a ghost image. There obviously is no image there on the negatives. It's the vertical side of negs. Even if it were the top or bottom of image, the next image would be much farther away.
What is Vuescan doing? Is it happening because of some setting in Vuescan which I should change?
It's not a big deal. I can crop it out before I make the scan or afterwards in Photoshop. But I'm wondering what's going on.
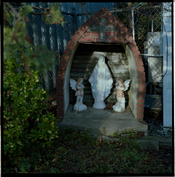
Attached is sample. It might be a little hard to see, but if you look closely on the right side, you will see a faint version of the lines of the clapboard on the house to the right of the black border. Toward the bottom, the faint image doesn't mirror what is next to it in the image, so that's confusing, too.
Anyone else notice this when using Vuescan?
Thanks.
Noticed something weird. It's not a big problem, but I'm wondering what's going on.
When I do preview scan of a frame from Hasselblad negatives, Vuescan shows faint image outside of the black border. (I like to include black border of neg in my scans. I adjust buffer setting in Vuescan, so border doesn't affect exposure.)
It's kind of a ghost image. There obviously is no image there on the negatives. It's the vertical side of negs. Even if it were the top or bottom of image, the next image would be much farther away.
What is Vuescan doing? Is it happening because of some setting in Vuescan which I should change?
It's not a big deal. I can crop it out before I make the scan or afterwards in Photoshop. But I'm wondering what's going on.
Attached is sample. It might be a little hard to see, but if you look closely on the right side, you will see a faint version of the lines of the clapboard on the house to the right of the black border. Toward the bottom, the faint image doesn't mirror what is next to it in the image, so that's confusing, too.
Anyone else notice this when using Vuescan?
Thanks.
Attachments
Last edited:


