

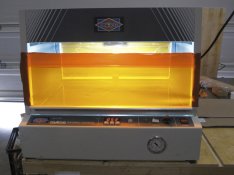
I like the compact size of the NuArc NL22, but one thing that it lacks compared to its larger brethren (like the 26-1ks) is a vacuum gauge.
Many people have commented that pulling full vacuum can dry out coated papers, or in my case, pull excess water out of my sensitized carbon tissues. I've had it in my mind to try and retrofit a vacuum gauge to the NL22 for quite some time. I finally got a little free time, and I went ahead and did it.
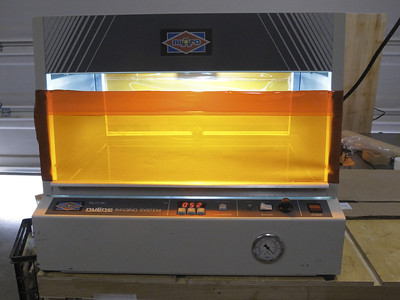
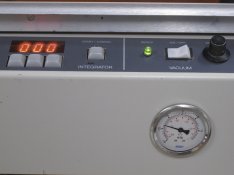
The finished product.
Total cost to me was about $60, but a less-expensive vacuum gauge and tubing might be possible. I didn't keep super-tight track of my time, but I don't think it took me more than 3 hours total, and a big chunk of that was refining the jigsaw-cut hole for the gauge into something a little rounder and smoother with my dremel.
Here's a link to a gallery of my work photos:
http://gmikol.smugmug.com/Other/NuArc/18149870_RZXMmh
I'm also going to attach images to this post, so they'll get archived.
Materials
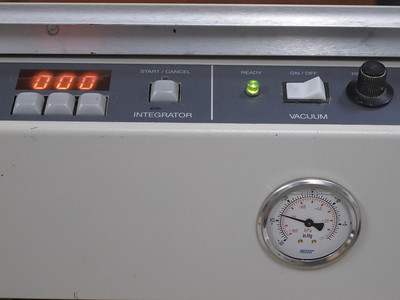
- Panel mount vacuum gauge. I chose panel-mount so that it sat (nearly) flush on the front face of the unit, and was less likely to get knocked in moving, as the unit gets put away in a cubby-hole when it's not being used. I chose a glycerin-filled 2 1/2" gauge. A glycerin filled gauge is supposed to avoid needle flutter, which I thought might be a problem due to the small volume of the evacuated space, though I'm not sure that's strictly necessary. I used McMaster # 38545K191 (www.mcmaster.com). It's certainly possible to use a smaller dial face, or even a stem-mount, either on the very front like I did, or on the control panel.
- Tubing
I used a 1/4" ID (same as stock) flexible rubber, vacuum-rated tubing out of a material called Norprene (McMaster # 51075K282). It is more flexible than the stock stuff. This stuff is 10 ft. minimum order, and I only ended up using about 5 ft. of it. There may be other options that you could source locally or order by the foot. Just make sure the tubing isn't too "floppy", as it could collapse under the vacuum.
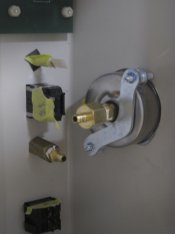
- Tube fittings
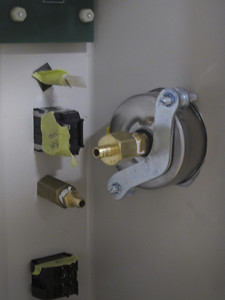
I got my 1/4" tubing fittings at my local hardware store. 1/4" tubing fittings are pretty common. I reused one tee that was in the original tubing, and the barb that was connected to the vacuum pump. You can re-use the barb that attaches to the bleeder valve as well, but I cracked mine when a wrench slipped, so I replaced it with a brass one. I needed to buy one additional tee, plus a barb for the vacuum gauge. Here's the specs on all the parts for reference:
Vaccuum pump: 1/4" NPT (Male) to 1/4" hose barb
Bleeder Valve: 1/8" NPT (Male) to 1/4" hose barb
Tees: 1/4" hose barb, all 3 legs (you need 2 of these total, one can be salvaged from the old tubing).
Vacuum gauge: 1/4" NPT (Female) to 1/4" hose barb (this will vary depending on the gauge you use. Check your specs).
Tools
- A template or other means of marking the hole to be cut out for the gauge.
- Misc. hand tools: screwdriver, pliers, scissors/shears/razor knife to cut tubing, wrench for tubing fittings.
- Drill / jigsaw / Dremel / hole saw
Method
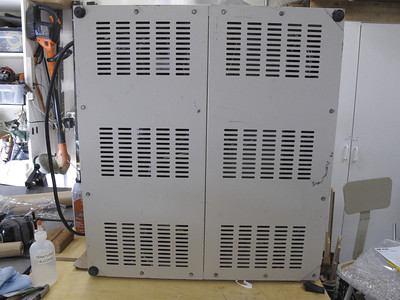
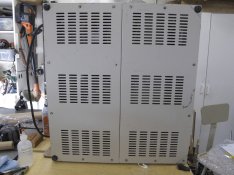
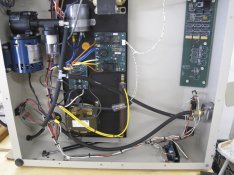
1) Remove the bottom panels of the NuArc.

Please make sure the unit is disconnected from mains power before removing the bottom panels. The metal halide bulb in this unit runs off almost 400V, which is enough to kill someone.
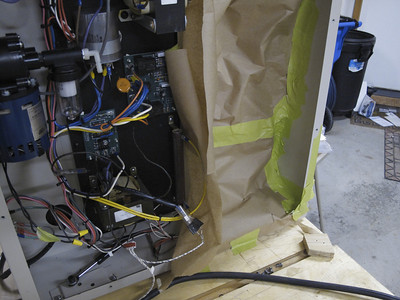
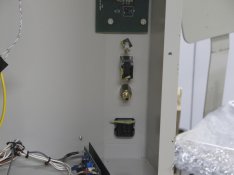
2) Mark any wires you disconnect from the control panel, and take out all the old tubing, plus any fittings you plan on replacing.

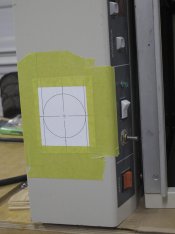
3) Mark out the area to be cut. I also masked off the back side to prevent any metal chips/dust from getting into the electronics.

4) Cut the hole out. I used a jigsaw, followed by a dremel to clean up the hole, since I did not have a hole-saw of the right diameter. Use whatever method works best for you, but keep in mind that the steel is relatively thick (16 ga. ?, almost 1/16" thick), and the flange on a panel-mount gauge like this is relatively narrow, so there's not a lot of room for error.
5) Mount the gauge in the hole, using the supplied hardware.
6) Connect all the tubing. I used zip-ties on all the connections, but that seemed to be wasted effort, as it made no difference in the max. vacuum.

Once I had it all hooked up, I flipped the unit back over and powered up the vacuum. It maxes out at about 23.5" Hg. As vacuums go, that's pretty weak, but many think that the vacuum should be limited to between 5-10" Hg, to limit drying out coated papers, or pulling excess moisture out of sensitized gelatin for carbon printing.
I've found that the dial on my bleeder valve is a bit loose, and so the vibration from the vacuum pump can cause it to open or close a bit in operation, so I still need to figure out a way to make the dial a bit stiffer. Other units may not have this problem if they have less wear on them than mine does.
I know there are some other NL22 owners out there in APUG-land. Hope somebody finds this useful.
--Greg
Many people have commented that pulling full vacuum can dry out coated papers, or in my case, pull excess water out of my sensitized carbon tissues. I've had it in my mind to try and retrofit a vacuum gauge to the NL22 for quite some time. I finally got a little free time, and I went ahead and did it.
The finished product.
Total cost to me was about $60, but a less-expensive vacuum gauge and tubing might be possible. I didn't keep super-tight track of my time, but I don't think it took me more than 3 hours total, and a big chunk of that was refining the jigsaw-cut hole for the gauge into something a little rounder and smoother with my dremel.
Here's a link to a gallery of my work photos:
http://gmikol.smugmug.com/Other/NuArc/18149870_RZXMmh
I'm also going to attach images to this post, so they'll get archived.
Materials
- Panel mount vacuum gauge. I chose panel-mount so that it sat (nearly) flush on the front face of the unit, and was less likely to get knocked in moving, as the unit gets put away in a cubby-hole when it's not being used. I chose a glycerin-filled 2 1/2" gauge. A glycerin filled gauge is supposed to avoid needle flutter, which I thought might be a problem due to the small volume of the evacuated space, though I'm not sure that's strictly necessary. I used McMaster # 38545K191 (www.mcmaster.com). It's certainly possible to use a smaller dial face, or even a stem-mount, either on the very front like I did, or on the control panel.
- Tubing
I used a 1/4" ID (same as stock) flexible rubber, vacuum-rated tubing out of a material called Norprene (McMaster # 51075K282). It is more flexible than the stock stuff. This stuff is 10 ft. minimum order, and I only ended up using about 5 ft. of it. There may be other options that you could source locally or order by the foot. Just make sure the tubing isn't too "floppy", as it could collapse under the vacuum.
- Tube fittings
I got my 1/4" tubing fittings at my local hardware store. 1/4" tubing fittings are pretty common. I reused one tee that was in the original tubing, and the barb that was connected to the vacuum pump. You can re-use the barb that attaches to the bleeder valve as well, but I cracked mine when a wrench slipped, so I replaced it with a brass one. I needed to buy one additional tee, plus a barb for the vacuum gauge. Here's the specs on all the parts for reference:
Vaccuum pump: 1/4" NPT (Male) to 1/4" hose barb
Bleeder Valve: 1/8" NPT (Male) to 1/4" hose barb
Tees: 1/4" hose barb, all 3 legs (you need 2 of these total, one can be salvaged from the old tubing).
Vacuum gauge: 1/4" NPT (Female) to 1/4" hose barb (this will vary depending on the gauge you use. Check your specs).
Tools
- A template or other means of marking the hole to be cut out for the gauge.
- Misc. hand tools: screwdriver, pliers, scissors/shears/razor knife to cut tubing, wrench for tubing fittings.
- Drill / jigsaw / Dremel / hole saw
Method
1) Remove the bottom panels of the NuArc.
Please make sure the unit is disconnected from mains power before removing the bottom panels. The metal halide bulb in this unit runs off almost 400V, which is enough to kill someone.
2) Mark any wires you disconnect from the control panel, and take out all the old tubing, plus any fittings you plan on replacing.
3) Mark out the area to be cut. I also masked off the back side to prevent any metal chips/dust from getting into the electronics.
4) Cut the hole out. I used a jigsaw, followed by a dremel to clean up the hole, since I did not have a hole-saw of the right diameter. Use whatever method works best for you, but keep in mind that the steel is relatively thick (16 ga. ?, almost 1/16" thick), and the flange on a panel-mount gauge like this is relatively narrow, so there's not a lot of room for error.
5) Mount the gauge in the hole, using the supplied hardware.
6) Connect all the tubing. I used zip-ties on all the connections, but that seemed to be wasted effort, as it made no difference in the max. vacuum.
Once I had it all hooked up, I flipped the unit back over and powered up the vacuum. It maxes out at about 23.5" Hg. As vacuums go, that's pretty weak, but many think that the vacuum should be limited to between 5-10" Hg, to limit drying out coated papers, or pulling excess moisture out of sensitized gelatin for carbon printing.
I've found that the dial on my bleeder valve is a bit loose, and so the vibration from the vacuum pump can cause it to open or close a bit in operation, so I still need to figure out a way to make the dial a bit stiffer. Other units may not have this problem if they have less wear on them than mine does.
I know there are some other NL22 owners out there in APUG-land. Hope somebody finds this useful.
--Greg
Attachments
-
 i-Qh7DVDk-XL.jpg194.5 KB · Views: 197
 -
 i-pvL27qN-XL.jpg215.5 KB · Views: 185
 -
 i-rq3VWJg-XL.jpg116.7 KB · Views: 177
 -
 i-5ZkPX9L-XL.jpg87.5 KB · Views: 203
 -
 i-WB6p93g-XL.jpg204.1 KB · Views: 179
 -
 i-vw6g3q4-XL.jpg65.3 KB · Views: 188
 -
 i-pQSskXx-XL.jpg220.7 KB · Views: 200
 -
 i-Xfs838G-XL.jpg141.6 KB · Views: 192
 -
 i-NgdpJ4h-XL.jpg168.4 KB · Views: 196
