• Welcome to Photrio!
    Registration is fast and free. Join today to unlock search, see fewer ads, and access all forum features.
    Click here to sign up

Nova Dryer - Wavy edges

Recent Classifieds

Forum statistics

Threads
201,760
Messages
2,829,659
Members
100,929
Latest member
WBM
Recent bookmarks
0

Jessestr

Member
Allowing Ads
Joined
Mar 31, 2014
Messages
399
Format
35mm
So, I bougth myself a Nova Dryer after trying a cheap fiber dryer and using gummed tape (which works really well , but has its downsides) to get my prints flat.

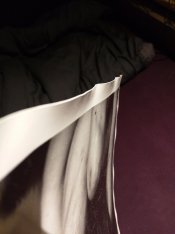
All good, heated it up untill the max. Put print on it (squeegeed almost all the water off), stretched the cloth over it and waited. When the print starts to dry I can immediatly see that the edges are getting wavy (see attachment) beneath the cloth.

As people suggested and the manual said, reduce temperature and try again. I've done this, until I really can't go lower on the temperature other then "OFF". It's much better but still getting the wavy edges. How can I deal with this problem? it's quite an expensive tool.

The attachment shows the edges after heating on MAX. (should be 70 degr. celcius).
I have the problem both with Adox MCC 110 and Ilford FB Warmtone
 

Attachments

  • IMG_20160630_143137.jpg
    IMG_20160630_143137.jpg
    106.2 KB · Views: 218

Gerald C Koch

Member
Allowing Ads
Joined
Jul 12, 2010
Messages
8,131
Location
Southern USA
Format
Multi Format
Now you know why you will never see one of these gadgets in a professional darkroom. They use frames with plastic screening and air-dry prints. Another down side to them is that the cloth must be keep clean as it will build up chemicals which can cause staining.
 

tedr1

Member
Allowing Ads
Joined
Feb 3, 2016
Messages
940
Location
50 miles from NYC USA
Format
Multi Format
There is a whole thread devoted to getting FB prints flat...................

Expect to trim the wavy edges off, or try another method.
 

Sim2

Member
Allowing Ads
Joined
Nov 21, 2009
Messages
492
Location
Wiltshire UK
Format
Medium Format
Hallo,
There is a good article about flat-bed dryers at:

http://www.darkroomdave.com/tutorial/drying-fibre-based-paper-using-flatbed-dryer/

I understand that Dave Butcher uses the dryers all the time for his prints.

I have recently started to trial one of these dryers and have encountered an issue similar to yours, I have found that using a sheet of watercolour paper between the print and the apron helps with flatness (and keeping fluff of the wet print) and putting it under a weight when dry. A trial print I dried in this way has stayed as flat as when it came out from the weights; as this was a trial print that has been washed numerous times, for a variety of reasons, I would expect a less but adequately washed print to be flatter.

There may be a case of playing with this process till you find a 'sweet spot' for your process. I have good expectations of my flat-bed. Have fun!
 

Ronald Moravec

Member
Allowing Ads
Joined
Jan 17, 2005
Messages
1,355
Location
Downers Grov
Only a few ways that work.
3` diameter belted dryer. Used one in 1960 college & have not seen one since. Works well. Flats and small round ones do not work

Blotter rolls, NOT books Can`t find these either

Blotter stack with fan. Blotters intermixed with corrigated cardboard. Mine is a garage sale Burke & James. Some were made in the 70`s under very classy brand, Salthill. Works well.

I used to tape prints to a basswood mechanical drawing board. Slow but works. Heavy glass is also reported to work.

Back to back mount and hang. No good

Screens. Very marginal if at all.

It simply comes down to the pros used blotter stack or 3 foot diameter belt fed. If you are handy, you could make a blotter stack and fan set up. Or give up and use RC paper
 

williaty

Member
Allowing Ads
Joined
Mar 31, 2016
Messages
179
Location
Licking County, Ohio, USA
Format
Medium Format
I've always just dried them on a screen and flattened them in a dry mount press (just flattened, not mounted). Certainly that can't be more expensive to buy than some of these drying contraptions!
 
OP
OP

Jessestr

Member
Allowing Ads
Joined
Mar 31, 2014
Messages
399
Format
35mm
Hallo,
There is a good article about flat-bed dryers at:

http://www.darkroomdave.com/tutorial/drying-fibre-based-paper-using-flatbed-dryer/

I understand that Dave Butcher uses the dryers all the time for his prints.

I have recently started to trial one of these dryers and have encountered an issue similar to yours, I have found that using a sheet of watercolour paper between the print and the apron helps with flatness (and keeping fluff of the wet print) and putting it under a weight when dry. A trial print I dried in this way has stayed as flat as when it came out from the weights; as this was a trial print that has been washed numerous times, for a variety of reasons, I would expect a less but adequately washed print to be flatter.

There may be a case of playing with this process till you find a 'sweet spot' for your process. I have good expectations of my flat-bed. Have fun!

I have heard the same just from my German lab which do my color processing. They use a passe partout paper in their press and they get even results, however they press the DRY print. (They leave them on screens)

My questions on your method is, if you take a wet print and put the watercolor paper on top. Will the print emulsion not stick to it? I've had it happen once, as a test. I dryed fiber paper face down on glass, had to scratch it off....
 

Sim2

Member
Allowing Ads
Joined
Nov 21, 2009
Messages
492
Location
Wiltshire UK
Format
Medium Format
Hi Jessestr,
Good timing on your part as this afternoon is the next time I could log-in.

*other peoples experiences may differ from mine*
With regard to drying on glass, I tried this and the emulsion did stick to the glass but emulsion facing outwards was no real problem, the prints could dry till they 'popped' off the glass or with taping with artists tape would release when I cut them off - the only times they stuck with this method was when I used too much water and excess 'glue' seeped into the print. A great way of flattening prints, my issue with it was that it dried the print at the wet/expanded size and the paper did not expand equally in all directions leading to an oblong print of a square neg, only by less than 1/4 of an inch or so, but still visisble.

I do not have my process with the flat-bed dryer totally sorted yet, been unable to do more testing, however on what I have done:
I have only been drying with the back of the print in contact with the hot plate. Initially I had issues with 'fluff' of the new apron sticking to the print emulsion. In seeking a solution to this I heard about using the watercolour paper between the print face and the apron. I was sceptical. A hot-pressed type of paper is to be used, presumably as this has been heat treated already but I don't know for sure, and I have not found it to stick to the emulsion at all, either when wet or when dry. I don't squeege first, being a bit lazy I let it drip a bit from the washer and then use the water left in the print to ensure a consistent contact with the hot plate with no air bubbles, cover the emulsion face with a slightly larger sheet (as that is what I bought!) of the watercolour paper, tension the cloth and away we go. So far I have found no difference in finished print if I remove it when dry but still hot or if I leave it under the apron to cool off. So far a period under some weights after drying assists with flatness. I have only been using Ilford multigrade classic, warmtone or MG300 so other papers may be different and my test prints have had numerous 'soakings' so may have taken up more water into the base than may occur during a 'normal' print run.

I am happy with it so far, but I suppose time will tell. It's less time consuming than my last method.
Hope this is of some assistance and good luck with your ongoing testing.

<edit> P.S. I believe the heated mounting press is like the 'gold standard' for flat prints but I could not justify the cost of a decent secondhand one or, more relevant, contemplate the difficulties of relocating with the press when moving - they are heavy heavy heavy, easily a two person operation and not sure I would like to use a car to transport them either.
 
OP
OP

Jessestr

Member
Allowing Ads
Joined
Mar 31, 2014
Messages
399
Format
35mm
Hi Jessestr,
Good timing on your part as this afternoon is the next time I could log-in.

*other peoples experiences may differ from mine*
With regard to drying on glass, I tried this and the emulsion did stick to the glass but emulsion facing outwards was no real problem, the prints could dry till they 'popped' off the glass or with taping with artists tape would release when I cut them off - the only times they stuck with this method was when I used too much water and excess 'glue' seeped into the print. A great way of flattening prints, my issue with it was that it dried the print at the wet/expanded size and the paper did not expand equally in all directions leading to an oblong print of a square neg, only by less than 1/4 of an inch or so, but still visisble.

I do not have my process with the flat-bed dryer totally sorted yet, been unable to do more testing, however on what I have done:
I have only been drying with the back of the print in contact with the hot plate. Initially I had issues with 'fluff' of the new apron sticking to the print emulsion. In seeking a solution to this I heard about using the watercolour paper between the print face and the apron. I was sceptical. A hot-pressed type of paper is to be used, presumably as this has been heat treated already but I don't know for sure, and I have not found it to stick to the emulsion at all, either when wet or when dry. I don't squeege first, being a bit lazy I let it drip a bit from the washer and then use the water left in the print to ensure a consistent contact with the hot plate with no air bubbles, cover the emulsion face with a slightly larger sheet (as that is what I bought!) of the watercolour paper, tension the cloth and away we go. So far I have found no difference in finished print if I remove it when dry but still hot or if I leave it under the apron to cool off. So far a period under some weights after drying assists with flatness. I have only been using Ilford multigrade classic, warmtone or MG300 so other papers may be different and my test prints have had numerous 'soakings' so may have taken up more water into the base than may occur during a 'normal' print run.

I am happy with it so far, but I suppose time will tell. It's less time consuming than my last method.
Hope this is of some assistance and good luck with your ongoing testing.

<edit> P.S. I believe the heated mounting press is like the 'gold standard' for flat prints but I could not justify the cost of a decent secondhand one or, more relevant, contemplate the difficulties of relocating with the press when moving - they are heavy heavy heavy, easily a two person operation and not sure I would like to use a car to transport them either.
Thanks for the detailed answer. I'll try it right away. However what is the temperature and time you use for the press?
 

Sim2

Member
Allowing Ads
Joined
Nov 21, 2009
Messages
492
Location
Wiltshire UK
Format
Medium Format
I don't know the exact temperature only that my dial is more in the 'cool' half of the range rather than the 'hotter' half.
Timing - erm... again not sure of exact times, I have gauged it roughly by how the cloth on top feels, that gets damper as the print initally dries and drier as the print looses more/most of the water, then a bit of trial and error - I take the print out and see how it feels, not very scientific :-/ but the prints I have left under the tensioned cloth after the machine has been switched off have even been left overnight before I look at them.
As you may tell my process is still in the trials stage and being worked on...!
 
OP
OP

Jessestr

Member
Allowing Ads
Joined
Mar 31, 2014
Messages
399
Format
35mm
Nothing works... recuding temperature, reducing time or extending it... wet...dry... using watercolour paper.. start hot and end cool... Always comes out flat with wrinkled edges... I'm going to ask for a refund, this is really an expensive tool that doesn't actually work.
 
OP
OP

Jessestr

Member
Allowing Ads
Joined
Mar 31, 2014
Messages
399
Format
35mm
Finally found something that works. Using a piece of cardboard (nice and clean) put it on the print, I just do this so the apron doesn't get too much chemicals on it over time. 10 minutes at about 45 degrees. Just before it's dry I pull it out, put it between two more cardboard pieces and put some heavy weights on it. The cardboard has a smooth surface, it's like thick paper. I'm going to grab some acid free materials in the future.

I read about this on the internet, to pull before it's 100% dry and seems to work. Print almost dry in 10 minutes, just stacking the prints on top and put heavy weights on it like books. Works like a charm.
 

Patrick Robert James

Member
Allowing Ads
Joined
Jul 31, 2012
Messages
3,417
Format
35mm RF
First- If your print stuck to the glass, you didn't wax the glass. I use waxed Plexiglas to ferrotype prints and never have a problem. Drying taped prints on glass is a waste of time IMO.

Second- If you let the prints dry a little before you put them in the dryer you will have more success. I use 300 lb. hot press watercolor paper over the prints which some people might call "cardboard" since it is pretty thick. If you don't want to wait then you need to dry the print in stages by putting it in, rubbing the apron to flatten the print for a few seconds then flipping the print over and repeating. You will get a flat print.

If you have curly dry prints and you want to flatten them, use the dryer. Turn the heat all the way up, make a stack of prints and put them in the dryer face up. Close the dryer and turn off the heat. Your prints will come out flat. You may have to repeat this though.

If you want to keep your prints flat, overstuff your storage boxes. Put a few more prints in the boxes than they can hold and keep the boxes in stacks. The prints will remain flat pretty much forever that way because they will always be compressed.

Hope that helps you.
 
OP
OP

Jessestr

Member
Allowing Ads
Joined
Mar 31, 2014
Messages
399
Format
35mm
First- If your print stuck to the glass, you didn't wax the glass. I use waxed Plexiglas to ferrotype prints and never have a problem. Drying taped prints on glass is a waste of time IMO.

Second- If you let the prints dry a little before you put them in the dryer you will have more success. I use 300 lb. hot press watercolor paper over the prints which some people might call "cardboard" since it is pretty thick. If you don't want to wait then you need to dry the print in stages by putting it in, rubbing the apron to flatten the print for a few seconds then flipping the print over and repeating. You will get a flat print.

If you have curly dry prints and you want to flatten them, use the dryer. Turn the heat all the way up, make a stack of prints and put them in the dryer face up. Close the dryer and turn off the heat. Your prints will come out flat. You may have to repeat this though.

If you want to keep your prints flat, overstuff your storage boxes. Put a few more prints in the boxes than they can hold and keep the boxes in stacks. The prints will remain flat pretty much forever that way because they will always be compressed.

Hope that helps you.

Thanks for these helpful tips. Going to test them out on my current workflow!
 
OP
OP

Jessestr

Member
Allowing Ads
Joined
Mar 31, 2014
Messages
399
Format
35mm
So I was experimenting again and for some reason it just works today without curling the edges.... Difference is... I check every 1-2 minutes on the print how dry it is etc, when it's like almost dry, the print is almost flat. Just pressing them between books and it's fine.

Problem with retracting the print from the machine before it was dry is that after a 24 hour period, they are still not fully dry at all because I stacked them with other not so dry prints. So I was trying to dry them further and further and got no wavy edges anymore.
 
OP
OP

Jessestr

Member
Allowing Ads
Joined
Mar 31, 2014
Messages
399
Format
35mm
May have somehow to do with humidity

Celebrated too quickly. Not seems to be working anymore... :smile: However prints that are slighty slighty wet can be pressed really good I found out. I pressed prints yesterday until 90% dry and they are still wet today and I put them back in the dryer and they seem perfect.

So it might have to do with what Patrick Robert James said. Let the print dry first before really drying it out. I might try the other trick today with flipping it over.
 

MartinP

Member
Allowing Ads
Joined
Jun 23, 2007
Messages
1,569
Location
Netherlands
Format
Medium Format
Trimming a couple of millimeters off each side often seems to help relax the paper, but these days I just use the heated-plate dryers to do prints under 40cm. Anything bigger gets taped on to polycarbonate sheets (the flat, clean plastic usually used for 'unbreakable' glazing) to dry and then, after drying, has the tape trimmed off. The appropriate tape is available as watercolour-paper tape from any artshop.
 
OP
OP

Jessestr

Member
Allowing Ads
Joined
Mar 31, 2014
Messages
399
Format
35mm
Okay! What works is, wash the print, let it dry over night and then press it. No problems :smile: It's because I used gummed tape that makes the edges stress and curl. I have to de-stress the paper before it works. They are flat!!
 

Sim2

Member
Allowing Ads
Joined
Nov 21, 2009
Messages
492
Location
Wiltshire UK
Format
Medium Format
Jessestr - glad you found a routine that works for you, I mentioned that I found a pressed print to remain flatter than a non-pressed print. I am firmly of the belief that drying fibre papers is the darkest of these dark arts and what works for one does not necessarily work for another! Fingers crossed for continued success.
 

M Carter

Member
Allowing Ads
Joined
Jan 23, 2013
Messages
2,149
Location
Dallas, TX
Format
Medium Format
In defense of the canvas - stretchy driers...

They're cheap and widely available used; they'll do 2 11x14's or 4 8x10's. They WILL get a print pretty dang flat, and do it FAST. They WON'T transfer chemicals if used properly.

So, find one, pop one of the sheetmetal sections off, pull the arms and wash the canvas. PUT THE CANVAS BACK ON WET and let it air dry.

Buy some heavy artist canvas, wash and dry, and trim it to fit the metal sheets, where it will just hang out a bit.

Squeegie your prints and put them on the COLD surface. Don't pre-heat the dang thing (you can get a pretty nasty burn, too)! Cover with an extra layer or two of canvas. Close up and turn on to about half heat. If you use both sides, flip the thing every five minutes. Give it 12 to 18 minutes. Turn off and let cool down some. Stack the prints between 2 sheets of clean matte board, weight with books, and let sit a couple days. I very rarely get the frilled edges this way.

The extra canvas layers makes the whole thing tighter (so the edges can't wrinkle); it's disposable if you worry about chem transfer. When the dryer is running, steam (and any residual chem) is being forced through the new canvas and then the original canvas - away from the print. The odds of a the print absorbing anything (if you wash your prints properly) seem nil to me. And if you're worried, toss the canvas sheets when you feel it's iffy.

Hell yeah, I'd LOVE LOVE LOVE a drymount press and somewhere to keep the damn thing, and I really like printing 16x20 and larger. But for 11x14 and smaller, the canvas drier kicks all kinds of ass (for me anyway). Small and easy to store, does the job quickly. Very glad to have one.
 
Photrio.com contains affiliate links to products. We may receive a commission for purchases made through these links.
To read our full affiliate disclosure statement please click Here.

PHOTRIO PARTNERS EQUALLY FUNDING OUR COMMUNITY:


Ilford ADOX Freestyle Photographic Stearman Press Weldon Color Lab Blue Moon Camera & Machine
Top Bottom