j-dogg
Member
My scouring of the internet has found me many tutorials on how to regrease the later Gauss 105 but not the earlier silvernose Sonnar model which is based on the rangefinder lens. Today I decided to fix that.
This will cover the regrease, which yours probably needs, and the front and rear elements. This would have been a full one but the second ring to get into the optical block I can't remove it, it's either stuck or that lacquer in the 60s was just made different. Luckily, my block was mostly OK except a small amount of fungus on the first element. Also the aperture ring was a no go because well, it didn't need to be done and usually they never have problems but I'll cover what the screws do on it.
Before you attempt this, buy a good set of JIS screwdrivers. If I catch you using WD40 for anything other than cleaning hard grease off I will make sure the Nikon gods punch holes in all of your shutters.
This lens is almost completely accessed from the top, with the exception of the rear element and the plastic alignment tab but even that can be done without taking off the baseplate. The tension spring on the baseplate is a pain to reinstall if you remove it so if you don't have to drop that baseplate, don't. We will start from the top.
Contrary to previous experience, you don't need a rubber cup to get the nameplate off. It's held on a different way and you'll need some good screwdrivers, preferrably a JIS set, to get into it. First, remove the focus ring. There are three screws. Don't lose them.
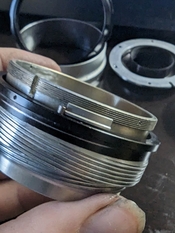
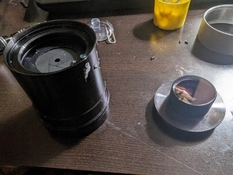
Once you get the focus ring off, get the silver filter ring off. That's the part on the top in the first image. This is two small set screws, very very tiny, loosen them. You don't need to fully remove them, just loosen them enough to where the ring will twist off, counter-clockwise.
Now that you have the filter ring off, remove the DoF scale ring, also three screws. You will notice these are shorter than the focus ring screws, don't mix them up. Slide the scale ring up.

Now you have access to the optical block, hopefully. This top ring is held in with a lacquer material, if yours doesn't twist off, use acetone or isopropyl alcohol and let sit for 5 minutes, it should twist off. This is also screwed on. If you aren't servicing the optical block, skip down to the regrease section and just set the block aside.
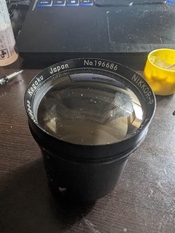
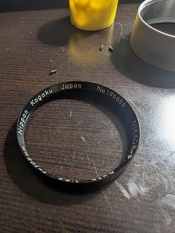
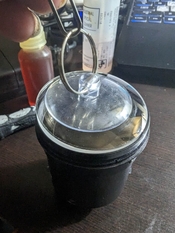
The optical block is 5 elements in 3 groups with two groups on top of the aperture. Twist the name plate off and use a suction cup to get the first element out for cleaning. I used an industrial optical cleaner that is safe for coated glass. If I catch you using Windex I'm going to not shower for a week, come over to your house and put my greasy fingerprints on all of your elements and I'll polish the chrome on my semi truck after driving the Northeast with your microfiber cloths.
The second group comes out with a ring on the side you will need a lens spanner tool to remove this. Mine was stuck on and it didn't need to be removed so I didn't mess with it. Once you have this element out, unscrew the base of the block and remove the rear element for cleaning. The aperture assembly is held on with three screws like this, you'll need to remove them as well as the large set screw on the side, then the tab on the other side to get the aperture out. Clean with naptha, don't flush the blades get each blade out and clean it with naptha.
Assembly is the reverse of removal. Be sure to install the aperture correctly and make sure it is free of dirt and contaminants.
Now the regrease. This lens has two helicoids and they both have to be aligned correctly. There is a plastic stopper tab held in with two flathead screws, remove them. Remove the plastic tab. Make alignment marks to make note of how this lens goes back together. There is only one way and 59 potential other combinations that are wrong. Make those alignment marks and study them, take pictures if you have to. Someone has been in this lens because it had marks on it already.


Unscrew the first helicoid and set the base aside. Make alignment marks for the second helicoid and remove it too. I used naptha and WD40 to get the hard grease out, then went back over it again with naptha to get the film of the WD40 off. WD40 is a great solvent for stubborn grease especially on old Soviet grease but a horrible lubricant. DO NOT MIX IT WITH OLD GREASE it will work for a while and then congeal and you'll be back to square one. If you're going through all the effort of disassembly you may as well use good lubricants to put it back together. When you are doing your alignment marks, do one set for it installed and one set for the part where you have to re-thread the helicoids together, extend them to their maximum and then make your marks right before it removes itself.
There are a few different greases you can use. Japan Hobby Tool has a few which I've used in the past. This is a portrait lens and I like quick effortless focusing so I used white lithium grease. Once you get the helicoids cleaned put the grease on. With all the excess grease on the assembly, align the helicoids and reinstall. This helps the edges of the helicoids dig in and thread. Once you are certain on realignment, wipe off excess grease. Ideally you only want grease on anything metal touching, outside of that wipe it off.

Now install the helicoid assembly onto the base. Hopefully you remembered your alignment marks. Re-install the plastic alignment tab by either removing the bottom baseplate or fully extending the helicoid assembly and placing the tab in with a set of tweezers. If your helicoids are aligned correctly, you should be able to turn the helicoids down to where the holes on the tab and on the base align perfectly, if you did this right, reinstall the screws. Rack the focus back and forth a few times to check the stops.
If you are satisfied with everything, it is now time to reinstall the optical block. Set the lens to f2.5. Your tabs on the sides should look like this, then carefully slide the optical block into place. Pay attention to this alignment screw that sticks out of the bottom of the nameplate, this is how you align the optical block. It has three alignment points, this screw, the aperture ring tab and this smaller tab inside. You can also do this at f/22 but the alignment posts for the aperture assembly looks different, it's still doable.


Screw the filter ring over the nameplate, set to infinity focus and mount on a Nikon camera to check infinity focus. If all is well, reinstall the DoF scale first, then the focus ring. Both only go on one way, make sure the marks all line up down the middle.
This will cover the regrease, which yours probably needs, and the front and rear elements. This would have been a full one but the second ring to get into the optical block I can't remove it, it's either stuck or that lacquer in the 60s was just made different. Luckily, my block was mostly OK except a small amount of fungus on the first element. Also the aperture ring was a no go because well, it didn't need to be done and usually they never have problems but I'll cover what the screws do on it.
Before you attempt this, buy a good set of JIS screwdrivers. If I catch you using WD40 for anything other than cleaning hard grease off I will make sure the Nikon gods punch holes in all of your shutters.
This lens is almost completely accessed from the top, with the exception of the rear element and the plastic alignment tab but even that can be done without taking off the baseplate. The tension spring on the baseplate is a pain to reinstall if you remove it so if you don't have to drop that baseplate, don't. We will start from the top.
Contrary to previous experience, you don't need a rubber cup to get the nameplate off. It's held on a different way and you'll need some good screwdrivers, preferrably a JIS set, to get into it. First, remove the focus ring. There are three screws. Don't lose them.
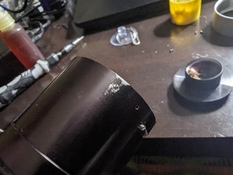
Once you get the focus ring off, get the silver filter ring off. That's the part on the top in the first image. This is two small set screws, very very tiny, loosen them. You don't need to fully remove them, just loosen them enough to where the ring will twist off, counter-clockwise.
Now that you have the filter ring off, remove the DoF scale ring, also three screws. You will notice these are shorter than the focus ring screws, don't mix them up. Slide the scale ring up.
Now you have access to the optical block, hopefully. This top ring is held in with a lacquer material, if yours doesn't twist off, use acetone or isopropyl alcohol and let sit for 5 minutes, it should twist off. This is also screwed on. If you aren't servicing the optical block, skip down to the regrease section and just set the block aside.


The optical block is 5 elements in 3 groups with two groups on top of the aperture. Twist the name plate off and use a suction cup to get the first element out for cleaning. I used an industrial optical cleaner that is safe for coated glass. If I catch you using Windex I'm going to not shower for a week, come over to your house and put my greasy fingerprints on all of your elements and I'll polish the chrome on my semi truck after driving the Northeast with your microfiber cloths.
The second group comes out with a ring on the side you will need a lens spanner tool to remove this. Mine was stuck on and it didn't need to be removed so I didn't mess with it. Once you have this element out, unscrew the base of the block and remove the rear element for cleaning. The aperture assembly is held on with three screws like this, you'll need to remove them as well as the large set screw on the side, then the tab on the other side to get the aperture out. Clean with naptha, don't flush the blades get each blade out and clean it with naptha.

Assembly is the reverse of removal. Be sure to install the aperture correctly and make sure it is free of dirt and contaminants.
Now the regrease. This lens has two helicoids and they both have to be aligned correctly. There is a plastic stopper tab held in with two flathead screws, remove them. Remove the plastic tab. Make alignment marks to make note of how this lens goes back together. There is only one way and 59 potential other combinations that are wrong. Make those alignment marks and study them, take pictures if you have to. Someone has been in this lens because it had marks on it already.
Unscrew the first helicoid and set the base aside. Make alignment marks for the second helicoid and remove it too. I used naptha and WD40 to get the hard grease out, then went back over it again with naptha to get the film of the WD40 off. WD40 is a great solvent for stubborn grease especially on old Soviet grease but a horrible lubricant. DO NOT MIX IT WITH OLD GREASE it will work for a while and then congeal and you'll be back to square one. If you're going through all the effort of disassembly you may as well use good lubricants to put it back together. When you are doing your alignment marks, do one set for it installed and one set for the part where you have to re-thread the helicoids together, extend them to their maximum and then make your marks right before it removes itself.
There are a few different greases you can use. Japan Hobby Tool has a few which I've used in the past. This is a portrait lens and I like quick effortless focusing so I used white lithium grease. Once you get the helicoids cleaned put the grease on. With all the excess grease on the assembly, align the helicoids and reinstall. This helps the edges of the helicoids dig in and thread. Once you are certain on realignment, wipe off excess grease. Ideally you only want grease on anything metal touching, outside of that wipe it off.
Now install the helicoid assembly onto the base. Hopefully you remembered your alignment marks. Re-install the plastic alignment tab by either removing the bottom baseplate or fully extending the helicoid assembly and placing the tab in with a set of tweezers. If your helicoids are aligned correctly, you should be able to turn the helicoids down to where the holes on the tab and on the base align perfectly, if you did this right, reinstall the screws. Rack the focus back and forth a few times to check the stops.
If you are satisfied with everything, it is now time to reinstall the optical block. Set the lens to f2.5. Your tabs on the sides should look like this, then carefully slide the optical block into place. Pay attention to this alignment screw that sticks out of the bottom of the nameplate, this is how you align the optical block. It has three alignment points, this screw, the aperture ring tab and this smaller tab inside. You can also do this at f/22 but the alignment posts for the aperture assembly looks different, it's still doable.
Screw the filter ring over the nameplate, set to infinity focus and mount on a Nikon camera to check infinity focus. If all is well, reinstall the DoF scale first, then the focus ring. Both only go on one way, make sure the marks all line up down the middle.


