Nikon F2 repair/ Battery compartment access?

Self portrait.

A
Self portrait.

  • 1
  • 1
  • 38
There there

A
There there

  • 4
  • 0
  • 69
Camel Rock

A
Camel Rock

  • 7
  • 0
  • 168
Wattle Creek Station

A
Wattle Creek Station

  • 10
  • 3
  • 162

Forum statistics

Threads
198,965
Messages
2,783,864
Members
99,758
Latest member
Ryanearlek
Recent bookmarks
0

saman13

Member
Joined
Mar 28, 2017
Messages
365
Location
Sarasota, Florida
Format
Multi Format
I am trying to diagnose why the electronics in one of my F2 bodies are acting up. There is a decreased voltage across the finder contacts (~1.8V) and my expansive knowledge of Kirchoff's laws tells me a prime suspect is corrosion causing an increased resistance somewhere in the circuit. I ahve aa second F2 body that works perfectly so I have been able to compare all voltages to this working model.
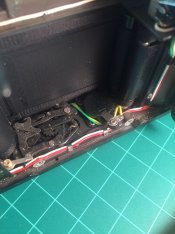
Now I have the bottom plate off and there is no obvious corrosion either inside the battery chamber or in the On/Off contact. I'd like to see the back side of the battery compartment there to see if there is any corrosion there or on the wire. Only problem is, I don't know the best way to do that. Is the only way to take out the mirror box?
One more observation I've made is that the negative battery contact at the bottom of the chamber is loose. It moves around much more than the bottom contact on my working F2.
I know that "this is a precision crafted machine that should be sent to a professional" but I really want to learn how to repair this camera myself. Honestly it is just fun to work on it. I also have a fully functional F2 so if I cause irreparable harm to this one, oh well. It'll just be a learning experience.

So, if anyone has experience working on this camera, please let me know! Also, if there is something you think I may have overlooked, just say so. Thank you!
 
OP
OP
saman13

saman13

Member
Joined
Mar 28, 2017
Messages
365
Location
Sarasota, Florida
Format
Multi Format
I have just fixed an F2 with all the same issues as yours.
(there was a url link here which no longer exists)

Wow what a job that was! So is the only way to access the other end of the battery compartment to go through the mirror box? If so, is there a way to remove the mirror box without removing the entire front face? All the leatherette on this camera is in great shape and I'd like to avoid tearing it up if I could.
 

Chan Tran

Subscriber
Joined
May 10, 2006
Messages
6,824
Location
Sachse, TX
Format
35mm
If you could check the resistance between the battery contact to the finder contact to see which of the wire has high resistance. That may help in troubleshooting.
 

Robin Guymer

Member
Joined
Mar 27, 2017
Messages
204
Location
Melbourne Australia
Format
35mm
The leatherette doesn't tear if you are careful. Just ease up one edge with a blunt knife then push a toothpick along the joint between metal and leather. Once you can get fully underneath start folding it back and cutting at the glue with a craft knife. You'll have the front off this camera in less than an hour.
 
OP
OP
saman13

saman13

Member
Joined
Mar 28, 2017
Messages
365
Location
Sarasota, Florida
Format
Multi Format
If you could check the resistance between the battery contact to the finder contact to see which of the wire has high resistance. That may help in troubleshooting.
The big disparity in resistance seems to be between the bottom "negative) battery contact and the top right (when looking at the front of the camera) finder contact. On my working F2 the resistance is around 0.5 ohm and the resistance on the non working finder is around 5 MEGA ohms. So, that part of the circuit seems to be the issue.
 
OP
OP
saman13

saman13

Member
Joined
Mar 28, 2017
Messages
365
Location
Sarasota, Florida
Format
Multi Format
The leatherette doesn't tear if you are careful. Just ease up one edge with a blunt knife then push a toothpick along the joint between metal and leather. Once you can get fully underneath start folding it back and cutting at the glue with a craft knife. You'll have the front off this camera in less than an hour.
Do you need to remove the top cover in order to remove the front face? As I look at the camera, it seems you need to remove both top covers in order to get to the two screws that are half hidden by the cover. It looks as if these are holding part of the front face in place.
 

John Koehrer

Subscriber
Joined
Apr 3, 2004
Messages
8,277
Location
Aurora, Il
Format
Multi Format
Unfortunately yes. ^^^ There are a number of cameras that will have corrosion IN
the wire leading from the battery to a metering circuit. There's also cold solder joint to consider.
Relying on my memory though it seems that this was usually the positive lead.
 

Johnkpap

Member
Joined
Aug 21, 2006
Messages
293
Location
Australia
Format
Medium Format
Yes I have fixed one of these......Mine was a KEH UGLY I paid $65....The part you need is the Plastic Battery compartment About $12 on line, you may need a metal cover that is under the rewind knob, they are a bit hard to get.

You will need the service manual (this can be downloaded for free) and the
Nikon Camera Repair Handbook by Thomas Tomosy is very helpfull about $25 if you can find a copy.

You will also need a set of basic camera repair tools and a good soldering iron $80 - $200 less if you have tools already

It took me about 3 hours to do the repair, I am a Qualified Electronics Technician but not a camera repair expert :- If you have done a basic camera repair before it is not that hard.

If you are not technicaly minded and delicate repair work is not your thing sent it to
the expert :- Sover Wong http://www.soverf2repair.webs.com/

He Charges more than others, but a camera serviced by him is going to come back working like new.....

Johnkpap
 

Robin Guymer

Member
Joined
Mar 27, 2017
Messages
204
Location
Melbourne Australia
Format
35mm
Do you need to remove the top cover in order to remove the front face? As I look at the camera, it seems you need to remove both top covers in order to get to the two screws that are half hidden by the cover. It looks as if these are holding part of the front face in place.

You could be right about not having to remove either top cover. The two screws you mention should be left in till you pull out the front face with the Mirror Box still attached, then the screws are accessible to take the Mirror Box off the Front Face panel. I did pull off the Face first and just bent up slightly the rewind cover to access that screw, then relised this was not the correct method.

As far as your wiring problem. The camera works with Positive to Body and Negative to the Finder connection on the Rewind/Flash side. See attached image which shows how I think the wiring works. I got my camera together after I thought I had fixed all the wiring and connection issues, only to find that when I pushed my micrometer down on the negative Finder terminal (rewind side) I got 3v with a light touch but it shorted when I pushed down further. So the problem was the points connection under was shorting to the Mirror Box. So this may help you. Without taking the camera apart again I just took off the lens mount cover. Then I carefully inserted a small flat screw driver and wedged up the front of the top cover enough so it was not permanently bent but enough so I could just see the points connection. Then I slipped in another small tool and pushed the points slightly away from the Mirror Box and retested. This fixed the problem. Now you could try the same but at the same time give the points a clean using some electrical connection cleaner. You could probably slip in a points feeler gauge dipped in the electrical cleaner. Give this a try before pulling the camera apart.

If you look at the attached image there are three areas where there can be connection issues. 1/ The battery compartment. 2/ The cocking arm points connection. 3/ The Finder points connection. You can test these with a micrometer starting from the battery compartment. I found even with the battery box broken I was only getting a short up at the Finder connection. If you don't want to pull the camera apart to fix the battery box break then just put a small piece of foam light seal under the bottom negative terminal and this should give you a good battery connection.

Failing the checking of all the points connections, the electrical leakage can be caused by crushed wires in body panels or disintegrating wiring insulation. Removing the Front face is then the only way to access this problem and you may need to rewire.
F2_wiring.jpeg
 
Last edited:

Robin Guymer

Member
Joined
Mar 27, 2017
Messages
204
Location
Melbourne Australia
Format
35mm
Here is another view of the internal. You can see clearly how close the points connection for the Finder is to where the Mirror Box slips into place. This also shows the wiring connection at the Battery Box and where it typically breaks where the brown wire (negative) connection juts out from the side.
F2_internals.jpeg
 
OP
OP
saman13

saman13

Member
Joined
Mar 28, 2017
Messages
365
Location
Sarasota, Florida
Format
Multi Format
Unfortunately yes. ^^^ There are a number of cameras that will have corrosion IN
the wire leading from the battery to a metering circuit. There's also cold solder joint to consider.
Relying on my memory though it seems that this was usually the positive lead.
This is what I think the issue is due to the absurdly high resistance between the finder contact and the negative battery lead.

If you look at the attached image there are three areas where there can be connection issues. 1/ The battery compartment. 2/ The cocking arm points connection. 3/ The Finder points connection. You can test these with a micrometer starting from the battery compartment. I found even with the battery box broken I was only getting a short up at the Finder connection. If you don't want to pull the camera apart to fix the battery box break then just put a small piece of foam light seal under the bottom negative terminal and this should give you a good battery connection.

Failing the checking of all the points connections, the electrical leakage can be caused by crushed wires in body panels or disintegrating wiring insulation. Removing the Front face is then the only way to access this problem and you may need to rewire.
View attachment 183103

The corrosion behind the battery compartment is what I think because I am still getting power to the finder contacts, when with pressure. Just, the voltage is 1.8V instead of 3, so I think there is an area of high resistance somewhere in the circuit where it should not be. Also, thank you for all your help. All your pictures in this and your other post have been a huge help! I think I'll try taking off the front face to get to the battery compartment this weekend. I got distracted from the F2 repair by an extremely dirty 50mm 1.4 that has now been fully cleaned and polished.
 

Chan Tran

Subscriber
Joined
May 10, 2006
Messages
6,824
Location
Sachse, TX
Format
35mm
Since the problem connection goes thru the film advance switch, I wonder if the position of the film advance level makes a different in resistance or voltage measured at the finder terminals?
 
OP
OP
saman13

saman13

Member
Joined
Mar 28, 2017
Messages
365
Location
Sarasota, Florida
Format
Multi Format
Since the problem connection goes thru the film advance switch, I wonder if the position of the film advance level makes a different in resistance or voltage measured at the finder terminals?
Here are my measurements across the finder terminals:
Closed=0V, 0 Ohm
Open=1.8V, ~150K Ohm
 
OP
OP
saman13

saman13

Member
Joined
Mar 28, 2017
Messages
365
Location
Sarasota, Florida
Format
Multi Format
Bingo...battery compartment both broken and corroded. I even have access to the source of the "PING"! Thanks for all your help! Now, is it worth it to pay the $18 for a new battery compartment? Poor college student here, $18 is a lot. That's the lowest price I saw them at. If someone has seen them somewhere cheaper, let me know. Or could I just clean all the contacts and glue the broken piece back?
 

Attachments

  • 0E9A0455-D60B-403C-BA00-37E1B1E6FDA2.jpg
    0E9A0455-D60B-403C-BA00-37E1B1E6FDA2.jpg
    507.8 KB · Views: 466
OP
OP
saman13

saman13

Member
Joined
Mar 28, 2017
Messages
365
Location
Sarasota, Florida
Format
Multi Format
I was just wondering if I could get the same functionality by using the parts I already have. Because the battery compartment itself is intact, it is only the small tab that is broken. I'd imagine I could glue it back using pliobond and I wouldn't have to buy an additional part.
The little bit of damper foam between the spring on the mirror box and the box itself was completely deteriorated and had to be removed. I had to order light seal foam online and it will be at least a week until it arrives I imagine, so I can't close up the camera until then. Is there anything else in particular I should check, clean, etc while the camera is all taken apart?
 

Robin Guymer

Member
Joined
Mar 27, 2017
Messages
204
Location
Melbourne Australia
Format
35mm
I just cleaned up the broken ends and epoxy glued the battery tab back on. Then I added some Tarzan tape across the top of it. I reckon the tabs break off when owners try to lift up the lower battery terminal to get a better negative connection. That leverage just snaps the end and it can then float up against the Mirror Box.

I would check the rest of the wiring as I found splits in the insulation where the wires run along the body to the advance lever points. As far as servicing other parts maybe an expert member could advise you. I first cleaned then put drops of Singer Sewing Machine Oil on the moving parts I could get to. Check the felt runners on the back of the Mirror Box that sit against the top and bottom of the shutter curtain.

You mentioned previously about your problem with the T setting on the shutter button. I have the same issue as you with my black F2 and I could not see how the shutter button could be held down by the T setting so it just worked the same as the normal setting. I suspect there is a part missing that created friction on the shutter button at T. I'll have to look at the factory parts diagram some time, not that I am particularly concerned about it. My silver F2 does hold the shutter button down till the lock turned back to the front.

I am pleased you were able to proceed with your own repairs. Hope it goes together okay and let me know the outcome. Regards Robin.
 

BMbikerider

Member
Joined
Jul 24, 2012
Messages
2,954
Location
UK
Format
35mm
If you look at http://www.soverf2repair.webs.com/ This a Nikon F2 repair and restoration specialist based in UK, who is scathing about some of the bodges inflicted upon the Nikon F2 cameras - even by so called repairers. He can even repair the meters when the electrics have passed away by making new sensors. He has a black museum of photographs of some of the 'so called' repairs he has had to repair again. Including glueing wires into place rather than soldering them. Screw sockets, so badly damaged that the 'repairer has had to flood the socket with silicon adhesive to stop the screw from dropping out .Flooding mechanisms with oil that just made things worse and don't mention corrosion! He talks about what to do to get rid of it and has photographs of 'before and after'.

I don't know if he will help with diagnosis via E mail but it may be worth a try.
 
Last edited:
OP
OP
saman13

saman13

Member
Joined
Mar 28, 2017
Messages
365
Location
Sarasota, Florida
Format
Multi Format
You mentioned previously about your problem with the T setting on the shutter button. I have the same issue as you with my black F2 and I could not see how the shutter button could be held down by the T setting so it just worked the same as the normal setting. I suspect there is a part missing that created friction on the shutter button at T. I'll have to look at the factory parts diagram some time, not that I am particularly concerned about it. My silver F2 does hold the shutter button down till the lock turned back to the front.

Yeah, I have been trying to figure out what the mechanism is that causes the T setting to engage with no luck. This body I have been working on is the body that the T setting works on, but even when I know that it is working as it should I cannot see what is engaging. I'll keep poking around and see if I can figure anything out. I thought it would be easy to see what the difference is between the two bodies because I have one that works and one that doesn't but no luck. I'll keep you posted on how the reassembly goes when my foam arrives!
 

Robin Guymer

Member
Joined
Mar 27, 2017
Messages
204
Location
Melbourne Australia
Format
35mm
With the reassembly have a look at photos 3, 4 & 5 on Mr Wong's site. It shows how the Finder/Prism holder mechanism needs to connect with a fork on the body that the external silver release button moves. http://soverf2repair.webs.com/Repairers_from_hell_4.htm Its worth having a look through his other black mark repairers photos for some more tips on not what to do. I'll probably end up there too. :cry: But it was a $30 camera and I was not about to spend $300 on it like I just have done with a Leica M3.
 
Photrio.com contains affiliate links to products. We may receive a commission for purchases made through these links.
To read our full affiliate disclosure statement please click Here.

PHOTRIO PARTNERS EQUALLY FUNDING OUR COMMUNITY:


Ilford ADOX Freestyle Photographic Stearman Press Weldon Color Lab Blue Moon Camera & Machine
Top Bottom