New Years Resolution: A darkroom

Do-Over Decor

A
Do-Over Decor

  • 1
  • 0
  • 28
Oak

A
Oak

  • 1
  • 0
  • 26
High st

A
High st

  • 7
  • 0
  • 63
Flap

D
Flap

  • 0
  • 0
  • 26

Recent Classifieds

Forum statistics

Threads
199,218
Messages
2,788,029
Members
99,835
Latest member
HakuZLQ
Recent bookmarks
0

Nerotheroman

Member
Joined
Dec 1, 2014
Messages
48
Location
Germany
Format
Medium Format
Good evening and happy new year to all of you :smile:,

As this is the one year anniversary of me and my analog passion,
I decide to built my first darkroom until summer :smile:

I would like to share this long term project with you guys
and hope you will have some fun, follwing me on this journey :smile:


The room:

I have a room in my basement which is my dedicated learning and aquarium
room. The room side which I want to use for the darkroom
is about 8 square meters large.
The room has a window and I have access to a water tap in
the room next door.

My goal:

Until summer this year I would like to be able to print
up to sizes of 60x80cm (Baryt only because I simoly don't like PE) from negatives in the range 6x7 up to 13x18cm.

The plan:

I have a 2mx0.6m kitchen working plate which I want
to fix on the wall. On top of the plate I like to
install a metal wet sink in the size of 1.6mx0.6m.
To darken the room I will simply turn of the aquarium lights or work in
the evening. The LEDs of the Aquarium controllers I will cover with
black insulation tape. Do you guys think, that will work?
To make the door light proof, I would like to use some thick
black fabric, which is normally used in theaters. What do you guys think
about that?

For enlarging I will use a Durst Laborator 138.


So that's the plan as for now.
It will be a long term project, so I habe lots of time, to
gather all the needed equipment :smile:

For any advice, critiques or questions I'm very thankful.

Best wishes
Mathias
 
OP
OP

Nerotheroman

Member
Joined
Dec 1, 2014
Messages
48
Location
Germany
Format
Medium Format
Oh, I saw this is the wrong section for this topic.
I'm sorry :sad:

Could one of the mods take the thread to the right section please?

Greetings
Mathias
 

Sirius Glass

Subscriber
Joined
Jan 18, 2007
Messages
50,411
Location
Southern California
Format
Multi Format
Enjoy!!
 
Joined
Dec 30, 2005
Messages
7,175
Location
Milton, DE USA
Format
Analog
So, you are gong to have running water in this room? That will be a big help. Since you have so much room, you might also set aside an area for working on mounting of prints and also for framing. Perhaps a walled-off office about three meters squared on one corner of the room. That will leave you with plenty of darkroom space.

How much headroom do you have? As it is a basement, room overhead for the elnarger and also for just walking are considerations.

Good luck and keep us posted. This is fantastic.
 
OP
OP

Nerotheroman

Member
Joined
Dec 1, 2014
Messages
48
Location
Germany
Format
Medium Format
Good morning,

@Sirius Glass: Thank you :smile:

@Christopher Walrath: Thank you! The room itseld doesn't
have an own tap line. But the room next door does.
I hope that will work for me. The room is 2.1m high so I can
walk through it, with a good amount of space
between my head and the ceiling. I hope the Durst 138
will fit in there without me cutting it.
As for framing that is a noce idea. But this room
is also the place of my reef aquarium so there is no corner
left for that. But I can do this without Problems in my
room. That's the way I did the last 5 year for digital
stuff I wanted to exhibit or sell.

I just loaded up some pictures on my
PC. I'll post them later :smile:

Greetings
 

MartinP

Member
Joined
Jun 23, 2007
Messages
1,569
Location
Netherlands
Format
Medium Format
Sounds a great plan :smile: If there is no water supply inside the darkroom then - as you obviously know - it just means that you have to wash the prints in the other room, using a deep sided tray in between, and this is not a show stopper. I just thought I should point that out for all those people who were unsure about the practicality of a room without a water-tap.

With such a large set of trays needed it could be a good moment to use either just one tray (with jugs or buckets for the chemicals) or narrow troughs and roll the paper. I'm sure we all look forwards to seeing the solutions you come up with.

Make sure to keep any developer residues containing hydroquinone away from the fish tank!
 
OP
OP

Nerotheroman

Member
Joined
Dec 1, 2014
Messages
48
Location
Germany
Format
Medium Format
Good evening Martin,

thank you for your reply.
It's really good to hear that! I mean worst
case I could get in a flexible tap line, using
some tubing. But if I can avoid that, it's a big plus :smile:
As for transporting the prints to the final washing,
I have been thinking of one of those tool cars. You know, those
thingies people have in their garages. I saw one in the hardware
store, with was pretty sturdy, had lots of drawers, one could
use for paper and other stuff needed and the best thing a 1mx0.6m flat surface
on top with a slightly higher rim around it.
That think would be awesome to use for transporting the prints.
I could simply put some pond foil on top and place the tray
with the prints on it. The I just have to roll the thing into
the other room. As for the trays I'm gonna use, I found some of a german brand.
They were from a studio that closed down. For 6 trays in 50x60cm and 60x80cm I payed
around 5€ so around 7 bucks. Quite good :smile:

Good tip with the developer! I'm using D76 exclusively, don't know whether this is a part of it or not.

Thanks again :smile:
 
OP
OP

Nerotheroman

Member
Joined
Dec 1, 2014
Messages
48
Location
Germany
Format
Medium Format
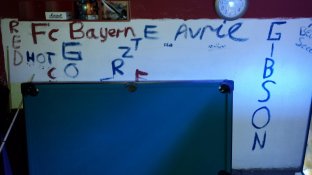
I'm sorry for the not so good quality.
Got my digital camera in the studio.

Just to give you a reference point in the picture, I put the billiards table
there. It is 2m long and 80cm wide.
So as you see i maybe have around 2.2-2.4m to work with on this wall.

Best wishes
 

Attachments

  • 20150106_172827.jpg
    20150106_172827.jpg
    304.1 KB · Views: 130

MartinP

Member
Joined
Jun 23, 2007
Messages
1,569
Location
Netherlands
Format
Medium Format
I thought you meant that you would be printing on paper? D76 is a film developer. Also have a look at the recommended archival process from, for example, Ilford (lots of links on the Ilfordphoto website). The best results are found when the minimum wet time is used in fixer and before the washaid - try not to leave prints soaking unwashed, before rinsing them of surface fixer and putting them in the washaid bath. In practice that probably means making one 'good' print, or a couple from the same neg, then taking them through to washaid/wash immediately and this is not really a hardship.

I mentioned the water availability thing because it seems that a few people I have chatted to have not tried any darkroom work, because they thought they needed a 'perfect' darkroom to make the simplest print. This really isn't the case!
 
OP
OP

Nerotheroman

Member
Joined
Dec 1, 2014
Messages
48
Location
Germany
Format
Medium Format
Hi Martin,

well I want to use the darkroom for developing
my LF negatives, too :smile:
I much prefer tray developing over any other form of
developing.

I'll keep that with washing the prints directly in mind!
Thanks a lot :smile:

Best wishes
 

paul_c5x4

Member
Joined
Apr 22, 2009
Messages
1,942
Location
Ye Olde England
Format
Large Format
I have a 2mx0.6m kitchen working plate which I want
to fix on the wall. On top of the plate I like to
install a metal wet sink in the size of 1.6mx0.6m.
To darken the room I will simply turn of the aquarium lights or work in
the evening. The LEDs of the Aquarium controllers I will cover with
black insulation tape. Do you guys think, that will work?
To make the door light proof, I would like to use some thick
black fabric, which is normally used in theaters. What do you guys think
about that?

A 600mm wide worktop is a bit small in my opinion, especially if you are planning on printing up to 60x80. See if you can find a piece of 800mm or 900mm worktop - You will be thankful of the extra space in time... My worktop is 800mm wide, and some days it just isn't big enough :sad:

I used to have an assortment of computer equipment in my darkroom and covered the various flashing lights with insulation tape - Worked just fine until I spilt some fixer over a modem. It hissed and fizzed for a few minutes before dying. A light-proof blanket to throw over the aquarium would probably work as long as it doesn't the temperature inside to rise too much.

For covering the door and window, I use a blackout lining used to make curtains - Tip: Use glue, do not sew. If you do sew, the needle will leave a nice neat row of holes that light will show through. If you want to fix blackout cloth to a window/door, you can buy self-adhesive velco.
 
OP
OP

Nerotheroman

Member
Joined
Dec 1, 2014
Messages
48
Location
Germany
Format
Medium Format
Hello Paul,

:smile: thanks a lot for your answer.
Well to say the truth, yes 60cm is definitely to tide to work
good. I just tested it out. So what I will do is fix some aluminum ts
under the table to create a kind of rail system. Then I will buy a seconde kitchen
counter in the same sice. I'll fix it with rolls into the rail system, so that 80-100cm working depth. Hope that will work :smile:

Ah that's bad :sad: hope there was no more damage than the modem
itself! My aquarium controllers are all fixed on the wall just across
the darkroom space. So a blanket won't work I'm afraid :sad:


Could you please show me a picture or a link to the black out lining?
Is that the stuff one fixes in front of the curtain hangers?
Looking like mini curtains?
Velco is an awesome tip! Haven't even thought about
that :smile: Great!

No boring stitching :smile::smile: :smile:

Best wishes!
 

MattKing

Moderator
Moderator
Joined
Apr 24, 2005
Messages
53,262
Location
Delta, BC Canada
Format
Medium Format
P.S. The modem was terminal, but my ISP provided a replacement and upgraded my service all for free.

So you improved your internet access by pouring fixer over your modem? :whistling:
 
OP
OP

Nerotheroman

Member
Joined
Dec 1, 2014
Messages
48
Location
Germany
Format
Medium Format
Good morning,

thanks for the link Paul!
Seems you've been lucky with your provider.
Mine certainly would charge full for the modem and
higher the prices xD
 

goros

Member
Joined
Jun 6, 2006
Messages
279
Location
The Basque C
Format
Medium Format
Hello Mathias,

I recently (along our Christamas holidays) have built my own darkroom. I was more or less two weeks planning everything and buying the major materials and then built it in another ten days. I must to say that I already had all the equipment (enlarger, etc), so I just needed "building" materials.

This is the link to the post in Darkroom Protraits (Part 2) thread:
(there was a url link here which no longer exists)
 

M Carter

Member
Joined
Jan 23, 2013
Messages
2,147
Location
Dallas, TX
Format
Medium Format
The biggest thing for me doing my own darkroom is that I'm a pretty good DIY plumber. No master, but my work can pass a code inspection.

I used PEX tubing to tie in and route water. It's way easier to work with then copper (and it's been accepted in Europe far longer than the US). In the US I needed 1/2" and 3/4" ring compressor tools, but the savings over copper made it worth it. (I needed a 1" tool at one point but rented it, big PEX isn't common once the water enters the house).

To tie into drains, you may need to deal with iron pipe or plastic. If it's iron, you'll need rubber sleeves (Ferncos in the US) to interface plastic (ABS or PVC?).

You should only DIY this if you're confident - don't want a leak springing while you're on vacation! Here in the US, one might have trouble finding a plumber to do this stuff affordably, but you may have a friend who's handy with it. Just remember your insurance may not pay if damage is caused by an amateur, uninspected job.

For blackout curtains, I just got on eBay and found overstock, 2 big ones for maybe $15, in a pretty deep blue with black backing.

There are lots of threads on the internet about building awesome sinks from plywood and sealing with epoxy coatings, or fiberglass, etc.
 
OP
OP

Nerotheroman

Member
Joined
Dec 1, 2014
Messages
48
Location
Germany
Format
Medium Format
Good evening everybody :smile:

Just came back from university.
What a day...

Anyhow^^

@Goros: I'll check your thread, always interested in how
people work on such things :smile: By the way I love the Basque Country!
Beautiful :smile:

@MCarter: Thanks for your reply :smile:
Lots of good tips! I just had a little chat with
my best friend from kindergarten, well he is sort of
a plumber and told me, it wouldn't be to much
work and money to instal a water line coming in.
The problem would be the waste water line, because we
don't have sewage (is it called like that?) here.
Just some weird kind of bio filter don't know what, law forces us
to have. I like the idea of coated plywood very much! Will do an extensive
research this weekend :smile:
I got some blackout cloth in a handcrafts shop close to
university :smile: Lucky me! So I will do a little light leak test
with it tomorrow!

I got a question for you guys.
I never enlarged before, so this question came up today:

My enlarger has got a black and white head. Know I read many
times people use those Ilford Grad Filters with it,
the get better contrast results. But others simply use
a color head for black and white work and the filters that are build
in there. Is there a viewable difference between
those methods? What makes more sense in my case.
I don't want to shoot color, so I haven't thought
of getting a color head for the enlarger so far.
A mistake?

Greetings
Mathias
 

John Koehrer

Subscriber
Joined
Apr 3, 2004
Messages
8,277
Location
Aurora, Il
Format
Multi Format
I'd live with the Ilford filters. You won't have to deal with converting Durst values to an equivalent number. IE:Filters in the color head don't convert to the Ilford filter value.
There are equivalents using different brand color heads printed on the box(usually). Most people find that the harder grades(4, 5) can't be attained with a color head.
Presuming your aquarium lights aren't amber or red you will have to cover them to print. For film loading or developing, you need total darkness.
I believe 600mm(24") would be adequate for most use. A lot of us have certainly done with less.
 

Sirius Glass

Subscriber
Joined
Jan 18, 2007
Messages
50,411
Location
Southern California
Format
Multi Format
I can take my color head and set it in the "White" light mode and use Ilford filters it I wanted or needed grade 5 prints.
 
OP
OP

Nerotheroman

Member
Joined
Dec 1, 2014
Messages
48
Location
Germany
Format
Medium Format
Good morning :smile:


@John: Thanks for your advice regarding tue Ilford filters.
I did some deeper research on those filters this night until
5 am. Basically most people say, they work totally amazing
when using Ilford grade paper. But just from a budget,
that's not possible at the moment. What do you think,
when using a different paper, do they still work good?

Concerning my aquarium lights. They are set up for
12 hour cycle. From 8 am to 12 PM, printing I will do after 8.
So the main light shouldn't be a problem :smile: Thanks for
mentioning though :smile:

@Sirius: Okay, so is this mode one of the
special abbilities of your enlarger? Or is this
a common setting on many of them? In the Laborators
manual I couldn't find something about that.

Best wishes!
 

MartinP

Member
Joined
Jun 23, 2007
Messages
1,569
Location
Netherlands
Format
Medium Format
A condenser head, like you have available, will work very nicely for black-and-white and any particular neg will print a little 'harder' using it. Large 'condenser' lenses focus the light from the bulb to illuminate the negative. Make sure you know which sort of multigrade filter you need, either for a filter-drawer or in plastic holders for under the lens - they are functionally identical, just physically a bit different. Multigrade papers all (so far as I have seen) work with blue and green illumination for the different emulsions in the paper, so Ilford filters will certainly give a usable result with other brands of paper. Don't get too worried about precise grade numbers, all that matters is you can make things more or less contrasty to suit the image.

Colour-heads work by mixing the coloured light in, effectively, a white 'diffusion' box - the neg is then illuminated via a hole in one side of the box. It is normal to have a lever to remove the set C/Y/M filtration because that makes it easier to line up the (colour) neg, and this is also perfectly usable for printing with white-light and a filter under the lens. All other things being equal, this sort of enlarger gives a slightly lower apparent contrast than a condenser-head, for some odd optical reasons. You would usually use the magenta and yellow filtration to change multigrade contrast - each brand of paper will have it's own (very similar) suggestions for matching filtration to an equivalent grade of contrast, but 'more-contrasty' and 'less-contrasty' is sufficient.

The contrast differences between these two types of enlarger were more critical before variable-contrast paper was of a usable standard. Your enlarger, when in good condition, has an extremely high quality condenser arrangement and you will appreciate that later I'm sure. There are some other types of enlarger light-source but they are rarely seen, don't worry about them.

Look at resin-coated papers to start your learning experience, as they are much quicker to use and your learning will therefore be quicker. Instead of one washed and dried print per session you can make five, for example. A brand such as Kentmere (made by Harman, same as the Ilford papers) would be perfectly adequate. In Germany you will also find, at least, Tetenal (probably also coated by Harman, under contract) and Foma (made in Czech Republic). For a view of the paper and chemical possibilities available to you, try looking on macodirect.de, and other local online stockists.
 
OP
OP

Nerotheroman

Member
Joined
Dec 1, 2014
Messages
48
Location
Germany
Format
Medium Format
Hello Martin,

thanks a lot for your answer! Zhat was really, really helpful now
I actually understand some things much better :smile:

So I will stick with the condenser head and just ordered a Ilford Multigrade filter set.
As for paper, I think I will start out with Adox papers. They seem to offer great value for the price point. They offer PE and fiber based paper, nice thing :smile:

I will keep you updated :smile:

Best wishes
 
OP
OP

Nerotheroman

Member
Joined
Dec 1, 2014
Messages
48
Location
Germany
Format
Medium Format
So I just did some research on the Macowebsite.

I came up with these two papers:

ADOX MCC 112fiber based paper
ADOX MCP 312 RC

What do you guys think?
A viable choice for starting out?
 

Sirius Glass

Subscriber
Joined
Jan 18, 2007
Messages
50,411
Location
Southern California
Format
Multi Format
@Sirius: Okay, so is this mode one of the
special abbilities of your enlarger? Or is this
a common setting on many of them? In the Laborators
manual I couldn't find something about that.

Best wishes!

My enlarger Super Chromega Dichroic II 5D-XL has three light modes: Low, High and White. Low and High use the Dichroic filters while White bypasses the Dichroic filters.
 
Photrio.com contains affiliate links to products. We may receive a commission for purchases made through these links.
To read our full affiliate disclosure statement please click Here.

PHOTRIO PARTNERS EQUALLY FUNDING OUR COMMUNITY:


Ilford ADOX Freestyle Photographic Stearman Press Weldon Color Lab Blue Moon Camera & Machine
Top Bottom