New 5" x 4" Folding Camera Under Construction

Go / back

H
Go / back

  • 3
  • 0
  • 82
untitled

untitled

  • 6
  • 0
  • 150
Crow

H
Crow

  • 4
  • 3
  • 117

Recent Classifieds

Forum statistics

Threads
199,417
Messages
2,791,302
Members
99,903
Latest member
harryphotos206
Recent bookmarks
0

Steve Smith

Member
Joined
May 3, 2006
Messages
9,110
Location
Ryde, Isle o
Format
Medium Format
I have deliberated, planned and talked about this for long enough. It's time to start cutting some wood.

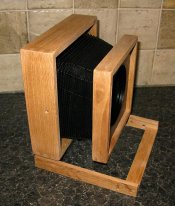
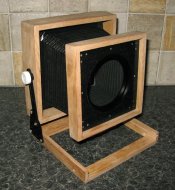
Back in 2006 I made a 5" x 4" camera with the benefit of knowing nothing about them or how they worked. It didn't fold up, had limited movements and weighed about seventeen and a half tons... It took pictures though which was the main thing.

A couple of years ago I discovered Rayment Kirby's website: http://www.raymentkirbycameras.co.uk/ which is one of the best sites I have found for DIY camera builders.

I based my camera on his design and produced some CAD drawings from the PDF file on the website.

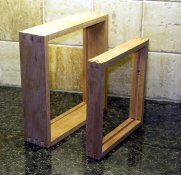
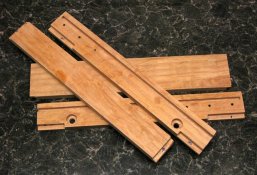
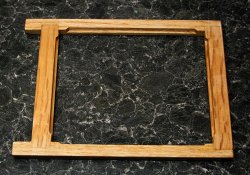
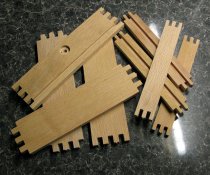
Today I started to cut the wood - some oak which used to be a piece of furniture which was given to my brother and which I somehow ended up with.

Whilst I like working wood with hand tools (I have built a few guitars) I also have the use of a CNC router/drill at work (as those of you who have read about my 6x12 camera will know) so I used that to cut the rebates and the profiles. It can cut much more accurate finger joints than I can!

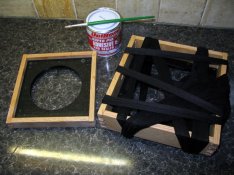
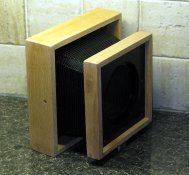
I will add more pictures as I progress.


Steve.
 

Attachments

  • 5x4cam1.jpg
    5x4cam1.jpg
    112.4 KB · Views: 296
Last edited by a moderator:
OP
OP
Steve Smith

Steve Smith

Member
Joined
May 3, 2006
Messages
9,110
Location
Ryde, Isle o
Format
Medium Format
Surely in Australia, you use the proper British 5x4 term, not 4x5!


Steve.
 

pentaxuser

Member
Joined
May 9, 2005
Messages
20,058
Location
Daventry, No
Format
35mm
Steve, my experience of your ingenuity and engineering skills suggest that you can make this work and maybe make some money from it or at least cover costs of development.

Best of luck

PS while you are at it can you produce a cheap second P645n for me :D:D

pentaxuser
 
OP
OP
Steve Smith

Steve Smith

Member
Joined
May 3, 2006
Messages
9,110
Location
Ryde, Isle o
Format
Medium Format
Some more in progress pictures.

1. Parts balancing in roughly the right place.
2. Parts being glued together with integral bellows mounting plates (an old pair of tights being used instead of clamps).
3. The front and back being introduced to the bellows.
 

Attachments

  • 5x4cam2.jpg
    5x4cam2.jpg
    147.7 KB · Views: 240
  • 5x4cam3.jpg
    5x4cam3.jpg
    119.2 KB · Views: 256
  • 5x4cam4.jpg
    5x4cam4.jpg
    118.8 KB · Views: 249
OP
OP
Steve Smith

Steve Smith

Member
Joined
May 3, 2006
Messages
9,110
Location
Ryde, Isle o
Format
Medium Format
I promised some more pictures as I progressed so here they are:

EDIT: And they appeared in the wrong order! The second picture is some recently CNC drilled and routed parts to form the outer part of the focussing rack and the first picture is those parts glued together with the previous parts balanced on top in roughly the right place.


Steve.
 

Attachments

  • 5x4cam5.jpg
    5x4cam5.jpg
    132.5 KB · Views: 192
  • 5x4cam6.jpg
    5x4cam6.jpg
    180 KB · Views: 219
OP
OP
Steve Smith

Steve Smith

Member
Joined
May 3, 2006
Messages
9,110
Location
Ryde, Isle o
Format
Medium Format
Excellent. I had better bring this bit along to see if I gave you accurate measurements!


Steve.
 

Attachments

  • 5x4cam7.jpg
    5x4cam7.jpg
    175.5 KB · Views: 158

BetterSense

Member
Joined
Aug 16, 2008
Messages
3,151
Location
North Caroli
Format
35mm
The hardest part of a DIY camera is the bellows. Maybe you already stated, but how/where did you get the bellows?
 
OP
OP
Steve Smith

Steve Smith

Member
Joined
May 3, 2006
Messages
9,110
Location
Ryde, Isle o
Format
Medium Format
I think the bellows are from a Sinar Norma camera (that's how they were advertised on ebay).

They are too long though. As I need the front and rear standards to get close together to fold the camera up, I cut off about 1/2" (closed measurement) from the back and will now have to re-glue them back to the plate.

I have made bellows before but the reason I'm building this camera is that I bought the bellows for not much money.


Steve.
 
OP
OP
Steve Smith

Steve Smith

Member
Joined
May 3, 2006
Messages
9,110
Location
Ryde, Isle o
Format
Medium Format
More pictures. I have cut some parts from 3mm black plastic which will eventually be made from 1/8" brass to see if it all works (it does).


Steve.
 

Attachments

  • 5x4cam8.jpg
    5x4cam8.jpg
    159.8 KB · Views: 192
  • 5x4cam9.jpg
    5x4cam9.jpg
    159.8 KB · Views: 184
OP
OP
Steve Smith

Steve Smith

Member
Joined
May 3, 2006
Messages
9,110
Location
Ryde, Isle o
Format
Medium Format
I have had lots of thoughts about this. The front standard is large because I have used the Sinar bellows from a mono-rail camera which do not taper as much as the bellows on most field cameras.

Because of this I am going to use the method Chamonix use which detaches the front standard from the sliding bed.

I am building a second camera with another set of bellows I have which will have the more traditional folding mechanism which I am copying from Wista.

There is a thread here with a discussion about the differences between the two cameras with some good detail pictures: (there was a url link here which no longer exists)


Steve.
 
OP
OP
Steve Smith

Steve Smith

Member
Joined
May 3, 2006
Messages
9,110
Location
Ryde, Isle o
Format
Medium Format
I can now CNC cut 1/8" brass sheet.

This might not sound like much of an achievement as CNC machines are supposed to cut metal. However, my machine was built to drill and rout printed circuit boards and has a minimum spindle speed of 7,000 RPM (goes up to 40,000 RPM).

I have found that if I use a 2.4mm diameter double fluted cutter and cut 0.5mm depth at a time, I can get a nice cut which doesn't need a lot of cleaning up.

This is good news because it means I can make all the brass pieces instead of paying someone else to do it!


Steve.
 

paul_c5x4

Member
Joined
Apr 22, 2009
Messages
1,942
Location
Ye Olde England
Format
Large Format
I have found that if I use a 2.4mm diameter double fluted cutter and cut 0.5mm depth at a time, I can get a nice cut which doesn't need a lot of cleaning up.

If you can find four flute cutters to fit your collets, you'll find them much more robust than two flute. Or... If the collets will take 6mm shanks, you have a wide choice of three flute disposable carbide cutters that can be run at 7-10,000RPM.
 
OP
OP
Steve Smith

Steve Smith

Member
Joined
May 3, 2006
Messages
9,110
Location
Ryde, Isle o
Format
Medium Format
Thanks. I can only fit 1/8" shank cutters into our machine (Excellon). I did find a company selling a 3/32" cutter with an 1/8" shank suuitable for cutting metal so I might try one of those.


Steve.
 
Last edited by a moderator:

paul_c5x4

Member
Joined
Apr 22, 2009
Messages
1,942
Location
Ye Olde England
Format
Large Format
I might have some 1/8" shank solid carbide cutters (four flute), if not I can put you in touch with a UK supplier. Ping me in a day or so if I haven't gotten back (doing the night shift tonight).
 
OP
OP
Steve Smith

Steve Smith

Member
Joined
May 3, 2006
Messages
9,110
Location
Ryde, Isle o
Format
Medium Format
Would you mind sharing your CAD files?

I wouldn't mind at all. I have shared them with many people already. Send me a private message with your e-mail address.

Are DXF files ok for you? (originated in AutoCAD).


Steve.
 
Photrio.com contains affiliate links to products. We may receive a commission for purchases made through these links.
To read our full affiliate disclosure statement please click Here.

PHOTRIO PARTNERS EQUALLY FUNDING OUR COMMUNITY:


Ilford ADOX Freestyle Photographic Stearman Press Weldon Color Lab Blue Moon Camera & Machine
Top Bottom