Negative scan vs wet print

Red

D
Red

  • 2
  • 1
  • 57
The Big Babinski

A
The Big Babinski

  • 2
  • 4
  • 82
Memoriam.

A
Memoriam.

  • 6
  • 6
  • 152
Self Portrait

D
Self Portrait

  • 3
  • 1
  • 69
Momiji-Silhouette

A
Momiji-Silhouette

  • 2
  • 3
  • 78

Recent Classifieds

Forum statistics

Threads
198,002
Messages
2,768,051
Members
99,523
Latest member
Seeker0221
Recent bookmarks
0

ivenhoe

Member
Joined
Jul 16, 2019
Messages
26
Location
Russia
Format
35mm
I attached 2 crops, one is a negative scan and another one is a wet print.
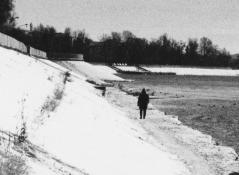
The film is Foma 400@800 developed in D76 stock.
1) The scan was made with a DSLR and a good macro lens.
2) The wet print was made on 8.5x11 inch RC paper, developed in Dektol 1+2 (Durst - condenser head + Schneider Componon-S 2.8/50mm lens) and then scanned. Not the best scanner, but definitely gives the idea, in reality it looks almost the same.
The negative scan has just a bit more contrast, but a lot more sharpness/acutance and more pronounced grain.
I know that paper's grain is much thinner and it also depends on the size of the print. But is there any way of getting similar high acutance, crispy, grainy image when wet printing?

PS. Probably it's better to move the thread to "B&W: film, paper, chemistry" section.
 

Attachments

  • print 100%crop.png
    print 100%crop.png
    894.5 KB · Views: 374
  • scan 100crop.png
    scan 100crop.png
    1 MB · Views: 382
Last edited:

Alan9940

Member
Joined
Jun 17, 2006
Messages
2,395
Location
Arizona
Format
Multi Format
There are many high acutance film developing formulas and development techniques that will easily provide strong acutance. Increased grain is easy...use a higher speed film and/or a developer such as Rodinal which produces very crisp grain. Combine, say, a 400 speed film with Rodinal and, if you're shooting 35mm you'll see plenty of grain.
 
OP
OP

ivenhoe

Member
Joined
Jul 16, 2019
Messages
26
Location
Russia
Format
35mm
There are many high acutance film developing formulas and development techniques that will easily provide strong acutance. Increased grain is easy...use a higher speed film and/or a developer such as Rodinal which produces very crisp grain. Combine, say, a 400 speed film with Rodinal and, if you're shooting 35mm you'll see plenty of grain.

This is basically what I've done, Foma 400@800 looks quite grainy and contrasty. I'm satisfied with the negative and the level of acutance and grain, when scanning. BUT I can't get the same look when making wet print. As I've just started printing, I'm not sure are there any techniques to produce such grainier, sharper images. Or is it even possible for wet printing?
 

MattKing

Moderator
Moderator
Joined
Apr 24, 2005
Messages
52,299
Location
Delta, BC Canada
Format
Medium Format
The acutance in your scan is a result of digital manipulation of a file. Scans will always start out as inherently Loa in acutance - every scan needs to have some amount of "sharpening" done to it. You and/or your scanning software and/or your post processing software have just elected to add a fair bit.
With optical prints, acutance can be controlled by modifying the light source, changing to a lens that offers more contrast, or employing unsharp masking techniques.
Alternatively, if you carefully adjust contrast higher, including employing some lo alized split grade contrast controls, you can greatly increase the subjective appearance of grain and edge sharpness (which is what acutance actually is).
 

removed account4

Subscriber
Joined
Jun 21, 2003
Messages
29,833
Format
Hybrid
hi ivanhoe
best way I have found to increase grain and contrast is to give less light to the film and add a little more time in the juice
another good way is to do what you did in these examples, enlarge and use VC enlarging filters and nice strong developer
so if you shoot with a wider lens give less light, develop longer and develop your prints differently you might have the grain you crave
. you can find your personal film grain sweet-spot by taking a roll or two or 3 of film and putting a wide lens on your camera and then ..
bracket your exposures by about 1 stop .. then develop your film the same way, each roll a little more agitation and development time ...
then contact print and enlarge your films to see which you like the best ... THEN shoot a whole roll at whatever exposure and development time you thought you liked
and see if it is really what you wanted. its also a great exercise to visually see how light and development does their magic on any film you might come across to use..
you might decide you like your film exposed and developed the way you are doing it now so you have other options, and use your digital means as another layer of image making.
don't forget to have fun!
John
 

gone

Member
Joined
Jun 14, 2009
Messages
5,505
Location
gone
Format
Medium Format
Comparing scans to prints will drive you batty. They're two totally different things. If you're not going to wet print, you'll have to go by what you see on a computer monitor. For darkroom printing, you go by what you actually see in front of you. It's not the same thing. The scan on a monitor is a virtual image, the print is a real image. So you'll have to decide whether or not you are going to go w/ darkroom printing, or w/ scanning and I assume inkjet printing before you can do anything meaningful w/ your negs.

Acufine developer will give you a lot of acutance at the expense of some tonality. One little tip about darkroom printing.....it requires spending a lot of time in the darkroom figuring things out to get what you want. That's just how it is. After a few months of working in there, you'll either be proficient or have gone back to scanning and printing the scans. There really is no substitute to hands on experience when it comes to figuring out what you prefer and what you don't. Kind and knowledgeable people here helped me a lot, but I still had to make a lot of "failures" to see what worked.
 
OP
OP

ivenhoe

Member
Joined
Jul 16, 2019
Messages
26
Location
Russia
Format
35mm
The acutance in your scan is a result of digital manipulation of a file. Scans will always start out as inherently Loa in acutance - every scan needs to have some amount of "sharpening" done to it. You and/or your scanning software and/or your post processing software have just elected to add a fair bit.
With optical prints, acutance can be controlled by modifying the light source, changing to a lens that offers more contrast, or employing unsharp masking techniques.
Alternatively, if you carefully adjust contrast higher, including employing some lo alized split grade contrast controls, you can greatly increase the subjective appearance of grain and edge sharpness (which is what acutance actually is).

Thanks! That's helped a lot. I've tried split grade printing, but with little success so far, anyway will try it again. But I've never heard of unsharp masking technique, so I'll look into it as well. I've got a couple of question. What do you mean by modifying light source? I've got a Durst b&w head enlarger with a standard opal bulb, guess there is not much I can change. And do you think the type of developer or dilution, or the type of paper play any role in sharpness, acutance, grain appearance in a final image?
 
OP
OP

ivenhoe

Member
Joined
Jul 16, 2019
Messages
26
Location
Russia
Format
35mm
hi ivanhoe
best way I have found to increase grain and contrast is to give less light to the film and add a little more time in the juice
another good way is to do what you did in these examples, enlarge and use VC enlarging filters and nice strong developer
so if you shoot with a wider lens give less light, develop longer and develop your prints differently you might have the grain you crave
. you can find your personal film grain sweet-spot by taking a roll or two or 3 of film and putting a wide lens on your camera and then ..
bracket your exposures by about 1 stop .. then develop your film the same way, each roll a little more agitation and development time ...
then contact print and enlarge your films to see which you like the best ... THEN shoot a whole roll at whatever exposure and development time you thought you liked
and see if it is really what you wanted. its also a great exercise to visually see how light and development does their magic on any film you might come across to use..
you might decide you like your film exposed and developed the way you are doing it now so you have other options, and use your digital means as another layer of image making.
don't forget to have fun!
John
Thank you, that is a great method, I definitely need to run some tests, because I've just started printing and initially didn't know what to expect from the earlier developed negatives. It appears to be that my contrasty and grainy negatives look much smoother when wet printing. So I guess if I choose this medium for obtaining final result, I need to rethink my developing techniques.
 
OP
OP

ivenhoe

Member
Joined
Jul 16, 2019
Messages
26
Location
Russia
Format
35mm
Comparing scans to prints will drive you batty. They're two totally different things. If you're not going to wet print, you'll have to go by what you see on a computer monitor. For darkroom printing, you go by what you actually see in front of you. It's not the same thing. The scan on a monitor is a virtual image, the print is a real image. So you'll have to decide whether or not you are going to go w/ darkroom printing, or w/ scanning and I assume inkjet printing before you can do anything meaningful w/ your negs.

Acufine developer will give you a lot of acutance at the expense of some tonality. One little tip about darkroom printing.....it requires spending a lot of time in the darkroom figuring things out to get what you want. That's just how it is. After a few months of working in there, you'll either be proficient or have gone back to scanning and printing the scans. There really is no substitute to hands on experience when it comes to figuring out what you prefer and what you don't. Kind and knowledgeable people here helped me a lot, but I still had to make a lot of "failures" to see what worked.

I've just started printing and I like it a lot, but I'm still comparing my prints to what I see on the monitor, as a reference. And I just realized that with my 7-8x enlargements the prints look quite smooth, which is a good thing for some prints, but for others I'd like to get more sharpness and grain and just couldn't understand what should look into, either chemistry/paper or some unknown techniques, or it's just what it is, and the negative itself should much sharper/grainier for wet printing.
 

koraks

Moderator
Moderator
Joined
Nov 29, 2018
Messages
21,567
Location
Europe
Format
Multi Format
I'm still comparing my prints to what I see on the monitor, as a reference
As someone else pointed out, that's probably going to drive you crazy at some point.
Anyway, while you're doing this comparison, notice how the tonal separation in the wet print in the example you posted above is really far superior to the digital scan, which actually can only barely considered as 'continuous tone' anymore.
So two suggestions: (1) don't stare yourself blind on acuteness. It's a fetish like any other. (2) if you want 'crispness', try printing everything you've got at grade 5 and achieve desired contrast / fit the image in the tonal range of the paper by burning & dodging.
 

Pieter12

Member
Joined
Aug 20, 2017
Messages
7,549
Location
Magrathean's computer
Format
Super8
Are you printing with a condenser head? A diffusion or cold light set-up will soften the grain. Plus, developing in Rodinal will give you nice, sharp grain.
 

Alan9940

Member
Joined
Jun 17, 2006
Messages
2,395
Location
Arizona
Format
Multi Format
A more collimated light source like a point source will provide the highest contrast and sharpest grain.
 

Don_ih

Member
Joined
Jan 24, 2021
Messages
7,474
Location
Ontario
Format
35mm RF
Perhaps you would like lith printing. I find that often makes a grainy-looking print.
 

MattKing

Moderator
Moderator
Joined
Apr 24, 2005
Messages
52,299
Location
Delta, BC Canada
Format
Medium Format
What do you mean by modifying light source? I've got a Durst b&w head enlarger with a standard opal bulb, guess there is not much I can change. And do you think the type of developer or dilution, or the type of paper play any role in sharpness, acutance, grain appearance in a final image?
Answering the second question first:
a) print developer and dilution can have an effect on contrast, but if you are using variable contrast paper, it is better to use contrast control;
b) the paper surface and tone can have a big affect on appearance.
Remember, acutance, which is a type of contrast, is the largest component of the highly subjective phenomena we refer to as sharpness, and a very sharp image is one where any grain will be most visible.
For clarity of discussion, sharpness is often emphasized at the expense of resolution. A print showing high resolution will often appear less sharp.
So with respect to your first question and given your expressed desire, you should take the steps available to you to maximize the potential for contrast.
Your light source may not be easily varied, but it is worthwhile to confirm you have the correct bulb in place and it is properly positioned. Also be sure that any condensors are both in proper place and in full, working, undamaged and clean order.
Your lens and any glass in a negative carrier are also important parts of the optical path, and should be of high quality in proper place and in full, working, undamaged and clean order.
 

M Carter

Member
Joined
Jan 23, 2013
Messages
2,147
Location
Dallas, TX
Format
Medium Format
Some thoughts and examples -

Rodinal 1+50 with gentle agitation, and rating film a half stop faster to retain shadow detail - it will pull out every bit of sharpness your gear is capable of.

I'm never a fan of pushing with Rodinal, kiss your shadows goodbye - in my experience, but I don't do stand development.

Lith printing has been mentioned, and it can boost accutance, and create grain the the paper that doesn't exist in the neg. I do almost all of my prints in lith, even when I don't want the lith look - I use stronger lith development. There's something about the contrast.

Enlarger alignment is huge, esp. as print size goes up. IMO, a Versalab is something everyone should own and love. Alignment in a minute or two.

Unsharp masking can make a big difference; there are ways to do it without a registration setup. It takes some learning with your masking film (I like cheap Ortho-litho, fast developing, safe light handling, etc, no base fog to speak of).

DSLR scanning is far superior to the desktop scanners out there; desktop scanners with B&W film don't seem able to differentiate between shadow texture and blank film; I've seen so many posterized-blobby shadows in forums where kids are doing this stuff. A properly done DSLR scan is in the drum-scan ballpark.

Rollei IR400, Rodinal 1+50, lith print:

QCDVO7D.jpg
 

warden

Subscriber
Joined
Jul 21, 2009
Messages
2,960
Location
Philadelphia
Format
Medium Format
I can't have a dark room but I love reading these threads. Apologies if I'm steering in the wrong direction (I know next to nothing about printing), but I am curious why focus accuracy wasn't mentioned. Is it possible that the OP simply didn't nail the focus in that print?
I suppose its possible, but if the OP is using a grain focuser it's pretty hard to mess that up. @ivenhoe did you use a grain focuser? And were you at least two stops down from wide open with your enlarger lens?

As for the OP's images I don't have a suggestion as I've only done pretty standard darkroom work, which tends in my experience to make the images smoother and less grainy than scans, the opposite of what ivenhoe wants. The OP's DSLR scan shows what looks more like software sharpening than grain, but it's hard to say without the negative in hand.
 

DREW WILEY

Member
Joined
Jul 14, 2011
Messages
13,803
Format
8x10 Format
Don't try getting into unsharp masking unless you've reached your limit with other options. You'll need special equipment, and it works best with large format sheet film. If you eventually decide to go that route, I've posted about it many times before. How M Carter recommends doing it is fine if you don't mind going insane at the same time. I guess all we dedicated darkroom workers gotta be a little nuts; but being outright driven nuts isn't much fun. So unless you're just fooling around wiggling your toes in the water, do it right to begin with, and purchase dedicated punch and register equipment and a more realistic film, not just a cheap one like Ortho Litho. Consider masking as a whole supplemental tool kit, not just a single technique, and subsequent to mastering the basics of enlarging and printing. Otherwise, you don't know what you're aiming for.

You also need a very clean workspace if you're doing that, as well as a full glass carrier - glass on both sides; otherwise the sandwiched sheets can't possibly stay in register. You didn't mention which model and size of Durst enlarger you have.

I was just out in the lab reviewing some dry prints I made the other day which came out quite well, but might be even better masked. It is the kind of option that makes one wonder why anyone would want to go qualitatively backwards and still print digitally. Masking is extra work, but isn't all real taste-good home cookin'?
 
Last edited:

M Carter

Member
Joined
Jan 23, 2013
Messages
2,147
Location
Dallas, TX
Format
Medium Format
How M Carter recommends doing it is fine if you don't mind going insane at the same time. I guess all we dedicated darkroom workers gotta be a little nuts; but being outright driven nuts isn't much fun. So unless you're just fooling around wiggling your toes in the water, do it right to begin with, and purchase dedicated punch and register equipment and a more realistic film, not just a cheap one like Ortho Litho.

I've only been into masking for maybe 4 years, but did start with pin registration (I've seen the pushpins & tape ideas for unsharp but never tired it). I've found it straightforward and completely enjoyable (but yeah, my wife thinks I'm nuts from time to time!) Some learning curve for development, the real maddening thing can be dust control.

While I've tried masking with t-max and ortho-plus, it brought nothing to the table but cost and time for my uses. I primarily got into it for image compositing, so the density + clear base of litho film is the absolute shizz for me (as the kids say). Other than that, I rarely do unsharp masking, but I can map out a mask that covers all the dodging for a print, and one for the burns. But the last couple years for me have all been fixed-grade liquid emulsion, even with a neg dialed in I still want more control for aesthetic directions. Trying to create large bromoil paper these days, the masks are real frustration-killers.

Compositing is huge for where I'm going, I'm shooting models on white and then building smaller-scale sets, compositing, printing on emulsion-coated canvas and tinting. All my dreams have come true for this stuff with my setup, but we all have our own workflows. Personally, I'd never go back to "regular" pan or ortho films, haven't seen a need.

(Wall behind the figure was a 20" plaster model - my next image in the works now is, umm, "you're freaking nuts" territory, according to my wife, much more complex than this one):

LHUlXCh.jpg
 

warden

Subscriber
Joined
Jul 21, 2009
Messages
2,960
Location
Philadelphia
Format
Medium Format
I've only been into masking for maybe 4 years, but did start with pin registration (I've seen the pushpins & tape ideas for unsharp but never tired it). I've found it straightforward and completely enjoyable (but yeah, my wife thinks I'm nuts from time to time!) Some learning curve for development, the real maddening thing can be dust control.

While I've tried masking with t-max and ortho-plus, it brought nothing to the table but cost and time for my uses. I primarily got into it for image compositing, so the density + clear base of litho film is the absolute shizz for me (as the kids say). Other than that, I rarely do unsharp masking, but I can map out a mask that covers all the dodging for a print, and one for the burns. But the last couple years for me have all been fixed-grade liquid emulsion, even with a neg dialed in I still want more control for aesthetic directions. Trying to create large bromoil paper these days, the masks are real frustration-killers.

Compositing is huge for where I'm going, I'm shooting models on white and then building smaller-scale sets, compositing, printing on emulsion-coated canvas and tinting. All my dreams have come true for this stuff with my setup, but we all have our own workflows. Personally, I'd never go back to "regular" pan or ortho films, haven't seen a need.

(Wall behind the figure was a 20" plaster model - my next image in the works now is, umm, "you're freaking nuts" territory, according to my wife, much more complex than this one):

Thank you for sharing your work! I still don't know how you did it but never mind that, it's cool.
 

DREW WILEY

Member
Joined
Jul 14, 2011
Messages
13,803
Format
8x10 Format
M Carter - well you're having fun at it and have found a nice niche for a creative outlet. Large sized masks are somewhat easier; and you can employ full sized punches for sake or 1/4 inch or oval pins instead of little micro pins. Visual registration is also easier on bigger prints if you want to go that way. But then you'd need a punch with a light table built into it. I made some of that kind of registration gear too, but never have gotten around to using it yet! Ternes Burton is an excellent source for traditional graphics work punches and registration strips.
 

M Carter

Member
Joined
Jan 23, 2013
Messages
2,147
Location
Dallas, TX
Format
Medium Format
M Carter - well you're having fun at it and have found a nice niche for a creative outlet. Large sized masks are somewhat easier; and you can employ full sized punches for sake or 1/4 inch or oval pins instead of little micro pins. Visual registration is also easier on bigger prints if you want to go that way. But then you'd need a punch with a light table built into it. I made some of that kind of registration gear too, but never have gotten around to using it yet! Ternes Burton is an excellent source for traditional graphics work punches and registration strips.

I've got one of the Radeka setups, it's not fantastic accuracy but works well; never tried it with 35mm, just 6x7 and 4x5. It uses 1/4" pins, and the glass carrier is also the contact print frame. I DIY'd one with a BEseler glass carrier and used the ends of rivets to register the carrier, it was functional but no the greatest. I wish I could have tried one of the Ingless setups.

I also have a sheet of glass with 1/4" pins for hand work, like bleaching or painting onto masks. I started doing this stuff on the paper plane with 16x20 litho film and silkscreen pins, but man, what a pain!
 

DREW WILEY

Member
Joined
Jul 14, 2011
Messages
13,803
Format
8x10 Format
Well, that's a start. Micro pins are nicer for film, but it's getting hard to find matched sets of punches and printing frames. I'm well equipped already, and sometimes make my own registration accessories, so haven't looked at current pricing of the current German offering from Heiland, but I'd imagine it would be a bit steep.
 

Hilo

Subscriber
Joined
Apr 19, 2011
Messages
917
Format
35mm
If I were you I would stick to just darkroom printing. Do you know, or perhaps it has been mentioned here, that using a higher contrast filter gives you a more pronounced grain?

When printing, I look at my tests and the grain is what I look at first. The grain on the test strips tells me already something about the filter I am using: when the grain is too pronounced it means the contrast filter is too high (too hard) and too fine a grain generally means the contrast filter is too low (too soft). Of course I look at the image contrast at the same time.

As you seem to be starting out, I would not experiment with the film developing itself. It is not difficult to get a lot of grain, but you risk to be sorry later because you exagerated film developing and you can't undo that. Just use Rodinal (or any other good developer) at its normal 1+25 dilution and be critical with the result. If your developped film looks kind of soft you may agitate too little. Which will result in smaller grain. If your film looks kind of too contrasty you may have agitated too much. Which will result in too much (read large) grain. Show your film to someone near you who has experience with film developing.

Look at the work of some photographers. Mario Giacometti printed with a lot of contrast and this gave his landscapes and portraits more grain than most of his contempories. Bill Brandt at one point in his career switched to printing a very high contrast which changed the face of his work. But these photographers knew what they were doing and their prints are absolutely beautiful. When you're new to printing you risk to just end up with a lot of grain, but not a beautiful print.
 

Bill Burk

Subscriber
Joined
Feb 9, 2010
Messages
9,171
Format
4x5 Format
I think it’s been mentioned already but the scan looks the way it does because of artifacts introduced by the scanning and software.

The grain in the scan isn’t in the negative. It has been added by the computer.

The wet print is more faithful to the negative. If you want to increase grain to match what you like, then to get that much more grain I would recommend getting a half frame camera. I think that significant of a change is needed, and I think half frame will be about right.
 
Photrio.com contains affiliate links to products. We may receive a commission for purchases made through these links.
To read our full affiliate disclosure statement please click Here.

PHOTRIO PARTNERS EQUALLY FUNDING OUR COMMUNITY:


Ilford ADOX Freestyle Photographic Stearman Press Weldon Color Lab Blue Moon Camera & Machine
Top Bottom