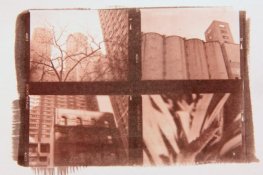
My first Cyanotype :D

The Padstow Busker

A
The Padstow Busker

  • 0
  • 0
  • 20
End Table

A
End Table

  • 1
  • 1
  • 102
Cafe Art

A
Cafe Art

  • 8
  • 6
  • 216
Sciuridae

A
Sciuridae

  • 6
  • 3
  • 201

Recent Classifieds

Forum statistics

Threads
197,663
Messages
2,762,688
Members
99,436
Latest member
AtlantaArtist
Recent bookmarks
0

m1tch

Member
Joined
Nov 26, 2012
Messages
172
Format
Multi Format
Hi all,

I thought I would finally put in practice what I have been sorting out over the last few months, just made a batch of the solutions up, here is my setup:

Watercolour paper
Phillips UV face tanner
Currently used printed image which is then oiled and dried

Exposure is around 30-40 minutes using poundland box frames as contact holders :D

I don't currently have any inkjet transparencies but its next on the list but it shows you can simply print out an image and oil it to get a good enough negative to use for printing - would just take slightly longer to expose, but much cheaper than inkjet transparencies.

Contact frame:


Print (note that this is taken on my DSLR, the lines you see on the background are due to the printer needing a clean!)

 
OP
OP

m1tch

Member
Joined
Nov 26, 2012
Messages
172
Format
Multi Format
Looking good! Which kit are you using? Those dark blues and overall contrast look great!

No kit, I have sourced everything myself, here is a list of things:

Chemicals - ProcessUK in London, cost around £25 for the chemicals, I have used around 10% of 1 chemical but made enough for 50 8x10s lol so £25 is good for 500 8x10s!
Used a cheap jewlery scale to measure the chemicals, brushed on using a cheap 'art wash brush' to some basic cold press water colour paper (I think it was something like £16 for 100 A4 sheets)
'Contact frame' - Poundland box frame which has 2 bits of glass which sandwich in the middle, don't have anything larger yet, just wanted to try 1/4 A4 sheets
UV source - Phillips face tanner (its a bit too overcast at the moment)
Negatives - simply printed on plain paper and oiled to be more transparent, kinda like waxing paper but quicker and much cheaper than inkjet transparencies!

Exposure time of around 40 minutes within around 3", developed in water and normal bleach then washed in tap water.

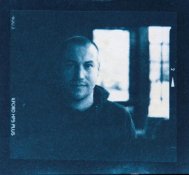
The image taken is of a building next to Euston station, I took it on my D3100, tweeked it in lightroom, then inverted it, printed it, oiled it, exposed it, developed it, dryed it lol

I also find it quite ironic that I have made a cyanotype of a building considering that a the word 'blueprint' is from the cyanotype process used on building drawings lol

What I am impressed with is the level of details in the mid-tones, you can also see that the above Cyanotype isn't 100% covered correctly as I think it was one of my initial coating attempts, but its fine as I don't like things to be perfect, the look of tintype got me into photography but its a bit too dangerous chemical wise for it to be easy. Cyanotypes are great as they are simple to do and unlike silver based processes, you are ok to work under normal light lol

Here is the original image I took and converted as a reference:

DSC_0486-1_zpsf2a1ae3b.jpg
 

Simon Howers

Member
Joined
May 21, 2011
Messages
124
Location
West Yorkshi
Format
Large Format
This is interesting. Can you explain how you oiled the paper and the materials you used to do this?

Thanks

Simon
 
OP
OP

m1tch

Member
Joined
Nov 26, 2012
Messages
172
Format
Multi Format
This is interesting. Can you explain how you oiled the paper and the materials you used to do this?

Thanks

Simon

Print off image onto plain paper
Put a drop of oil on the worktop
Smooth oil around on worktop to give even coat
Drop image onto oil
Allow to soak into the paper
Press down or move oil onto anywhere on the image that doesn't darken
Dry excess off
Hold up to light to check

The paper seems to turn into the same sort of texture as tracing paper, it won't be as good as if you had a transparency so you would need to notch up the exposure slightly but if you just pay attention to the colour the paper is going - ie going from a bright green to a darker green then you should be able to judge. I think that due to the fact that its blocking light its a bit harder to overexpose the image due to the longer exposure time - I gues kinda like stopping a lens down.

I have another exposing at the moment so will see how that comes out.
 
OP
OP

m1tch

Member
Joined
Nov 26, 2012
Messages
172
Format
Multi Format
Looks like the key to using oiled paper is to let it soak in for a bit and then completly dry it, it feels like tracing paper once its been oiled, I am now getting slightly addicted to printing lol I am on my 6th print now I think :tongue: I still have loads of chemical left, not sure how long it lasts before it starts going off but still a lot left.

I am still using the UV lamp, means I get an even UV exposure, looks like around 25 minutes is good for a 'normal' sort of photo ie both light and dark, over exposed one a bit and it came out darker than planned, but you can still see the image.
 

Klainmeister

Member
Joined
Jun 2, 2010
Messages
1,504
Location
Santa Fe, NM
Format
Medium Format
Interesting, your mixture matches a formula we recently discovered to have been dmax and overall contrast. Good work sir!
 

Jim Noel

Member
Joined
Mar 6, 2005
Messages
2,261
Format
Large Format
Hooray for you!
It is wonderful to see someone using thought and ingenuity to accomplish their purpose rather than getting on this or another forum and begging for answers and solutions. Don't lose this inquisitive and inventive attitude. It will serve you well throughout life.
Additionally,this is an interesting image.
More power to you! Keep up the good work!

Jim
 
OP
OP

m1tch

Member
Joined
Nov 26, 2012
Messages
172
Format
Multi Format
I have now dialed the exposure in a bit, I have printed around 7 or 8 now, seems that if the image is properly exposed ie equal tones of black and white 20 minutes is about correct, if there is a lot of lights less is needed otherwise it overexposes a bit and you lose some details.

I have just created a really nice print, 20 minute exposure time with really clear detail, it seems that if you soak the paper in oil for a bit longer so its saturates and then wipe off and dry for a bit it creates a really nice (cheap) negative to use. There are a few spots here and there on the image, this is probably due to a tiny bit of contamination, I will probably get some transparencies soon as those will give a sharper print, however I am quite impressed with the sharpness of the print I have just got.

I am currently just printing on 1/4 A4 size but I have just coated some 1/2 A4 size pieces and just gone and bought an A4 clip frame so might try a larger print tonight of a landscape or something, I do like the smaller 1/4 A4 prints though, kinda like a Polaroid Cyanotype :D

I also own most other camera formats from half frame all the way up to a 5x4 Speed graphic, I know that in-camera cyanotypes have been done but the exposure is measured in hours, I think tomorrow (as long as its not wet) I will set up my speed graphic and load a cyanotype in and simply hold the shutter open for a few hours exposure. The main issue someone else found with this was the sun physically burning through the paper and the holder lol so I will find somewhere away from the sun but still bright and try and exposure tomorrow.
 
OP
OP

m1tch

Member
Joined
Nov 26, 2012
Messages
172
Format
Multi Format
Make sure not to have a UV filter attached!

I don't think you can get a UV filter for a Schneider Kreuznach lol I was thinking about setting it up indoors looking out the window to keep everything safe but then thought....hmmm I think double glazing blocks out UV light lol :laugh:
 

Klainmeister

Member
Joined
Jun 2, 2010
Messages
1,504
Location
Santa Fe, NM
Format
Medium Format
I know that we had a student talking about not getting their exposure unit working and that all the prints were really light and low contrast. After much troubleshooting it turns out that the weasel who sold her the unit had replaced the glass with some that had a UV coating. WHOOPS
 
OP
OP

m1tch

Member
Joined
Nov 26, 2012
Messages
172
Format
Multi Format
I know that we had a student talking about not getting their exposure unit working and that all the prints were really light and low contrast. After much troubleshooting it turns out that the weasel who sold her the unit had replaced the glass with some that had a UV coating. WHOOPS

I believe that some people do use 'black light' bulbs which are weaker but still work, I have also seem a UV box made up from lots of UV LEDs which I do like, but I seem to be doing ok with the face tanning lamp at the moment, I will post up some photos in a bit.
 
OP
OP

m1tch

Member
Joined
Nov 26, 2012
Messages
172
Format
Multi Format
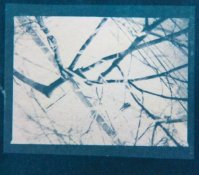
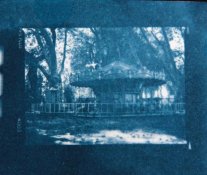
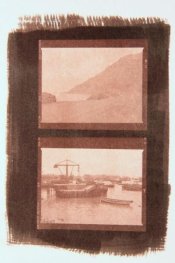
Here are the first set of prints done today, first time I have done Cyanotypes or indeed contact printing lol, basically the tip line I am very happy with, the next line I am ok with and the bottom print is a tad dark. What I have learnt is when it first gets developed in the water/light bleach mix is that the image goes slightly darker initially, then when its washed it gets slightly lighter bringing back details.

Here is how I have found it to go like:

Exposed
Put in water and bleach mix
Agitate water
Paper gets saturated and gradually goes dark blue
Most of the image looks like its over exposed at this point ie very blue and loss of detail
Agitate some more
Image then continues to develop with details starting to emerge as the unexposed solution is removed from the paper
Move to clean water tray and agitate
Image gets slightly lighter and move details come out - I am guessing that the paper can only absorb so much of the solution so some of it is washed out leaving a cleaner image and good contrast.

Here are the images so far:


Matlock (marks I believe are oil showing I need to wait a bit before printing lol)


Bridge along the canal - this is slightly over exposed as I have lost a bit of detail


This is a partly sunken barge on te canal, its really really sharp for a print made on rough paper using an old printer and oil lol

 
Last edited by a moderator:

Klainmeister

Member
Joined
Jun 2, 2010
Messages
1,504
Location
Santa Fe, NM
Format
Medium Format
Looking good. Struggling to hold the highlights, typical of all cyanos unless you specifically develop for them, but overall are looking really quite well.

We must be some of the few souls that like Cyanos!
 

cliveh

Subscriber
Joined
Oct 9, 2010
Messages
7,492
Format
35mm RF
Great cyanotypes, but may I ask what the D stands for?
 
OP
OP

m1tch

Member
Joined
Nov 26, 2012
Messages
172
Format
Multi Format
Looking good. Struggling to hold the highlights, typical of all cyanos unless you specifically develop for them, but overall are looking really quite well.

We must be some of the few souls that like Cyanos!

2 chemicals, add them together, brush on some paper, doesn't matter if the lights are on, expose to UV source for approx times, develop in water and some bleach - very user friendly process :D

I will look into some toning at some point as well, I have also seen a guide on how to do 2 tone cyanotypes where you tone one layer and not the other, makes a really interesting effect.

What I like about the process, much like tintype, is the fact that each print, although a print, is an original which can't be made exactly the same again. With Tintypes you only get 1 of each image, whereas with Cyanotypes you can get copies but none are identical and you can't change them after they have been exposed other than some toning.

I am just trying out some different times, 20 minutes seem to be about right for a well exposed image (like the barge) but just trying to work out what is best for images that are very light or very dark.

What have other people found work best for exposures? If its a dark image should I expose for longer or shorter? I can't remember which way round as I am printing a negative rather than taking a fresh image lol
 
OP
OP

m1tch

Member
Joined
Nov 26, 2012
Messages
172
Format
Multi Format
I have now put the UV lamp flatter and closer to the paper, probably at around half the distance now, so my exposure times have dropped, i'm gradually working my way back to correct exposure, each one takes around 10 minutes now which saves time and bulb life!

I have some transparencies on order, will be interesting to see what the exposure time is on those vs oiled paper, I might also look into creating a larger UV box with longer tubes so that I can do more than 1 print at a time - I am currently exposing 2 x 1/4 A4 prints in an A4 clipframe which seems to be working out well. I doubt I will be able to go an larger than A4 though due to not being able to print any larger than A4.
 

davidrborquez

Member
Joined
Jun 9, 2011
Messages
2
Location
Santiago, Ch
Format
Medium Format
awesome results m1tch!

I'm as well doing my first cyanotypes and Van Dyke brown copies of some negatives (I prefer not to use digital prints so they are 4,5x6cm contacts) using UV lamps as well, but I wasn't sure if oiled paper would work... now I know it does very well!

cheers!

here's what i got - not as sharp but not too ugly :tongue:
IMG_1974.jpg IMG_1975.jpg IMG_1976.jpg IMG_1972.jpg IMG_1980.jpg IMG_1979.jpg IMG_1978.jpg
 
Last edited by a moderator:

Klainmeister

Member
Joined
Jun 2, 2010
Messages
1,504
Location
Santa Fe, NM
Format
Medium Format
Well done! Welcome to APUG!

Both of you consider getting the cheapest red wine you can find and start toning both these types of prints in it. Cheap black tea works well and green tea has interesting effects.
 

davidrborquez

Member
Joined
Jun 9, 2011
Messages
2
Location
Santiago, Ch
Format
Medium Format
Well done! Welcome to APUG!

Both of you consider getting the cheapest red wine you can find and start toning both these types of prints in it. Cheap black tea works well and green tea has interesting effects.

hey, good idea! wanna see how wine reacts... i'm gonna do some cyanotypes in coloured paper too :wink:
 

Klainmeister

Member
Joined
Jun 2, 2010
Messages
1,504
Location
Santa Fe, NM
Format
Medium Format
Cheaper the better. The tannin in the wine will react.I have a 11x14 cyanotype toned first in red wine from a box (made it deep reddish/purple) then finished with green tea, making a nice blend of soft brown highlights and deep purple blacks. Something worth playing with. The best smelling toners I know of.
 
OP
OP

m1tch

Member
Joined
Nov 26, 2012
Messages
172
Format
Multi Format
I have found online that if you use coffee and tannic acid, then washed in Soduim carbonate.

Here is the image, its very close to black and white:

http://www.flickr.com/photos/9314116@N06/7615157908/

Taken from the description below the image:

Cyanotype
Dry
Coffee+Tannic Acid wash
Sodium Carbonate wash
(Repeat Coffee+Tannic acid wash , Sodium Carbonate Wash)
Rinse in cold Water
Dry.
I had thought this cyanotype was ruined when I did the first Sodium carbonate wash - the image developed ugly brown spots.
Thankfully I finished processing anyway. The spots faded once the paper was dry - Whew!
 
Photrio.com contains affiliate links to products. We may receive a commission for purchases made through these links.
To read our full affiliate disclosure statement please click Here.

PHOTRIO PARTNERS EQUALLY FUNDING OUR COMMUNITY:


Ilford ADOX Freestyle Photographic Stearman Press Weldon Color Lab Blue Moon Camera & Machine
Top Bottom