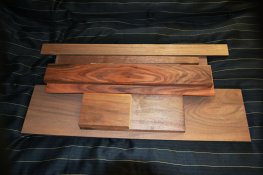
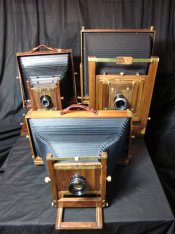
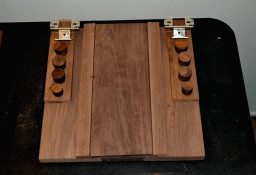
Some of you may remember that I have built three ULF camera's. 8x20, 11x14 and 14x17. I have been using them all and even though they are not perfectly rigid they work well enough. So I decided to build my 8x10. Seems only fitting that I should have all four formats built by me. So my 1904 Seneca Improved can get some rest. It is a great camera and the one I use the most. I've seen many designs i like and I've got a combination that I will use for this build. Some images. This will be Walnut and Rosewood. My New Years project!
-
Welcome to Photrio!Registration is fast and free. Join today to unlock search, see fewer ads, and access all forum features.Click here to sign up
- Home
- Forums
- Analog Workflow Forums (100% Analog/Traditional)
- Analog Equipment
- Camera Building, Repairs & Modification
You are using an out of date browser. It may not display this or other websites correctly.
You should upgrade or use an alternative browser.
You should upgrade or use an alternative browser.
My 8x10 camera build
-
A
- Thread starter Jim Fitzgerald
- Start date


Recent Classifieds
-
For Sale Omega C760 XL Medium Format Condenser Enlarger with Schneider Enlarger Lens - UK
- Started by Gary Holliday
-
For Sale Nikon FE2 / 50mm 1,4 AI-S
- Started by Jammoh
-
Found WTB: 4x5 field camera, wooden, simple
- Started by Dan Daniel
-
Found Looking for a good spot meter
- Started by Premier
-
Want to Buy View Camera Shutter
- Started by Beevo
Forum statistics
OP
OP
These sure are beauties!
OP
OP
All of the cameras I build are labors of love. They are functional and all have their quirks. Each one gets better. So the 8x10 should be the best.
I've seen these cameras. I can tell you that the finish is silky smooth. It's a joy to use equipment that's well made and elegant. The 8x10 will be fun to see.
OP
OP
Curt, thanks. Yes I love using the ULF'S. Can't wait to use the 8x10.
All of the cameras I build are labors of love. They are functional and all have their quirks. Each one gets better. So the 8x10 should be the best.
I need to pick your brain about sourcing some of those pieces of brass hardware so I can build myself a 5x7 instead of beating the bushes for a decent one; the metal parts are the only thing that's keeping me from doing it. Nice work on the three that you posted; going by those your 8x10 will be lovely as well!
Hi, Jim.
Looking forward to watching this progress. I'm currently doing the same thing (learning how to anodise aluminium at the moment!).
I couldn't see with the photos that you've posted; how are yo doing the joints? Finger joints?
Looking forward to watching this progress. I'm currently doing the same thing (learning how to anodise aluminium at the moment!).
I couldn't see with the photos that you've posted; how are yo doing the joints? Finger joints?
Jim, looks like your off to a good start, having seen a couple of your cameras I'm sire this on will turn out great. I followed your 14x17 project and really enjoyed it, so thanks for starting this thread. From your photos in post#1 it looks like walnut for the body or are you breaking tradition?
Roger
Roger
OP
OP
Roger, I am breaking form tradition a bit, I am using Rosewood as well as walnut. I wanted to incorporate the two woods as I like them both. They look good together. I've cut some of the wood and have some parts together. Going with stainless steel and aluminum on this one.
I'm going to dovetail the joints on this one. My box joints will come into play on some special parts that I am going to make. All wood will be hand sanded to 1,000 grit. I sand from 320 up with oil and diamonds to polish the wood and close the pores. I've done this on the other three ULF's and they look great.
I'm going to dovetail the joints on this one. My box joints will come into play on some special parts that I am going to make. All wood will be hand sanded to 1,000 grit. I sand from 320 up with oil and diamonds to polish the wood and close the pores. I've done this on the other three ULF's and they look great.
Roger, I am breaking form tradition a bit, I am using Rosewood as well as walnut. I wanted to incorporate the two woods as I like them both. They look good together. I've cut some of the wood and have some parts together. Going with stainless steel and aluminum on this one.
I'm going to dovetail the joints on this one. My box joints will come into play on some special parts that I am going to make. All wood will be hand sanded to 1,000 grit. I sand from 320 up with oil and diamonds to polish the wood and close the pores. I've done this on the other three ULF's and they look great.
Aluminum is a welcome word to read; I'm used to working with that and I'll thus be able to follow your build a bit better. Dovetails will be pretty on the outside corners; are you routing or hand-cutting? Also, I think the rosewood will look nice; I considered that as a material. Can't wait to see pics!
OP
OP
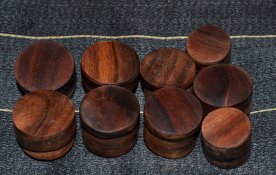
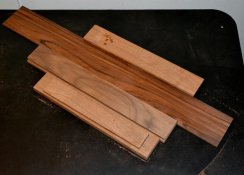
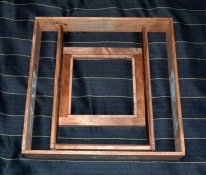
Here are some updated images. I will be cutting the dove's with the router. I have to lay them out and I still have many things to do and consider. Even though I have built three other cameras you are always trying to imagine how this all folds and goes together. Sometimes I just look at images and what I have done so far and think about it. I have found that if you do not rush it generally comes together.
Attachments
OP
OP
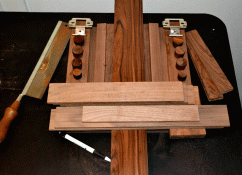
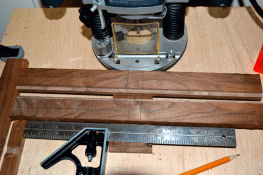
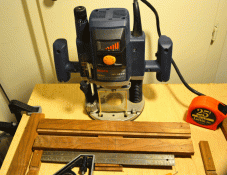
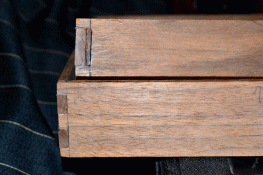
Got the router and jig working and did machine dovetails. I wanted the precision of the jig as my hand cutting skills are just not up to par yet.I'll need to slot the up rights and the base for the front standard. I cut and jointed the front lens board frame as well.
Attachments
Excellent! I shall enjoy following this thread.
I also have wood on hand to build a camera - but alas I just can't seem to find the necessary time. Whenever I tryy to make time - something else comes along and uses it up. Work seems to have a habit of expanding to fill any free time available to it, too. Maybe the first step I need to make to get my camera built is to take some of that "work / life balance" coaching. Trouble is, I'd never find the time...
I also have wood on hand to build a camera - but alas I just can't seem to find the necessary time. Whenever I tryy to make time - something else comes along and uses it up. Work seems to have a habit of expanding to fill any free time available to it, too. Maybe the first step I need to make to get my camera built is to take some of that "work / life balance" coaching. Trouble is, I'd never find the time...
OP
OP
Thanks, everyone. My cameras are functional like I said. The more you make the more you learn. I decided to use some machines on this build especially when it came to the joinery. I wanted to tighten things up a lot. What I learn here will give me the confidence to go back and work on the other cameras to upgrade them a little. Now remember I'm doing this in the hallway of my two bedroom apartment. My other half is in Indonesia for 11 months teaching. Great thing is, she is behind me 100%. Even with all of the router chips!
I'll post more images as I get more done.Thinking about the GG frame now.
If you have very little time I would suggest that you get the plan in place and pick away at it bit by bit. It took me 18 months to build the first camera my 8x20. Don't put a must be done by date on yourself. It will be much more fun that way.
Thanks for sharing Jim. I'me really impressed that you are doing it in an apartment. That is dedication. I am curious whether you made the bellows on your other cameras or had it made. They look great. Given what they seem to cost, I'd just as soon make one myself. I'm about half way done creating an 8x10 partially from a old Kodak 2D and partially new. I used it briefly, but I hated how wobbly it was....but I liked the way the rear movements worked so I decided to create a "Frankencamera" from old and new parts. I am designing as I am building.....and learning a lot about how I'd design something from scratch. The main thing for me is the metal bits. It is even hard to find nice aluminum knobs. I'm thinking that if I build one from scratch, I'll lay out the sheet metal bits on the computer and have them water jet cut since I have access to one at work.
OP
OP
Mark, great to hear you are building as you go. You have to do this. When you are designing and copying you have to make changes along the way. Having access to a water jet is awesome! I have to improvise.
My first bellows was from Western Bellows for the 8x20. The 11x14 I got lucky and scored a perfect bellows off of e-bay for 100.00! My 14x17 bellows I had done by Custom Bellows in England. Both of the bellows I had done are great and worth every penny. Getting the bellows done saves a lot of time but it adds to the cost. I just know that I'm not good at it. I just find cameras that I like and copy or use the design as a guide and add my own touches. Be prepared to make adjustments as you go. Makes you think.
My first bellows was from Western Bellows for the 8x20. The 11x14 I got lucky and scored a perfect bellows off of e-bay for 100.00! My 14x17 bellows I had done by Custom Bellows in England. Both of the bellows I had done are great and worth every penny. Getting the bellows done saves a lot of time but it adds to the cost. I just know that I'm not good at it. I just find cameras that I like and copy or use the design as a guide and add my own touches. Be prepared to make adjustments as you go. Makes you think.
Jim,
While dovetails do look nice, several skinny box joints (cut on a table saw) would be MUCH stronger and sturdier in this case since you're dealing with thin stock and no fixed "bottom" like a drawer has. I'm assuming it's going to have a rotating back.
While dovetails do look nice, several skinny box joints (cut on a table saw) would be MUCH stronger and sturdier in this case since you're dealing with thin stock and no fixed "bottom" like a drawer has. I'm assuming it's going to have a rotating back.
Last edited by a moderator:
OP
OP
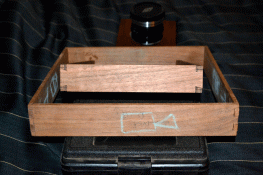
Vinny, the dovetails are not small ones. 1/2" doves. The back will rotate yes. I always support the inside of the back box with what will become the stops for the bellows. The rear bellows frame will stop and if need be attach to this. Generally I make the rear frame out of solid stock and make it fit tight to the back box. The rear frame is then very rigid. My back box is a more traditional depth. It is 2" deep. Even though I'm designing my camera around the Chamonix/Phillips design I feel the additional depth of the back bx is needed for better strength. I have Deardorff hardware to use and I'm going to move on to the rear back assembly with the ground glass soon. I'll be working on the old T depth question soon. I'll get some more images up soon.
OP
OP
OP
OP
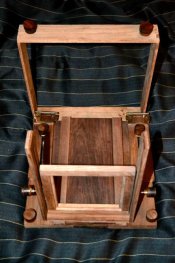
Here is the hard part.... well not really. This is my fourth build and I'm getting smarter with each one! I used my Seneca Improved to get the ground glass and T depth right. Gotta have clamps!
Attachments
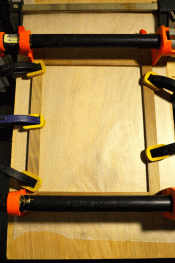
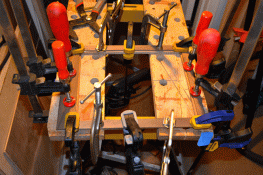
Gotta have clamps!
You can't ever really have enough of those.
| Photrio.com contains affiliate links to products. We may receive a commission for purchases made through these links. To read our full affiliate disclosure statement please click Here. |
PHOTRIO PARTNERS EQUALLY FUNDING OUR COMMUNITY:  |