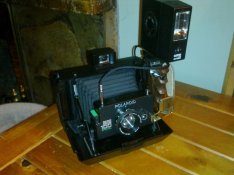
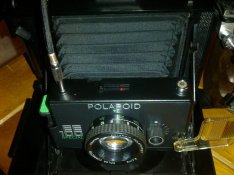
Mod'ing a Polaroid EE100's flashcube port to a hotshoe or PC port connection

Table for four.

H
Table for four.

  • 5
  • 0
  • 37
Waiting

A
Waiting

  • 2
  • 0
  • 49
Westpier

A
Westpier

  • 1
  • 2
  • 51
Westpier

A
Westpier

  • 2
  • 0
  • 36
Morning Coffee

A
Morning Coffee

  • 7
  • 0
  • 75

Recent Classifieds

Forum statistics

Threads
197,583
Messages
2,761,473
Members
99,408
Latest member
Booger Flicker
Recent bookmarks
1

DanielStone

Member
Joined
Dec 30, 2008
Messages
3,114
Location
Los Angeles
Format
Multi Format
(Hey everyone,

Just took delivery of a nice "EE100" bellows polaroid camera from the local camera show.

like this one here(not mine, but identical):

450043567_b88ea05b7d.jpg


Going through it I've found it has pinholes, although I had a "happy accident" if you can call it that(below)...

Polaroid_PinholeDreams.jpg


I'm interested in modifying the flashcube port to a hotshoe. Or even a female pc sync port, so I could plug in any pc-cable'd flash. Any ideas? I'm not the handiest person with electronics or wiring, so I thought I'd consult the experts :wink:

thanks

-Dan
 

xya

Member
Joined
Jun 13, 2010
Messages
1,030
Location
Calais, Köln
Format
Multi Format
just tested with an old useless pack 80 camera. I suppose the flashcube sockets are similar. it seems to be easy. there are two contacts at the base of the flashcube socket, towards the front, where the ready to fire flash would sit. they close when the shutter opens (and so fire the flash). there have to be batteries in the camera, if not, it doesn't work. if you get youself an extension cable for flash, you would have a female plug socket. just cut it off with a bit of the cable and solder it to the contacts. just 2 points of soldering, that's it. then scotch the cable to the camera and there you are.
 
Last edited by a moderator:

MattKing

Moderator
Moderator
Joined
Apr 24, 2005
Messages
52,004
Location
Delta, BC Canada
Format
Medium Format
I would guess that the flashcubes would be synched differently than X-synch, but do not know for sure.
 

E. von Hoegh

Member
Joined
Sep 14, 2011
Messages
6,197
Location
Adirondacks
Format
Multi Format
The synch for a flashcube would be "F" synch, you need "X" synch for an electronic flash. If the camera uses Magicubes, there is no electric synch, Magicubes are set off by a mechanical trigger.
 

xya

Member
Joined
Jun 13, 2010
Messages
1,030
Location
Calais, Köln
Format
Multi Format
it uses flashcubes, not magicubes. bulb flash is f-sync indeed, and it wouldn't work with an ordinary mechanical shutter. but obviously the electronic shutter of the polaroid opens immediately, so it catches the electronic flash. marty kuhn did quite some research on his wonderful site

Dead Link Removed

which is a "must" for polaroid owners. it worked well with the older pack film cameras. afaik they changed the cocking system of the shutter with the newer cameras, but they kept the electronics mainly. we only will know for sure if somebody tries and reports back to this page.
 

BobD

Member
Joined
Dec 22, 2006
Messages
1,113
Location
California,
Format
Analog
The way to convert it to electronic flash is to sell it and buy a ProPack with attached electronic flash.
 

Sethasaurus

Member
Joined
Sep 1, 2010
Messages
96
Format
Medium Format
Just got hold of an EE100 today. Of course, I had to pull it apart and modify it straight away!
Here's what I did:

Disassembly:
With camera closed:
Open back cover and remove batteries. Unscrew battery contacts. This should release the bellows from the front panel.

With camera open:
Unclip plastic front cover (one clip, either side).
Remove 2 screws on bottom of front shutter/lens housing.
Swivel mechanism so that you can remove the 4 screws from the back panel. The shutter/lens assembly (front case and back panel attached) can now be removed.
The back panel will come off. Be careful that the shutter spring cover does not come loose. Mine did not spring off unexpectedly, but you will need to remove this if you do the cable release mod.

Cable release mod:
I have a flash bracket with a cable release fitted but the centre pin on the release cable was not long enough to trip the shutter. It was moving it about 75% of the way.
To fix this, I glued in a small piece of plastic (approx 6mm dia x 6mm long), tapered to fit the existing shutter release (inside the camera).

PC socket mod:
My little Sunpak flash gives a good output, is not huge in size and also has a pc cable.
I recycled a pc socket from an old camera part I had for this one. Drilling a small hole (about 8mm from the left side) into the top of the case, right next to the flashcube socket (there is only a small spot to fit it in here).
Then I Connected the PC socket to the contacts inside - this is easy to figure out:
If you trip the mechanism while the front cover is off, you'll see the flash contacts closing as the shutter opens. You may need to take some 1200 grit sandpaper and clean up the contacts as they can be quite corroded.
I soldered onto one of the flashcube socket contacts and onto the (brass) terminal that the large battery contact screws into.

Sorry that I did not take pics as I was doing this, but it is a fairly straightforward operation, as long as you use some nice thin wire and route it so that it does not interfere with the other internals.

Faulty focus?
One other problem that people have also complained about when they get these cameras is that the focus is off. I'm glad I checked mine out completely as I noticed the front lens had become detached from the ring. You can pull off the range ring, then the front ring that holds the front lens element. I glued mine back in with a few (very small!) drops of epoxy. I wouldn't recommend cyano (super-glue), as it tends to react with plastic (this is a plastic lens).

OK, all this was completed about 2 hours ago and I have not yet calibrated my focus or taken any shots at all (at 1AM). I expect it to work fine with the flash (which fires when I trip the shutter). The shutter appears to be working fine with a couple of new batteries.
(If you are getting black pics, it's likely the shutter is not opening&closing. The circuit inside takes care of the exposure and needs power to function).

OK I hope that helps anybody. I couldn't find much info about using electronic flash. The flash should be firing as the shutter opens and I expect that the internal circuit should compensate for the light level (if you place your finger over the sensor in the center of the dark/light knob you can see the long shutter time easily).

Looking forward to some pics tomorrow! Also I'll try my hand at recovering the negs too. I expect the '75' setting will be just enough over-exposure to give good results).

ee100-mod1.jpg.jpg

ee100-mod2.jpg.jpg
 
Last edited by a moderator:

Sethasaurus

Member
Joined
Sep 1, 2010
Messages
96
Format
Medium Format
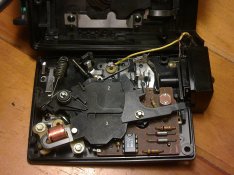
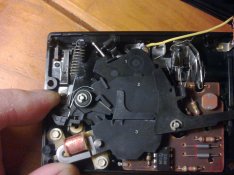
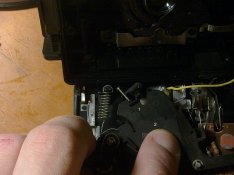
Here are a few pics of the mechanism. I thought again about the shutter and contacts arrangement and I have made another modification:

There are 3 leaves in the shutter: #1 closes the flash contacts, #2 opens the shutter, and #3 (held closed by a solenoid) is released after the sensor circuit has been exposed to enough light.

I cut a small piece from the first leaf which prevents it from closing the contacts. The next leaf opens the shutter and also closes the contacts, so I believe this will be the correct timing for an electronic flash (X-sync?).
(Ignore the sloppy soldering job! I did this in the early hours..)

Mechanism at rest:
05012014660.jpg

First leaf about to make contact:
05012014665.jpg

Modified first leaf:
05012014667.jpg

No test shots yet as I need to find my piece of ground glass to calibrate the focus.
 

Sethasaurus

Member
Joined
Sep 1, 2010
Messages
96
Format
Medium Format
Thanks 2bits.

I think manual focus may put people off a little (especially since you can also get the other rangefinder cameras cheap enough). Of course, if you end up with out-of-focus pics all the time, then that is going to disappoint anyone, but it is an easy fix.

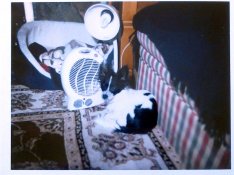
Here's my third test shot (the first was too dark without a flash, in low lighting at night. The second was out of focus until I made an adjustment).
09012014689.jpg

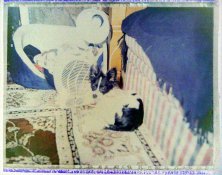
You can reclaim the negs easily from FP-100C film:
I trimmed it and taped it down (black side up), then poured a little bleach on the surface and left it for 1 minute.
The bleach washed off easily, so it's a nice quick process. I found masking tape is not good enough, but brown packing tape seals the edges pretty well.
Also, if you dry the negs while still taped down, they stay flat.

07012014682.jpg 07012014682a.jpg

(Sorry these are a bit poor quality, but my scanner is out of commission, so I'm using a phonecam to get a pic of a pic).

I think I just need to tweak my focus a little more and test it with a landscape pic..

As well as taking some slide film in my old rolleicord, this camera is going to be my 'friend-maker' at the land speed racing at Bonneville this year. I'm going to take shots of people with their machines and give them the instant pics.
I figure there will be a lot of light and my pics may be a little overexposed, but that's ok - I'll get better negs!
 
Last edited by a moderator:

Ektagraphic

Member
Joined
Feb 3, 2009
Messages
2,927
Location
Southeastern
Format
Medium Format
Thanks for that Seth! Great detailed info and pics! Did the EE100 have that electronic flash connector on the bottom that the ProPack does? I have the ProPack camera and have trouble getting constantly focused pictures
 

Sethasaurus

Member
Joined
Sep 1, 2010
Messages
96
Format
Medium Format
I haven't seen a ProPack, but no, there is nothing on the base of the EE100 apart from a tripod socket.
Unfortunately, I also haven't seen a shot from a correctly calibrated lens, so it is hard to judge whether this plastic lens is contributing to blur or perhaps it's just my shaky hand with a long exposure..

I adjusted my infinity focus using the procedure here:
http://feuerbacher.net/photo/repair/InfinityFocus/InfinityFocus.html

I am going to recheck it though, as I need to be sure my SLR infinity focus was correct to begin with (some lenses rotate past infinity focus).
I think that is the best method for setting focus, and the rest of the measurements should be correct. Unfortunately, during the testing period with instant film, you use up a filmpack quite quickly. Another good tip is to retain the darkslide from your filmpack and learn how to slide it back into place (in the dark!) so you don't waste another frame

Also, I have found that a pair of standard Duracell batteries don't last too long when you are constantly tripping the shutter (especially for long times). I decided to ditch alkaline batteries forever and went out and bought some 2000mAh rechargeables.
I think it's high time the old disposable, crappy battery technology was discontinued, considering many of us are more 'eco-friendly' and recycle, etc..

At least I can say I'm doing my part by keeping old cameras going and lowering my carbon footprint by restoring an 75 year old motorbike!
 

Sethasaurus

Member
Joined
Sep 1, 2010
Messages
96
Format
Medium Format
One last thing!

I was just reviewing and looking at my incredibly crappy soldering job (considering I worked as an electronics engineer for more an 15 years!).

Actually, I was using a 25Watt iron and the brass terminal was big enough to dissipate a lot of the heat from the iron tip - hence the messy job. Also make sure you scrape it (use a knife/screwdriver/sandpaper) until it is shiny and it'll be easier to solder.

If you're soldering this camera, it's actually preferable to keep the heat low anyway, as you may easily overheat a metal connector to the point where it'll melt through the plastic.
 

snapguy

Member
Joined
Jan 1, 2014
Messages
1,287
Location
California d
Format
35mm
Can you guys build me a World War II tank? I want to use it for my daily commute to work. This is just my devilish clever way of saying I am impressed with your knowledge and wllingness to help a poor bloke with a problem. Bravo! You lost me somewhere between the flashcubes and the magicube.
 

wiltw

Subscriber
Joined
Oct 4, 2008
Messages
6,364
Location
SF Bay area
Format
Multi Format
Some technical errors need correction...

1. The Polaroid uses a leaf shutter, so 'F' synch is NOT the applicable synch, it is 'M' synch!!!
2. 'F' synch is for flash bulbs designed to be used with Focal Plan Shutters

A FP synch bulb is a slow burning bulb.
M or F sync delays to it allows the bulb to fire and come up to full intensity before the shutter opens. Class M bulbs reach their peak illumination at around 20-25 milliseconds after ignition, and class F lamps reach their peak at approximately 5 milliseconds. Flascubes were M sync, in my over 45 years in photography I do not recall ever seeing an F sync bulb. Post 5 linked to an article, and that article clearly stated "an M3 flashbulb in the #268 Flashgun as intended for this camera"...the M3 flashbulb, very well known to me as I shot with them for almost 10 years, is an M sync bulb.
 
Last edited by a moderator:

jojonas

Member
Joined
Feb 4, 2014
Messages
21
Location
sweden
Format
Multi Format
great mod, seth!
after looking through how the shutter works, would you say that it is possible to make an additional bulb or time mode?
 

Sethasaurus

Member
Joined
Sep 1, 2010
Messages
96
Format
Medium Format
Thanks jo!

With the way it works, each leaf of the shutter gets pulled open 1,2,3 (unless 3 is held open for an exposure), so I think a mechanical mod might be a little tricky.

When I was setting focus, I had to have the shutter open for long periods. To do this, I put black tape over the sensor on the front of the camera.
That does work to some extent if you want a long exposure, although it tends to eat the batteries (the solenoid needs to be powered to keep the shutter open).

I have not traced out the circuit, but I would guess it is an integrator.
The sensor is an LDR, which is high resistance when dark and low resistance when lighted.
I would guess you could mod the circuit - e.g. put a switch in series with the LDR. Opening the switch would keep the integrator off. The solenoid holding leaf 3 would then be active until you the switch is closed again and when sufficient light reaches the sensor to trip it closed.
(Of course, if you're in low light, you might want to add a low value resistor to speed up the integration (same effect as shoving the sensor in front of a lamp/torch).

How about a 3-way switch for Open (T) - Normal - Closed? Switched to Open, you could just hold the shutter down for B.

I would possibly experiment and try and lower the spring tension so that I can reduce the power required by that solenoid on long exposures, so the batteries don't get eaten up. But that's another can of worms :wink:
 
Last edited by a moderator:

jojonas

Member
Joined
Feb 4, 2014
Messages
21
Location
sweden
Format
Multi Format
def a few ways to go about this. a mechanical way to hold it open might be best to save the batteries. a bit crude, but some floss/fishing wire connected to the right piece and sticking out of the body could work. would have to figure out where though.
 

StoneNYC

Member
Joined
Aug 5, 2012
Messages
8,345
Location
Antarctica
Format
8x10 Format
Just got hold of an EE100 today. Of course, I had to pull it apart and modify it straight away!
Here's what I did:

Disassembly:
With camera closed:
Open back cover and remove batteries. Unscrew battery contacts. This should release the bellows from the front panel.

With camera open:
Unclip plastic front cover (one clip, either side).
Remove 2 screws on bottom of front shutter/lens housing.
Swivel mechanism so that you can remove the 4 screws from the back panel. The shutter/lens assembly (front case and back panel attached) can now be removed.
The back panel will come off. Be careful that the shutter spring cover does not come loose. Mine did not spring off unexpectedly, but you will need to remove this if you do the cable release mod.

Cable release mod:
I have a flash bracket with a cable release fitted but the centre pin on the release cable was not long enough to trip the shutter. It was moving it about 75% of the way.
To fix this, I glued in a small piece of plastic (approx 6mm dia x 6mm long), tapered to fit the existing shutter release (inside the camera).

PC socket mod:
My little Sunpak flash gives a good output, is not huge in size and also has a pc cable.
I recycled a pc socket from an old camera part I had for this one. Drilling a small hole (about 8mm from the left side) into the top of the case, right next to the flashcube socket (there is only a small spot to fit it in here).
Then I Connected the PC socket to the contacts inside - this is easy to figure out:
If you trip the mechanism while the front cover is off, you'll see the flash contacts closing as the shutter opens. You may need to take some 1200 grit sandpaper and clean up the contacts as they can be quite corroded.
I soldered onto one of the flashcube socket contacts and onto the (brass) terminal that the large battery contact screws into.

Sorry that I did not take pics as I was doing this, but it is a fairly straightforward operation, as long as you use some nice thin wire and route it so that it does not interfere with the other internals.

Faulty focus?
One other problem that people have also complained about when they get these cameras is that the focus is off. I'm glad I checked mine out completely as I noticed the front lens had become detached from the ring. You can pull off the range ring, then the front ring that holds the front lens element. I glued mine back in with a few (very small!) drops of epoxy. I wouldn't recommend cyano (super-glue), as it tends to react with plastic (this is a plastic lens).

OK, all this was completed about 2 hours ago and I have not yet calibrated my focus or taken any shots at all (at 1AM). I expect it to work fine with the flash (which fires when I trip the shutter). The shutter appears to be working fine with a couple of new batteries.
(If you are getting black pics, it's likely the shutter is not opening&closing. The circuit inside takes care of the exposure and needs power to function).

OK I hope that helps anybody. I couldn't find much info about using electronic flash. The flash should be firing as the shutter opens and I expect that the internal circuit should compensate for the light level (if you place your finger over the sensor in the center of the dark/light knob you can see the long shutter time easily).

Looking forward to some pics tomorrow! Also I'll try my hand at recovering the negs too. I expect the '75' setting will be just enough over-exposure to give good results).

View attachment 79397

View attachment 79398

Want to make a 110 flash connector for hot sync? :smile:
 
Photrio.com contains affiliate links to products. We may receive a commission for purchases made through these links.
To read our full affiliate disclosure statement please click Here.

PHOTRIO PARTNERS EQUALLY FUNDING OUR COMMUNITY:


Ilford ADOX Freestyle Photographic Stearman Press Weldon Color Lab Blue Moon Camera & Machine
Top Bottom