minolta color MOD III enlarger

Couples

A
Couples

  • 0
  • 0
  • 8
Exhibition Card

A
Exhibition Card

  • 2
  • 0
  • 50
Flying Lady

A
Flying Lady

  • 5
  • 1
  • 79
Wren

D
Wren

  • 1
  • 0
  • 47

Recent Classifieds

Forum statistics

Threads
199,038
Messages
2,785,117
Members
99,787
Latest member
jesudel
Recent bookmarks
0

ann

Subscriber
Joined
Sep 10, 2002
Messages
3,336
Format
35mm
several years ago someone gave the school the above enlarger. However, they delievered it with the head removed from the strut and no insturction manual.

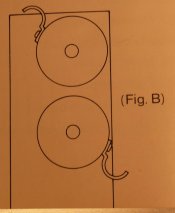
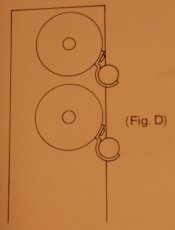
I have a student who would like to take it off our hands and when i went to put it together there is a large label that says "be sure to review the direction on page 3 before installing the head".

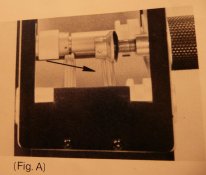
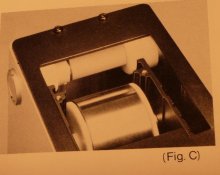
Anyone have a manual or experience with this model. I am having a problem getting the head onto the strut and in position to enage with the balance gear .

It is a shame to have this go into the trash as it is in lovely condition with a full set of negative carriers and two light boxes.

thanks.

ann
 

glbeas

Member
Joined
Sep 25, 2002
Messages
3,933
Location
Marietta, Ga. USA
Format
Multi Format
I used to have one years ago but never was foolish enough to remove the lower part of the head from the column. The upper part with the diffuser and lamp assembly is all that is normally removed for format changes. I could probably get it back together with a little quality time with it.
 

Tim Gray

Member
Joined
Sep 2, 2006
Messages
1,882
Location
OH
Format
35mm
I have the manual. I'm locked out of my storage unit at the moment, so it will be some time before I can get it and scan it.

If you are going to chuck it, I'll take the light boxes and the carriers.
 
OP
OP

ann

Subscriber
Joined
Sep 10, 2002
Messages
3,336
Format
35mm
i don't want to throw it away, i was hoping someone could give me a tip on how to place the enlarger back on the column.

at one time i thought there was a website that had a huge number of camera/darkroom manuals available but so far i haven't found one using google
 

Tim Gray

Member
Joined
Sep 2, 2006
Messages
1,882
Location
OH
Format
35mm
I know, I was just saying if you get to that point. I'll try to get a new key for my unit and when I do, I'll dig out the manual and scan it.
 
OP
OP

ann

Subscriber
Joined
Sep 10, 2002
Messages
3,336
Format
35mm
if things change i will get in touch with you. several of the negative carriers look as if they have never even been used.
 

ic-racer

Member
Joined
Feb 25, 2007
Messages
16,553
Location
USA
Format
Multi Format
If no one else comes up with the manual, I have it also (but not with me as I write this). I have had mine apart many times since 1975 when I bought it, and as I recall the warning pertains to someting pretty obvious as you put it together.

BTW I kept my Mod III in good condition and now have it set up for my kids to use in the darkroom. It really is a fantastic designed enlarger. All the black foam turned to goop around 1995 and I replced it all with fresh foam rubber. I was just using the enlarger with the kids last week.
 

tropicpine

Member
Joined
Sep 24, 2009
Messages
13
Format
Medium Format
The folowing are the instructions for mounting the head om my Model III. ( I have edited the instructions for clarity.)

To install the enlarger head carriage on the column, first rotate the nonslip, textured hand grip of the raising/lowering control counterclockwise as far as it will go without forcing. Look inside the carriage shaft way to check that the friction lock and its washer are far enough to the left to clear the right front rail of the column. If necessary move the washer to left with your fingertips (Fig. A)
Remove the top plate from the enlarger column.
Next rotate the upper spring counterbalance tape on the enlarger column so that it’s hooked end is toward the front of the column. It will remain in that position. (Fig B.)
Lower the carriage gently over the column so that the front and rear rails on the right side of the column will fit within the upper and lower grooved rotating bearings at the front and rear of the right side of the carriage shaft way. (Fig. C)
Check to see that the hook at the lower spring counterbalance tape has engaged the lower bearing shaft at the rear of the carriage shaft way. Now rotate the upper spring counterbalance tape to the rear so that it’s hooked end hangs down at the rear of the column at the rear of the shaft way, and continue lowering the carriage over the column. (Fig D.)
Press the carriage down gently along the column, and the upper spring counterbalance tape’s hook will engage the upper bearing shaft at the rear of the carriage shaft way. Lower the carriage on the upright by pressing down against the resistance of the counterbalance springs and lock the head in position by rotating the textured handgrip of the raising/lowering control clockwise.
Place the cap plate on the top of the upright and tighten the retaining screws finger tight.


I would post the figures but I'm waiting for the film to dry before scanning. Expect images soon.
 

Tim Gray

Member
Joined
Sep 2, 2006
Messages
1,882
Location
OH
Format
35mm
Ok, I got a key to my unit again and I will go down tomorrow and dig up the manual. I will scan it Monday and post a link then. I promise. For reals. :D
 

tropicpine

Member
Joined
Sep 24, 2009
Messages
13
Format
Medium Format
Here are the figures.

NJOI
 

Attachments

  • Figure A.jpg
    Figure A.jpg
    128.3 KB · Views: 168
  • Figure B.jpg
    Figure B.jpg
    36.6 KB · Views: 127
  • Figure C.jpg
    Figure C.jpg
    98.7 KB · Views: 132
  • Figure D.jpg
    Figure D.jpg
    27.5 KB · Views: 111
OP
OP

ann

Subscriber
Joined
Sep 10, 2002
Messages
3,336
Format
35mm
oh dear, i forgot to come back and let folks know i got it figured out a few days after i asked for help.

thanks to those who went out of their way to assist me, am sorry i wasted your time.
 
OP
OP

ann

Subscriber
Joined
Sep 10, 2002
Messages
3,336
Format
35mm
thanks tim, i will print it out and give it to the student who bought the enlarger.

It wasn't too hard, just a few minutes to sit still and think about the logic made a big difference :smile:
 
Photrio.com contains affiliate links to products. We may receive a commission for purchases made through these links.
To read our full affiliate disclosure statement please click Here.

PHOTRIO PARTNERS EQUALLY FUNDING OUR COMMUNITY:


Ilford ADOX Freestyle Photographic Stearman Press Weldon Color Lab Blue Moon Camera & Machine
Top Bottom