Minolta Autocord Winding Issue

Jekyll driftwood

H
Jekyll driftwood

  • 0
  • 0
  • 11
It's also a verb.

D
It's also a verb.

  • 2
  • 0
  • 23
The Kildare Track

A
The Kildare Track

  • 11
  • 4
  • 108
Stranger Things.

A
Stranger Things.

  • 1
  • 2
  • 74

Recent Classifieds

Forum statistics

Threads
198,914
Messages
2,783,017
Members
99,745
Latest member
Javier Tello
Recent bookmarks
0

aconbere

Subscriber
Joined
Aug 2, 2023
Messages
283
Location
Seattle, WA
Format
4x5 Format
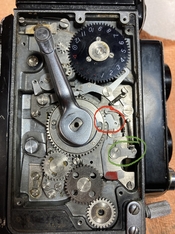
I'm working on a Minolta Autocord with an issue where after firing the shutter the crank is only able to advance to the normal "stopping" position. (maybe 2 or 3 o-clock).

I believe this is how the system roughly works.

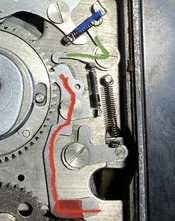
With film in the camera, when the crank is turned clockwise, there is a cam that runs under the large central gear. This cam bumps against the arm with the ratchet out to the film counter, when that happens the hook in green unlatches and the arm attached to it swings inwards and acts as a brake on the crank arm. Simultaneously the shutter is charged, and the lever with the spring marked in red is extended.

When you release the shutter, this lever with the red spring, pushes on the arm acting as a brake on the crank, pushing it back into it's little latch.

At least in theory!

In my camera, it seems like the red spring is not strong enough to put the brake back in it's perch. I tried cleaning and oiling all the moving surfaces, but with no luck. I'm left thinking the spring is worn out. Adding a TINY amount of tension to the spring restores correct operation.

Anyone have any advice on either repairing or replacing that spring?

IMG_3078.jpeg
 

250swb

Member
Joined
Apr 22, 2012
Messages
1,534
Location
Peak District
Format
Multi Format
The arm/fulcrum that the red spring is mounted on has been tampered with by the look of the screw driver marks in the screw head, and what looks like a distorted washer (maybe a spring washer) underneath the screw. Has this screw been overtightened in the past? Just an idea.
 
Last edited:

Dan Daniel

Subscriber
Joined
Jul 4, 2009
Messages
2,885
Location
upstate New York
Format
Medium Format
You might have the series of actions backwards? Below the counter dial is a disk with notches. The 'top' arm- the one pushed in and out by the cam underneath the plate as you described- has an end underneath the counter plate between 4 and 5 in your photo. Right now you are between frame,s yes? The upper arm is sitting between notches. As you wind forward, the arm will drop into a notch. When it does this, it will push the upper arm of the 'L' shaped lever that sits below the upper arm itself, and release the large central arm so this its hooked end- circled in green- can move left and stop the rotation of the central wind gear. Well, the upper arm dropping into the notch also stops the wind gear as a tooth underneath the wind gear drops into the gears to jam it. As you wind backwards, the cam under the wind gear will raise the large upper lever, pulling the arm away from the counter notch while the right side lever stops the winder from moving.

The lowest lever- bottom end of the red circled spring- is at the shutter release position at the moment. It is pushed to this position from underneath by a disk with slotted arm underneath the shutter block. It pushed the large center lever so that the upper end moves away from the central wind gear to the left. The small L lever then drops down to hook it, and stays hooked until the top lever drops into the counter dial notch and pulls it away from the main central lever which drops into the wind gear... Well, this could all be wrong, writing out this stuff is weird.

Do you have film or backing paper in the camera? You need this, or to manual turn the counter disk drive gear, for the film transport to work properly. The green circled parts should be tight to each other.

And the lower arm, lower end of right spring, should be back towards the bottom, not sitting up high like it is. This could be the real problem, that the parts around the shutter block are gummed up and not moving as they should. See if the slotted tab underneath this (ring with tab under shutter tied to shutter release motion) will move down and is sticking upwards.

250swb has the best suggestion. You might start by loosening all four screws for these four levers and see if they can all move freely. If so, then remove each lever and check for bends, burrs, etc. Polish smooth.

You can often rebend springs. Create a new loop a wind or two shorter than now. Tricky operation and sometimes the metal will simply crack off.
 
Last edited:

guangong

Member
Joined
Sep 10, 2009
Messages
3,589
Format
Medium Format
You might have the series of actions backwards? Below the counter dial is a disk with notches. The 'top' arm- the one pushed in and out by the cam underneath the plate as you described- has an end underneath the counter plate between 4 and 5 in your photo. Right now you are between frame,s yes? The upper arm is sitting between notches. As you wind forward, the arm will drop into a notch. When it does this, it will push the upper arm of the 'L' shaped lever that sits below the upper arm itself, and release the large central arm so this its hooked end- circled in green- can move left and stop the rotation of the central wind gear. Well, the upper arm dropping into the notch also stops the wind gear as a tooth underneath the wind gear drops into the gears to jam it. As you wind backwards, the cam under the wind gear will raise the large upper lever, pulling the arm away from the counter notch while the right side lever stops the winder from moving.

The lowest lever- bottom end of the red circled spring- is at the shutter release position at the moment. It is pushed to this position from underneath by a disk with slotted arm underneath the shutter block. It pushed the large center lever so that the upper end moves away from the central wind gear to the left. The small L lever then drops down to hook it, and stays hooked until the top lever drops into the counter dial notch and pulls it away from the main central lever which drops into the wind gear... Well, this could all be wrong, writing out this stuff is weird.

Do you have film or backing paper in the camera? You need this, or to manual turn the counter disk drive gear, for the film transport to work properly. The green circled parts should be tight to each other.

And the lower arm, lower end of right spring, should be back towards the bottom, not sitting up high like it is. This could be the real problem, that the parts around the shutter block are gummed up and not moving as they should. See if the slotted tab underneath this (ring with tab under shutter tied to shutter release motion) will move down and is sticking upwards.

250swb has the best suggestion. You might start by loosening all four screws for these four levers and see if they can all move freely. If so, then remove each lever and check for bends, burrs, etc. Polish smooth.

You can often rebend springs. Create a new loop a wind or two shorter than now. Tricky operation and sometimes the metal will simply crack off.

I refrain from camera repairs myself, but I find your descriptions and explanations interesting reading.
 
OP
OP
aconbere

aconbere

Subscriber
Joined
Aug 2, 2023
Messages
283
Location
Seattle, WA
Format
4x5 Format
You might have the series of actions backwards?

I think we're describing the same process (you're just doing a much better job).

Below the counter dial is a disk with notches. The 'top' arm- the one pushed in and out by the cam underneath the plate as you described- has an end underneath the counter plate between 4 and 5 in your photo. Right now you are between frame,s yes?

Yeah, so this is the state of the levers, immediately after firing the shutter (if everything works).

The upper arm is sitting between notches. As you wind forward, the arm will drop into a notch. When it does this, it will push the upper arm of the 'L' shaped lever that sits below the upper arm itself, and release the large central arm so this its hooked end- circled in green- can move left and stop the rotation of the central wind gear. Well, the upper arm dropping into the notch also stops the wind gear as a tooth underneath the wind gear drops into the gears to jam it. As you wind backwards, the cam under the wind gear will raise the large upper lever, pulling the arm away from the counter notch while the right side lever stops the winder from moving.

The lowest lever- bottom end of the red circled spring- is at the shutter release position at the moment. It is pushed to this position from underneath by a disk with slotted arm underneath the shutter block. It pushed the large center lever so that the upper end moves away from the central wind gear to the left. The small L lever then drops down to hook it, and stays hooked until the top lever drops into the counter dial notch and pulls it away from the main central lever which drops into the wind gear... Well, this could all be wrong, writing out this stuff is weird.

It is hard! I tried to short hand it and it didn't work. And to get the whole mechanism described seems like it would need a lot more pictures than I can draw and label.

The spring is in the "released" position (just making sure we're all talking about the same thing). It's in this position immediately after the shutter has been fired. It's connected to the "reset lever ring" on the front of the camera under the shutter. When the whole mechanism is charger this spring is tensioned and the lever is rotated clockwise in a state ready to push that crank brake arm back up into it's home.

Do you have film or backing paper in the camera? You need this, or to manual turn the counter disk drive gear, for the film transport to work properly. The green circled parts should be tight to each other.

I have a faux spool in (just some paper taped into strips). Agreed that without the paper that upper cam is never actuated and so none of this matters.

And the lower arm, lower end of right spring, should be back towards the bottom, not sitting up high like it is. This could be the real problem, that the parts around the shutter block are gummed up and not moving as they should. See if the slotted tab underneath this (ring with tab under shutter tied to shutter release motion) will move down and is sticking upwards.

Ah I think you're describing the state /before/ firing the shutter. I've attached a picture in the shutter charged position to better illustrate. I have previously fully disassembled and cleaned and lubricated the mechanisms in the front of the camera, including cleaning and lightly greasing the rings. To the best of my ability to test they move smoothly and cleanly.

250swb has the best suggestion. You might start by loosening all four screws for these four levers and see if they can all move freely. If so, then remove each lever and check for bends, burrs, etc. Polish smooth.

There is some roughed up wear around the arm attached to the reset lever ring. I'll try loosening things up and removing any burrs and see if that helps.

You can often rebend springs. Create a new loop a wind or two shorter than now. Tricky operation and sometimes the metal will simply crack off.

Yeah... sounds about right.

Thank you for the comprehensive response. Super helpful to get the some other ideas.
 

Attachments

  • IMG_3080.jpeg
    IMG_3080.jpeg
    1.1 MB · Views: 86
OP
OP
aconbere

aconbere

Subscriber
Joined
Aug 2, 2023
Messages
283
Location
Seattle, WA
Format
4x5 Format
The arm/fulcrum that the red spring is mounted on has been tampered with by the look of the screw driver marks in the screw head, and what looks like a distorted washer (maybe a spring washer) underneath the screw. Has this screw been overtightened in the past? Just an idea.

I’m pretty sure that at least the last person who worked on this put the washers in the wrong spot. I imagine they should be installed under the part to prevent the part from rubbing against the plate. But they’re both installed on top of the part agains the screw 🤔

Installing them against the plate has the whole thing moving better but still not consistently.
 

Kino

Subscriber
Joined
Jan 20, 2006
Messages
7,763
Location
Orange, Virginia
Format
Multi Format
You could try polishing the washer and mating surfaces of the levers with Brasso or Flitz metal polish and then putting some low to medium strength Loctite on the screws and not tighten them fully.

I assume the screws do not have a shoulder to limit their ability to be tightened, so the Loctite can secure them with a more loose binding on the levers.
 

Dan Daniel

Subscriber
Joined
Jul 4, 2009
Messages
2,885
Location
upstate New York
Format
Medium Format
Washers? Stock Autocord does not have washers in this spots. I didn't catch that these your camera has them. Try removing them. None on bottom, none on top.

The screws do have shoulders.

So after the camera is wound to the next frame, pressing the shutter release will both fire the shutter (duh...) and push the long lever with red flag's upper tip away from the central gear until it goes past the smalkl upper right lever that should drop down and capture the tip of the long lever.
 
OP
OP
aconbere

aconbere

Subscriber
Joined
Aug 2, 2023
Messages
283
Location
Seattle, WA
Format
4x5 Format
@Dan Daniel HA so funny enough, I just came back to report that I've removed the washers and it is mostly working! (9 out of 10 actuations succeed). I got to thinking about the screws and how they had shoulders and how the washers would just reduce the space there, and tried removing them. It's still not perfect, seems to get caught eeeeevery once in a while. But it is MUCH better.

I posted a couple videos:

1: Incorrect reset:
2: Correct reset:
 
OP
OP
aconbere

aconbere

Subscriber
Joined
Aug 2, 2023
Messages
283
Location
Seattle, WA
Format
4x5 Format
Little bit more progress (note: old photo pretend the washer is removed).

- On the red arm, the top edge that touches the latching lever was rough. I polished it with 1000 grit wet sandpaper.
- The green lever, the top arm was slightly raised, I bent it back flat
- The blue spring is... funky, the right hand side is kind of bent out of shape, and as a consequence, with the slightly raised arm of the green lever would rub on the arm. Tweaked it so that it no longer rubs.

With this in place we're getting closer to 1:20 times there's an issue.
 

Attachments

  • IMG_3080(2).jpeg
    IMG_3080(2).jpeg
    258.2 KB · Views: 70

Dan Daniel

Subscriber
Joined
Jul 4, 2009
Messages
2,885
Location
upstate New York
Format
Medium Format
If you loosen the screw in the upper right corner that has a tab for one end of the blue spring, you can rotate the tab clockwise and get the spring to not sit on top of the small green lever.
 
OP
OP
aconbere

aconbere

Subscriber
Joined
Aug 2, 2023
Messages
283
Location
Seattle, WA
Format
4x5 Format
Done, but if you mess with it TOO much it ends up impacting that arms touching of the cam below the crank. Touchy haha.

Anyway, of course once I fixed that, the reset process is off again. UGH.
 

Dan Daniel

Subscriber
Joined
Jul 4, 2009
Messages
2,885
Location
upstate New York
Format
Medium Format
Alrighty then.... one step forward, two steps back, eh. Jjust to make certain, that upper spring has the loops offset to one side. SO the main body of the spring should be to the top as I remember. __|||||||__
 
OP
OP
aconbere

aconbere

Subscriber
Joined
Aug 2, 2023
Messages
283
Location
Seattle, WA
Format
4x5 Format
Okay, I think I've got it all figured out. I emailed Karl Bryan (well know autocord repair person) and asked him what was up and explained what had been done. He let me know that there never should have been grease on the rings in the front (although mine was loaded with it). Cleaning everything again removed just enough friction that it fixed the reset process.

With that out of the way there were issues with the frame counter and frame ratchet. That came back to that spring we were just talking about, it needed to be tensioned enough to let the brake slide into the grooves in the counter mechanism and pull the crank brake. With some mucking about that seems to be working now.

I also just developed the roll from the first test and it seems like my other repairs were successful, I'll need to get them on the light table to be sure but focus and exposure look great.

Anyway, I'll do one more roll to make sure the counter and spacing are all good, but I think we might be done here! Thanks for all the help ya'll!
 
Photrio.com contains affiliate links to products. We may receive a commission for purchases made through these links.
To read our full affiliate disclosure statement please click Here.

PHOTRIO PARTNERS EQUALLY FUNDING OUR COMMUNITY:


Ilford ADOX Freestyle Photographic Stearman Press Weldon Color Lab Blue Moon Camera & Machine
Top Bottom