Messed up on my new camera, well the lens at least

Jekyll driftwood

H
Jekyll driftwood

  • 0
  • 0
  • 11
It's also a verb.

D
It's also a verb.

  • 2
  • 0
  • 23
The Kildare Track

A
The Kildare Track

  • 11
  • 4
  • 108
Stranger Things.

A
Stranger Things.

  • 1
  • 2
  • 74

Recent Classifieds

Forum statistics

Threads
198,914
Messages
2,783,017
Members
99,745
Latest member
Javier Tello
Recent bookmarks
0

NFSmaster16

Subscriber
Joined
Sep 13, 2023
Messages
36
Location
USA
Format
Multi Format
Hello, im fairly new to the analog scene, I've done 35mm a few times, polaroid's, and im just now getting into 120 film. I did a few weeks of research on which camera to get, and managed to get a Mamiya C300s with 4 lens for a decent price. But on to the bad part, 3 of the lens came with case, and the one I was taking out was the 55mm lens, and my hand slipped (It was really stuck in the case) on the side and broke off the plastic lever for the aperture (see both attached). It moves and works fine, but I am wondering if there are any replacements out there. I dont mind taking stuff apart, and I wouldn't mind getting a broken lens, but its such a small part I dont want to buy a whole lens just for that. I still have the broken part, but the plastics posts are toast. If anyone knows someone that has extras or makes a replacement please let me know. Thank you in advance.
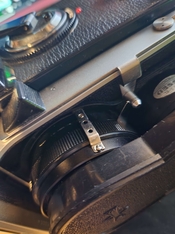
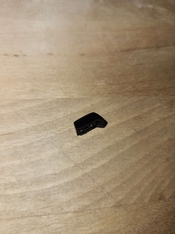
Aperature Lever.jpg Plastic Bit.jpg
 
Joined
Oct 21, 2016
Messages
1,274
Location
Calexico, CA
Format
Multi Format
Happened to My 180mm for my CC330. Sorry no diy solution here. My solution was to get a broken lens on Ebay. Easy to replace. Tried to made one using tin but need to be quite thin so gave out on that idea.

By the way you can still use as is. Just move the aperture ring and then move the aperture Tab to match. Not that hard to do IMHO.
 
OP
OP
NFSmaster16

NFSmaster16

Subscriber
Joined
Sep 13, 2023
Messages
36
Location
USA
Format
Multi Format
Happened to My 180mm for my CC330. Sorry no diy solution here. My solution was to get a broken lens on Ebay. Easy to replace. Tried to made one using tin but need to be quite thin so gave out on that idea.

By the way you can still use as is. Just move the aperture ring and then move the aperture Tab to match. Not that hard to do IMHO.

Yep, I agree. Just have to do with what I got for now, and see about getting a broken lens in the future. Just gotta be careful next time. Thanks
 

choiliefan

Member
Joined
Dec 27, 2013
Messages
1,311
Format
Medium Format
Might be a candidate for the old baking soda/super glue trick.
Fast forward to the 3:40 mark:
 

ic-racer

Member
Joined
Feb 25, 2007
Messages
16,549
Location
USA
Format
Multi Format
See this also:
 
OP
OP
NFSmaster16

NFSmaster16

Subscriber
Joined
Sep 13, 2023
Messages
36
Location
USA
Format
Multi Format
Might be a candidate for the old baking soda/super glue trick.
Fast forward to the 3:40 mark:


I have seen this before and to my avail, the posts are gone, knowing my house either stuck in a crack or swept up and trashed.
 
OP
OP
NFSmaster16

NFSmaster16

Subscriber
Joined
Sep 13, 2023
Messages
36
Location
USA
Format
Multi Format
See this also:

This is interesting might have to try it. Might get with my dad he is good with this type of stuff. Thanks
 

bernard_L

Member
Joined
Feb 17, 2008
Messages
2,039
Format
Multi Format
I dont mind taking stuff apart, and I wouldn't mind getting a broken lens, but its such a small part I dont want to buy a whole lens just for that.
Definitely not. Why not glue the tab onto the metal part? Not with superglue and baking soda; the author of the youtube video says at one point "light duty". But with industrial grade two-component epoxy. I used Loctite 3450 with success to repair a broken part inside the shutter of an Olympus-S; approx 1.5x1.5mm contact area. That is a structural adhesive designed for bonding metals. In your case, having plastic involved, Loctite 9466 might be more appropriate (higher shear strength on plastics).
  • make sure you roughen the mating surfaces with medium grade abrasive paper
  • make sure you de-grease both parts with naphta
  • beware of excess glue reaching the serrated ring below
  • be patient and wait for the full curing time before you try your repair
 
Photrio.com contains affiliate links to products. We may receive a commission for purchases made through these links.
To read our full affiliate disclosure statement please click Here.

PHOTRIO PARTNERS EQUALLY FUNDING OUR COMMUNITY:


Ilford ADOX Freestyle Photographic Stearman Press Weldon Color Lab Blue Moon Camera & Machine
Top Bottom