Massive Backlighting Problem - What Would You Do?

The Kildare Track

A
The Kildare Track

  • 3
  • 1
  • 37
Stranger Things.

A
Stranger Things.

  • 0
  • 0
  • 26
Centre Lawn

A
Centre Lawn

  • 2
  • 2
  • 40

Recent Classifieds

Forum statistics

Threads
198,906
Messages
2,782,890
Members
99,744
Latest member
NMSS_2
Recent bookmarks
0

JeffD

Member
Joined
Aug 29, 2004
Messages
292
Location
Atlanta, GA
Format
4x5 Format
Admittedly, I have only photographed a little in the beautiful desert landscapes. I came across this site with some great pics of backlit cactus in Joshua Tree.

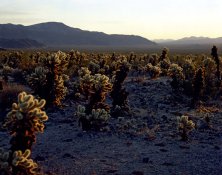
Take a look at the very first cactus picture at the top of this page:

http://www.joshuatreenationalpark.net/cholla.htm

Imagine you, as a zone system exposure practitioner, were metering this scene. You have a massive brightness scale, considering the darkest shadows, when compared to the sun coming over the far ridge- the author says maybe about 12 stops.

What would be your actual thought process metering this scene here? expose for the shadows? How will you pull in the highlights, that seem almost un retrievable through contracted developing? Would you reach for a graduated neutral density filter? What calculations are going through your mind? What must you do to make the shot a success in your mind?

For the sake of discussion, lets assume you are shooting black and white, and doing your own processing.

The reason I ask, is that I might be in a similar environment, in about a week. I'll have my 4x5, a 90mm, 150mm, 210mm and 300mm lenses. I'll have most filters common to black and white, and nd grads as well. I'll be shooting Ilford fp4+, probably processing in Rodinal 1:50, which I think I have pretty good control over.

I have an idea of how I might approach something like this, but would like to maximize my success. Of course, I'll need your help to pull it off!

Any comments appreciated!
 

Pinholemaster

Member
Joined
Oct 17, 2005
Messages
1,566
Location
Westminster,
Format
8x10 Format
You'd do well to have a good spot meter.

Finding the area in the scene that must have white w/ detail is probably the most important value to determine.

Easy to find the shadow detail we want to hold, but where do we draw the line between white w/ detail and blown-out is what I'd think about.

I can't tell you how to develop your film. It's up to you to know what works for you. Shooting directly into the sun, such as your example, makes me question using any filters. I'd want to eliminate as many air to glass surfaces that could cause flare. Lens choice is determine with how the scene should be rendered. Only you'll know what's correct when on location. Any of your lenses could be right or wrong depending on how you use them.

When faced with extreme exposure ranges, it is important to know exactly what is OK to lose, and what's important to retain.

Testing before going into the field with a couple of sunrise shots at home may help you. You'd learn what's needed in developing the film (normal, minus 1, minus 2) to retain the essentials in the film, while allowing the scene to look natural.
 
OP
OP
JeffD

JeffD

Member
Joined
Aug 29, 2004
Messages
292
Location
Atlanta, GA
Format
4x5 Format
good advice, pinhole master. I do have a Pentax spotmeter, and usually expose for shadows and develop for highlights, but am not use to a brightness scale quite this massive!

My knee jerk reaction would just be to automatically reduce development to give a -2 negative. Of course, I realize this can have a globally debilitating effect on the rest of the contrast in the scene. I would think that maintaining the glow on the edges of the cactus would be very important in this scene, I guess, and let the rest of the brightness of the sunrise go into white (maybe hoping to burn a little back in later in the print, if it would "work").

I definately hope to get some "glowing cactus" images of my own, but am hoping not to destroy the effect by a gross mistake in exposure or in what development is needed.
 

waynecrider

Subscriber
Joined
Feb 8, 2003
Messages
2,576
Location
Georgia
Format
35mm
If you need top pull detail out I have seen landscape photographers (I'll not mention their name) use flash. Of course it depends on the situation and lens choice, but done right it looks pretty good. At least the foreground isn't dark. Of course your cactus shot may not be the best subject, but what the hell, experiment.
 

Kino

Subscriber
Joined
Jan 20, 2006
Messages
7,763
Location
Orange, Virginia
Format
Multi Format
You could experiment with pre-flashing the film; that has a tendency to pull detail out of the shadows, but can kill your contrast if not handled with care.

Use a percentage of total exposure, (1/16th, 1/8th, 1/4); you can do this before or after the actual exposure.

Before, determine your exposure and shoot a sky or rock or whatever that is near by and uniform and without detail (massive defocusing helps here), at a percentage of total exposure THEN expose normally.

OR

Taking your carefully made notes on exposure, re-expose each sheet of film by shooting a white card in your darkroom using a percentage of the total exposure (you can convert an exposure to footcandles,divide by the percentage and then re expose based on that).

Of course, keep the exposure very low (no more than a 1/64th to 1/8 of the total exposure) until you determine what works best.

Of course, it may no twork for you either.

The other alternative is to do a "lightflex" type exposure, where you flash as you shoot, but that is a lot of work building a beam splitter and designing the perfectly uniform, variable light source that can be attached to your lens...
nevermind...
 

noseoil

Member
Joined
Oct 6, 2003
Messages
2,887
Location
Tucson
Format
Multi Format
Jeff, first I would use your "normal" exposure for the shadow values. Regardless of the SBR in your scene, you will still need to hold shadow detail to keep a strong image. Next are the high values. Since you are using FP4 which deals well with the large contrast range, I would just give it a try. Efke 100 would also be a similar good choice, as it deals with extreme contrast well. (I used Efke 100 in the following shot)

The next thing I will suggest might be a bit more difficult for you, but please give it a bit of consideration. Rodinal is a great developer, but in this situation I would switch to Pyrocat-hd. The advantage here is in the highest values. It will hold detail for you when the rodinal starts to lose out, due to the burnt edges of the cholla. The final ingredient here will be the type of development used.

Had this exact situation to deal with a year or two ago. I was shooting into the sun in a water canyon where the sun had just crested a ridge line. Use a lens shade to keep the sun off of the lens as much as possible (if even possible) and reduce the flare as best you can during the exposure. Meter the shadows and the high values (shadows will likely be about ev 10 or 11, high values at 18). Expose several sheets and record the informaion about the light you have (oh by the way, use box speed, keep reading!). I did a "normal" development at first, based on my typical numbers and came up with a very thin sheet of film. It had the high values well enough, but the bottom was just too thin at the extremely reduced development I had used.

Started thinking about stand development and decided, what the heck, I have nothing to lose at this point. I knew I had enough exposure but was concerned with the high values running off the charts, so I did a 1:1:150 development with pyrocat for about 45 minutes (I think that was where I ended up). Did a full minute of agitation at 70f (4x5 ABS plastic film tube), set it aside for 20 minutes, did another 10 seconds and pulled the sheet at 45 minutes. I was stunned with the results.

Had a fully developed sheet of film with shadows fully developed and high values which would print nicely. The developer will run out of steam on the high values fairly rapidly due to exposure, while the bottom end continues to creep along slowly. It may take a couple of tries to get the right development balance, but shoot several sheets to get your times down properly. This is a must-use for these shots, as far as I'm concerned. I just don't know of any other way you can get a fully developed sheet of film without jumping through too many hoops during exposure. The compensating effect from this type of slow development, edge effects, sharpness, shadow contrast and tonality must be seen to be appreciated. Initial agitation must be uniform or development artifacts will be the result.

So, to answer your question, yes! Just expose for the shadows and develop for the highlights. Best, tim curry, tucson, az.
 

Ole

Moderator
Moderator
Joined
Sep 9, 2002
Messages
9,245
Location
Bergen, Norway
Format
Large Format
I would do what I've done (successfully) in similar situations, and with even contrastier scenes:

Expose for the shadow detail you want, and develop for the contrast gradient you want. In most cases I develop to what others would think of as N+1.

The adjust the printing process to match the negative. Lith printing can be a good way to keep detail in what seems to be burned-out highlights without making the shadows go utterly black.

I have tried contraction (N-) developing, but find that it gives dull and flat negatives which will only require printing on a higher grade to look even remotely interesting. So I would far rather struggle with putting a contrastu scene onto a G2 paper!

In other words I have more or less abandoned the zone system - not because it doesn't work, but because I find I get better results without it.

Oh one more thing: Use a "traditional film" (FP4+ or similar) if you want to try my way. I've tried T-max and Delta too, but they just don't work with that kind of "abuse".
 

Jim Noel

Member
Joined
Mar 6, 2005
Messages
2,261
Format
Large Format
Keep the styrofoam cup your coffee is served in.

Focus the camera on the scene and meter to determine exposure.

Place the cup over your meter aimed in the same direction as your lens.

Take a reading for Zone I, II or III. In this extreme case III may be correct.
Set this reading on your camera.
Place the cup over the lens and make the exposure.

Remove the cup and make your exposure as previously determined for the total image.

This will pre-expose your shadows to Zone III, and do little to your highlights.

In actual practice I rarely pre-expose higher than Zone II.

Do an N-1 development and you should have a very useful negative with detail in the shadows up to highlights with detail.

Since you have never done this I suggest two negatives, one pre-exposed on Zone II and one on ZOne III.
 
OP
OP
JeffD

JeffD

Member
Joined
Aug 29, 2004
Messages
292
Location
Atlanta, GA
Format
4x5 Format
Man, what great useful tips! I will definately try variations of all of these. I have never done the pre-exposure to increase shadow density, but think that could be at least a little helpful. I have only done a small amount of experimenting with pyro, but it sounds like if I am stand developing in it, for a long period, I might be able to be a little off on my times, and still get decent results. It I can get what seems to be a very pleasing composition, and tricky light, as in the example picture, I'll take quite a few exposures, and try most these ideas. Thanks again for the recommendations.
 
Joined
Dec 30, 2005
Messages
7,175
Location
Milton, DE USA
Format
Analog
I go with Kino on this one. Pre expose your film so that you raise the luminance of the shadows while affecting the highlights very little. To pre expose the film, aim your lens at a non textured evenly lit surface. Meter it and set exposure to a zone ii setting. This will already brighten your film from base plus fog to zone ii. Then expose for the highlights. This will bring your zone 0 up to about 2. Zone ii up to about 3.5. Zone iv to about 5. But the higher zones might only increase about a 20th of a stop. Thus condensing your tonal range, flattening it out. But practice this before relying on it. It works, but you gotta know how it works, see how it works before it should be relied upon.
 

Dan Dozer

Subscriber
Joined
Dec 10, 2004
Messages
411
Format
Large Format
Jeff,

Is this what you're looking for. I live in the Palm Springs area and get out to Joshua Tree quite often. While I haven't photographed the Cholla Cactus yet in B&W, I have done them in color. I just made sure to keep the sun out of the image. Believe me, you don't need the sun directly in the shot to get a great image there. This image looks much better than on the scan. With B&W, you'll obviously have more control over the contrast than with color. I have tried the Ocatillo cactus with the sun directly behind it in B&W, and it is pretty extreme. However, I was doing it for Platinum/Palladium and a little extra contrast was what I was looking for.

You'll get plenty of contrast from the Cactus themselves without direct sun since the tops and edges are fairly light and the center stalks are pretty dark. For all of these types of images, you'll need to get there pretty early in the morning - preferably at sun up. The Cholla cactus garden is also about as far from either the west or south/east gates as you can get in the park so give yourself plenty of time to get there - probably up to an hour and a half from anywhere in the Palm Springs area. I guess you could also shoot at sun down, but I've never been there at that time so I'm not sure how it looks. I can attest that the panorama down the valley over the cactus at sun rise is pretty impressive.

If you're going to be there this coming weekend, maybe we can get together. I was thinking on getting out to Joshua Tree on Sunday.

By the way, you said that you're going to do B&W there, but I would recommend that if you have any Provia, take a couple of sheets along in a holder and also shoot it.

Good Luck,

Dan
 

Dan Dozer

Subscriber
Joined
Dec 10, 2004
Messages
411
Format
Large Format
Well - that didn't work. I was trying to post a color image I took at the cactus garden but it appears my computer at work isn't allowing me to attach a file. I'll have to see if I can do it from home tomorrow.

Dan
 

Dan Dozer

Subscriber
Joined
Dec 10, 2004
Messages
411
Format
Large Format
OK - I hope this works this time. This is the Cholla cactus garden in Joshua Tree national park at sunrise on Provia 4 x 5.

Dan
 

Attachments

  • joshua tree cholla garden 1.JPG
    joshua tree cholla garden 1.JPG
    197.6 KB · Views: 113

Ray Heath

Member
Joined
Dec 29, 2005
Messages
1,204
Location
Eastern, Aus
Format
Multi Format
g'day Dan
i don't see how the top image on that page is a good example of holding detail, there is no detail in the front of the plants, that has been sacrificed for the highlight detail

the other images on that page are the opposite, to get detail in the darker front areas they've lost detail in the near highlights

why believe this photographer when he writes that early morning is the best time?

why replicate what this person has already done?

find your own way to express the beauty and uniqueness of this place

Ray
 

dpurdy

Member
Joined
Jun 24, 2006
Messages
2,673
Location
Portland OR
Format
8x10 Format
I don't think you are ver going to get nice details everywhere type image shooting right into the sun. If you really want to do that then I would suggest a double exposure. Shoot the cactus before the sun comes up and then set the shutter much faster and expose the sun a little bit after it comes up.
 

jeroldharter

Member
Joined
Nov 6, 2005
Messages
1,955
Location
Wisconsin
Format
4x5 Format
An evenly lit gray card held closely to the lens so it is out of focus can also be used for pre-exposure on zone II or III. Sometimes you can tilt the card to get the effect of a graduated filter so that the sky part of the pre-exposure get less light and the shadows on the bottom get the II or III exposure.
 
OP
OP
JeffD

JeffD

Member
Joined
Aug 29, 2004
Messages
292
Location
Atlanta, GA
Format
4x5 Format
Well, amongst many other pictures in Joshua Tree, I did take a shot shooting into the sun with cactus in the foreground, in Cholla Cactus Garden. Below is the result. I forget how many stops from darkest area to the lightest. I tried to meter the edges of the cactus, to put them on something like Zone 8 or 9, and let everything else fall where it may. I then stand developed in Pyrocat-HD for 40 minutes @ 68 degrees, agitating the first 1.5 minutes, then for ten seconds midway through development. This scan doesn't show it well, but there is detail in the dark areas at the bottom of the cactus in the front. The cactus are actually a dark brown tone, near the bottom, in real life. I wanted to preserve a little black in the scanned image for drama. In the darkroom, I could probably dodge and burn a little, and bring out more detail if desired.

I have not used the Pyrocat-HD, but, at Tim's suggestion, I gave it a try. The theory is that the highlights would not get overly burned out, because the developer in the highlight areas would be exhausted before the highlights become too dense. I guess this happened. The sun looks kind of burnt out in this scan, but it is clearly and sharply identified on the negative- a little burning in on the print in the darkroom, or a change in scanner contrast options, would bring in it's circular shape.

Thanks for all the suggestions!


chola1.jpg
 
Photrio.com contains affiliate links to products. We may receive a commission for purchases made through these links.
To read our full affiliate disclosure statement please click Here.

PHOTRIO PARTNERS EQUALLY FUNDING OUR COMMUNITY:


Ilford ADOX Freestyle Photographic Stearman Press Weldon Color Lab Blue Moon Camera & Machine
Top Bottom