Mamiya six

Recent Classifieds

Forum statistics

Threads
199,029
Messages
2,784,918
Members
99,780
Latest member
Theb
Recent bookmarks
0

Daire Quinlan

Subscriber
Joined
Sep 8, 2008
Messages
282
Format
Multi Format
Hi All, thinking of picking up a Mamiya six to try out, been playing around recently with an Isola and a Nettar so I think I like the convenience and format, certainly easier to carry around than my Mamiya Super 23 or bronica :-D However what I don't like are the lenses, both so-so triplets, novar on the Nettar. They're ok stopped down a lot but I want a little more flexibility, particularly given the limited shutter speeds on both the above.

Also I'd like a built in rangefinder at least, ideally coupled, so I was looking at the various options in the Mamiya Six range.

So far as I can see there are a few different lens configurations on the sixes. There's the Zuiko lens which, I've read, is some tessar derivative. The most recent models all seem to have some Mamiya Sekor lenses which I assume is some reasonably complicated design. Most I've come across in the range I want to pick one up in though are Kominar lenses. This seems to have been more a brand than a designation, and I can't find any specific information as to the configuration. Anyone know? Is it a triplet ? Tessar clone ?

-edit- This is to do with the older Mamiya six FOLDERS, not the more modern 6/7 bodies -edit-
 
Last edited:

Paul Howell

Subscriber
Joined
Dec 23, 2004
Messages
9,711
Location
Scottsdale Az
Format
Multi Format
I have a Six with the Zuiko 75 3.5, 4 element and very sharp. Not sure of the Kominar lens, vague memories that is a 4 element tessar type. Overall I like the Six as a travel camera and usually carry it with my 4X5 gear. One word of caution, on the bottom there are two knobs that pull down the feed and uptake spool engagement mechanisms, they screw off and on, if you don't have a case they can come undone and fall off. I had one go missing in action, had to have a replacement made, cost me $60.00.
 
OP
OP

Daire Quinlan

Subscriber
Joined
Sep 8, 2008
Messages
282
Format
Multi Format
Actually, to add complications, there's one with a Kominar S, and one with a straight Kominar. From reading about a different camera altogether that also sported Kominar lenses, the 'S' is a tessar type, and the one without S is a triplet.
Maybe I'll just avoid any potential screwups and get one of the ones with the Olympus lens ...
 

Paul Howell

Subscriber
Joined
Dec 23, 2004
Messages
9,711
Location
Scottsdale Az
Format
Multi Format
I think that is a good bet, my 75 3.5 is as sharp or sharper than my Mamyia 100 3.5 for the Universal.
 

tokam

Subscriber
Joined
Nov 7, 2008
Messages
586
Location
Sydney, Aust
Format
Multi Format
Daire, Good luck with your Six. My recently acquired Six IV had sat unused for a very long time and all the optics were hazy and the body coverings were coming off. Good news is that all the optics I could reach have cleaned up nicely. The exit lens from the rangefinder is quite hazy on the inside. Viewfinder is usable but the rangefinder patch is very indistinct. Will have to dissolve shellac holding the lens in place and clean and replace the lens. Probably use a dab of nail varnish to secure lens. The rangefinder is barely usable at the moment but the lens focuses accurately using the distance scale above the focus wheel.

Body coverings will be fixed today, including the camera back cover which completely detached and dropped out the plastic piece for the red window along with the sliding metal cover.

My Six IV doesn't have any index marks on the film counter dial for use during film loading so I will have to sacrifice a film to see how the film is transported after takeup and before the film counter aligns to frame 1.

Hope to get a film through it in the next couple of days and then I'll make a decision on sorting out the rangefinder.

Cheers, Martin
 

Rick A

Subscriber
Joined
Mar 31, 2009
Messages
9,942
Location
Laurel Highlands
Format
8x10 Format
I used to have a Mamiya 6iv, with the coveted Zuiko D 75/3.5. It was stoles a couple of years ago, and dearly missed. I replaced it with a Zeiss Nettar, great camera, but just not the same. I really loved the mechanical genius that went into the Mamiya. Good luck with the purchase.
 

Punker

Member
Joined
Mar 4, 2015
Messages
153
Location
Los Angeles,
Format
Multi Format
I too have the Zuiko 75mm f/3.5 Mamiya Six. Wonderful camera. Certainly won't fit into a modern pocket (jacket or otherwise) but I sling it over my shoulder in its everready case. Still nice and compact.

Here are some images I've uploaded to Flickr that I took with it.
 

Rick A

Subscriber
Joined
Mar 31, 2009
Messages
9,942
Location
Laurel Highlands
Format
8x10 Format
I too have the Zuiko 75mm f/3.5 Mamiya Six. Wonderful camera. Certainly won't fit into a modern pocket (jacket or otherwise) but I sling it over my shoulder in its everready case. Still nice and compact.

Here are some images I've uploaded to Flickr that I took with it.
Mine fit in my jacket pocket, also the cargo pocket of my shorts.Folded of course.
 

Punker

Member
Joined
Mar 4, 2015
Messages
153
Location
Los Angeles,
Format
Multi Format
Mine fit in my jacket pocket, also the cargo pocket of my shorts.Folded of course.

Ah cargo pocket! Hadn't thought of that.

Truth be told, I was able to cram it into a pocket on one jacket I own; but it wasn't easy to get in or out.
 

M Carter

Member
Joined
Jan 23, 2013
Messages
2,147
Location
Dallas, TX
Format
Medium Format
My Isolettes fit in my back jeans pocket - but then, you need a good belt to avoid that "urban" look... they do add some weight...
 
OP
OP

Daire Quinlan

Subscriber
Joined
Sep 8, 2008
Messages
282
Format
Multi Format
Yeah my Nettar fits into a jacket pocket or a large trouser pocket. And ANYTHING is an improvement over the most totally un-ergonomic (at least to carry or bag) camera I own, the Mamiya Press, which is as unwieldy a collection of bits sticking out at every conceivable right angle imaginable.
 

Rick A

Subscriber
Joined
Mar 31, 2009
Messages
9,942
Location
Laurel Highlands
Format
8x10 Format
My Isolettes fit in my back jeans pocket - but then, you need a good belt to avoid that "urban" look... they do add some weight...
Oh yes, a belt is mandatory for one of these in your pocket.
 
OP
OP

Daire Quinlan

Subscriber
Joined
Sep 8, 2008
Messages
282
Format
Multi Format
So, finally got my Six IV and put a roll through it. Not a bad camera ergonomics wise. Quite a bit bigger and heavier than my Nettar, but it wouldn't be Mamiya if that wasn't the case :-D Rangefinder seems to be pretty much spot on, though I had to adjust the vertical tracking, and the lens is a big improvement over the triplets in the other folders I have.

Cons: bellows leaks like a sieve, and the wind indexing isn't working
First problem causes lightleaks like this ...


Second one is responsible for this:

Though in part, ahem, because I forgot to close the sliding cover over the red window. The Sixes seem to be particularly prone to this though, lots of space inside the back for the red light to bounce around given the focusing mechanism.

So first problem is being solved with a patch up job, drying now, and a fingers crossed that it'll still, y'know, FOLD, when it's all done. Also put seals in all the usual locations to be sure to be sure.

Second problem is a little more ... problematical. I can probably use the camera without the wind indexing just by using the red window, assuming I remember to close it :-D

However, has anyone ever gone into that mechanism ? I opened it up yesterday to see, and I can see the indexing mechanism clearly enough, little ratchet that engages with a disk with slots in it that's geared to rotate slowly, but it's screwing up because another part of that ratchet is catching on one of the gears itself so it'll never turn if it's engaged. Hard to explain, bu looking at it it's like someone went in to clean or fix something and put bits of it back in upside down or something. It doesn't make a pile of sense.

Doesn't help that I can't get any instructions anywhere as to how the initial load is meant to work :-D This is the earlier IV with just the knurled disk and numbers on a lower disk.

Anyhow, looks like a keeper once I resolve the initial issues.
 

tokam

Subscriber
Joined
Nov 7, 2008
Messages
586
Location
Sydney, Aust
Format
Multi Format
Hi Daire, my work-in-progress Mamiya Six IV sounds similar to yours in that there are no index marks on the film counter or inside the camera body with the back open,

My wind on and film counter appear to be working OK as each time you wind on to the next frame the wind on locks at the next frame. You then have to slide the lever below the wind on to release the wind on and wind to the next frame. This mechanism does not appear to be coupled to the shutter in any way. You can wind / slide the lever / wind through subsequent frames without having to cock and release the shutter. Frame 12 is a special case and all of the complicated gears and levers in the wind mechanism would control this.

I ran a sacrificial film twice through the camera before I figured it out. When you have shot frame 12 and you slide the lever to release the wind on, the wind on will rotate freely ad infinitum. This allows you to wind the film off onto the take up spool and load the next film. The frame counter will advance to frame 1 and stop even though the wind on can still be rotated. At this point do NOT slide the lever until you have shot frame 1 on the next film.

So the process for loading a new film is:
1. If you have been operating the camera without a film then advance the frame counter to frame 12 and then slide the lever to release the wind on.
If you have just unloaded a film, the wind on should be rotating freely and the frame counter may already be at frame 1.

Do not slide the lever below the wind on as this will set the wind mechanism to advance one frame only.

2. Remove the sliding pressure plate and feed you new film in and onto the take up spool. Wind the film until the arrow on the backing paper lines up with the lever under the wind on.

3. Insert the pressure plate.

4. Close the camera back and open the blind on the red window. Advance the film until you are on frame 1 through the red window. Close the blind over the red window.

At this point you are ready to shoot frame 1. The film counter dial and the red window are in sync. Now it's just a matter of shoot / slide the lever / wind on until wind mechanism stops at the next frame.

My test film was not as sharp as yours although I am not using the rangefinder. I did see a lot or swirly marks on a couple of the inner elements which didn't clean off. I was hoping that these marks would only cause issues with flare but I'm afraid that they may have taken the edge off of the lens sharpness. Won't really know until I clean the rangefinder and adjust it to the film plane.

I hope that you get your light leaks sorted out. I cannot see any seals around the camera back. Seems to rely on the door fitting closely into a channel in the body. I'm not sure that the red window is the cause of your leaks as the removable pressure plate covers the film pretty well. Have you tried looking through the back of the camera in a darkened room with a flashlight on the other side of the camera. This may reveal bellows leaks or gaps where the bellows meets the lens / shutter or the camera body.

All in all I'm very pleased with this camera. Just hope I can get it shooting a bit sharper. You are right. It is certainly quite a lump. My camera with leather case and a film loaded comes to 1.01 kg.


img020b2.jpg
img027b2.jpg
 
Last edited:
OP
OP

Daire Quinlan

Subscriber
Joined
Sep 8, 2008
Messages
282
Format
Multi Format
I ran a sacrificial film twice through the camera before I figured it out. When you have shot frame 12 and you slide the lever to release the wind on, the wind on will rotate freely ad infinitum. This allows you to wind the film off onto the take up spool and load the next film. The frame counter will advance to frame 1 and stop even though the wind on can still be rotated. At this point do NOT slide the lever until you have shot frame 1 on the next film.

Ah right, yeah that makes sense as to how it's supposed to work. Mine just doesn't :-D Basically I have to hold the lever to the left to wind on in any position. From a partial disassembly I can't work out how it's supposed to even work, as I was saying above there's a second part of that lever that just catches on one of the gears so I reckon someone disassembled it at some point and then screwed up the re-assembly.

On a brighter (or perhaps darker :smile: ) note though I patched the bellows and eliminated the light leaks. strips of blackout blind material glued in along the pinholes and tears seems to have done the job


Those red streaks though in the second picture in the OP are definitaly down to the red window. I'd wound on and then accidentally left it open in bright sunshine, so presumably enough light got in and reflected around the inside of the camera to result in those leaks. No sign of them on this roll because I would do the usual process of shielding the camera as much as possible, opening the window, winding on, then immediately closing the window again.
 

tokam

Subscriber
Joined
Nov 7, 2008
Messages
586
Location
Sydney, Aust
Format
Multi Format
Looks like it's shooting nice and sharp now. Hope I can get mine this good.

I'm off to pinch some acetone and nail polish from either my wife or niece who is staying with us.

When you said earlier that you adjusted the rangefinder vertical tracking, is that done via the external screw or did you have to remove the top cover and tackle the rangefinder itself? I have removed and cleaned that narrow rectangular lens that slides into the rangefinder. Just don't know where a vertical adjustment for the rangefinder patch would be.

Out of interest today I placed a bit of magic tape on the inside of the pressure plate so that I could get an idea of the focus accuracy. On an object at 13 feet the distance indicator above the focus wheel was about right and the image on the frosted tape looked pretty good, (must get a loupe or better magnifying glass to confirm). The rangefinder, however, was a different story. If I squinted hard through the viewfinder I could just about match up the rangefinder patch with my 13' object. The distance indicator read about 9 feet and the image on the tape didn't look too good. I think that someone has been here before. Probably many years ago as the film spool in he right hand chamber was an old metal Kodak one.
 
OP
OP

Daire Quinlan

Subscriber
Joined
Sep 8, 2008
Messages
282
Format
Multi Format
When you said earlier that you adjusted the rangefinder vertical tracking, is that done via the external screw or did you have to remove the top cover and tackle the rangefinder itself? I have removed and cleaned that narrow rectangular lens that slides into the rangefinder. Just don't know where a vertical adjustment for the rangefinder patch would be.

On mine at least you remove the hotshoe (two screws) and inside there's a round black metal barrel that contains the rangefinder mirror. There's a small hole in it that you can use to rotate the entire thing around it's long axis. I only had to move mine very fractionally for the RF patch to line up vertically. Distance wise the RF seems pretty spot on so I didn't touch that, but the adjustment for that is behind a large screw to the right of the top housing, there are 4 screws around the outside that hold it on, and one slightly larger one. Unscrewing that gives access to the RF adjustment. Adjust that too far and you might have to go in and fiddle with a stop on the distance wheel which can be moved if necessary. It basically stops the wheel at infinity and 3.5

Out of interest today I placed a bit of magic tape on the inside of the pressure plate so that I could get an idea of the focus accuracy. On an object at 13 feet the distance indicator above the focus wheel was about right and the image on the frosted tape looked pretty good, (must get a loupe or better magnifying glass to confirm). The rangefinder, however, was a different story. If I squinted hard through the viewfinder I could just about match up the rangefinder patch with my 13' object. The distance indicator read about 9 feet and the image on the tape didn't look too good. I think that someone has been here before. Probably many years ago as the film spool in he right hand chamber was an old metal Kodak one.

I assume by 'inside of the pressure plate' you mean across the film rails?
 

tokam

Subscriber
Joined
Nov 7, 2008
Messages
586
Location
Sydney, Aust
Format
Multi Format
I know about the distance adjustment of the rangefinder under the large screw on the right hand side of the top housing. Handy to know about external access to the vertical adjustment under the hot shoe. I've had my rangefinder out and apart to clean the sliding lens but I didn't notice the vertical adjustment screw.

Actually I was being lazy and just put the tape on the inside of the pressure plate, across the hole where the red window lines up. This would be set back from the film plane by the thickness of the film and backing paper. Not good enough! :redface:

When I get the rangefinder cleaned I will do it properly. What I have done successfully in the past for 35mm is to cut a piece out of a new CD jewel case and butt strips of tape on one side. This side is then held firmly against the film rails for focus checking. Poor mans ground glass and flatter than trying to stick tape across the film rails.
 

Sjixxxy

Member
Joined
Jul 12, 2004
Messages
433
Location
Zenith City,
Format
8x10 Format
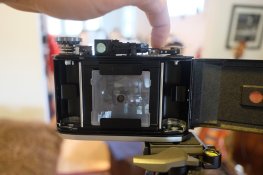
If you have access to a Bronica SQ, the focus screen on that camera easily pops out and fits nicely into a Mamiya six for rangefinder calibration.
 

Attachments

  • 18209388_10109678370619630_5194264258628762701_o.jpg
    18209388_10109678370619630_5194264258628762701_o.jpg
    165.3 KB · Views: 612

tokam

Subscriber
Joined
Nov 7, 2008
Messages
586
Location
Sydney, Aust
Format
Multi Format
No Bronica but I do have an RZ67 Pro II. Not gonna dismantle that for this exercise. Tape on jewel case is flat enough and I can secure with rubber bands or I can use more tape to fix it to the camera. It's also less precious than an MF focussing screen which could get damaged if left lying around. Not that I'm that clumsy, generally.:cry:

Your rangefinder exit lens looks good. Mine is a shocker on the inside and renders the patch almost unusable. Viewfinder is also fairly foggy. I'll get to it soon and report back.

Cheers, Martin

PS Looks like you are holding the shutter open on B for this shot. My shutter also has T setting so I then get a spare hand to hold the loupe / magnifying glass while operating the focus wheel.
 
Last edited:
OP
OP

Daire Quinlan

Subscriber
Joined
Sep 8, 2008
Messages
282
Format
Multi Format
Your rangefinder exit lens looks good. Mine is a shocker on the inside and renders the patch almost unusable. Viewfinder is also fairly foggy. I'll get to it soon and report back.

Mine was in a dreadful state, some kind of greasy fog on the inside, just old I think, probably lubricant outgassing over the years or something. I cleaned all the glass, didn't touch any of the actual rangefinder prism/mirror bits, they seemed ok. Even cleaning off the glass made a massive difference.
 

tokam

Subscriber
Joined
Nov 7, 2008
Messages
586
Location
Sydney, Aust
Format
Multi Format
Yep. I've cleaned all of the accessible optical surfaces under the top cover. I never touch front surface mirrors. Just have to unseat the sealed exit lens from the rangefinder and clean up inside.
 
OP
OP

Daire Quinlan

Subscriber
Joined
Sep 8, 2008
Messages
282
Format
Multi Format
Ok, so in light of what Tokam said about the operation of his wind mechanism I opened it up again yesterday to see if I could work out what it's supposed to be doing.
So, to be clear, it's a IV, simple wind mechanism as below, no 6x4.5 option. What happens in my case is that the advance is always locked (for reasons we will see below) with the lever like in this picture, and I have to pull it and hold it to the left to turn the advance wheel. It does *not* operate as Tokam's camera does (which sounds as though how it's supposed to operate).

fifth.jpg


So, quick disassembly, here's everything stripped off the advance mechanism, as seen from the front of the camera. The blue circle is around the spring loaded ratchet that prevents the wind from going backwards, it doesn't prevent it from winding on, just makes a pleasing clicking noise :-D. The red arrow is where the post for the advance lever sits, we'll be putting that back in in the next step.

first.jpg


This is the advance lever inserted back in, it's spring loaded against the small post on the right so that this is its default position. The yellow arrow points to part of it that contacts a toothed wheel which we're going to see in a bit, the RED arrow points to another spiked pawl that, at the moment, fits neatly into the advance gearing, preventing it from turning. There seems to be only one way of putting this together so far so I assume this is correct for now.

second-closed.jpg


This is what this looks like when the lever is pushed to the left ( when looking from the back as in the first picture above ), that pawl disengages the advance gear and I can turn the advance wheel.

second.jpg


This is the next gear inserted, it sits on top of the same shaft that the ratchet sits on (blue arrow above). You can still see the same bit of it as in the pictures above (yellow arrow)

third.jpg


And finally this bit. This is a combination of another gear which connects to the other wind gear, and, screwed onto it, a slottedwheel (blue). The yellow arrow points to the end of that advance lever. The numbered dial sits outside the case but attached to this slotted wheel by that offcentre post. Then the wind wheel is screwed into the top. The wind wheel only turns the very bottom gear, which then turns the gear to the left, which in turn turns the gear underneath this slotted wheel, so the slotted wheel and numbered dial make one entire revolution per roll of film.

fourth.jpg


I'm beginning to suspect that it's the interaction between this toothed wheel and the bit marked in yellow that's the problem. If it's turned in such a way that the yellow bit is held away from the slotted wheel by those extra protrusions then the spikey pawl marked in red in the pictures above does not contact the wind gear and the wheel can be turned. The extra protrusions are another disk underneath the slotted wheel attached to the slotted wheel with a spring, so this is where I think someone took it apart at some point and then screwed up reassembly, unless I'm totally wrong and there isn't a washer missing somewhere or something put in upside down or something.

Anyone disassembled this before ? Even something like pictures of this mechanism with the top off might help :-D
 
OP
OP

Daire Quinlan

Subscriber
Joined
Sep 8, 2008
Messages
282
Format
Multi Format
Incidentally I was examining the mechanism exposed in Sjixxxy's shot of the top of his six. It looks different from mine, for example there appears to be something in his counter that resets it to '1' when he opens or maybe closes the back or something. There are a bunch of different mechanisms on different Sixes. Even, it seems, ones that are nominally the same version.
 
Photrio.com contains affiliate links to products. We may receive a commission for purchases made through these links.
To read our full affiliate disclosure statement please click Here.

PHOTRIO PARTNERS EQUALLY FUNDING OUR COMMUNITY:


Ilford ADOX Freestyle Photographic Stearman Press Weldon Color Lab Blue Moon Camera & Machine
Top Bottom