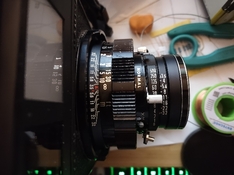
Mamiya Press 100mm f3.5 back focus adjustment?

What is this?

D
What is this?

  • 3
  • 9
  • 94
On the edge of town.

A
On the edge of town.

  • 7
  • 6
  • 187
Peaceful

D
Peaceful

  • 2
  • 12
  • 343
Cycling with wife #2

D
Cycling with wife #2

  • 1
  • 3
  • 127

Forum statistics

Threads
198,289
Messages
2,772,390
Members
99,592
Latest member
gregmulvey
Recent bookmarks
0

Theverant

Member
Joined
Jan 21, 2023
Messages
10
Location
Halifax
Format
Medium Format
Is there a way to {relatively easily} adjust the back focus of Mamiya Press lenses? In particular the 100mm f3.5?

I just bought (The Beast) on eBay - everything looks great, clean, no damage, etc. EXCEPT: My first test roll is all out of focus. I did a bunch of test today with the ground glass back (which I should have done before shooting, but I'm a shoot first ask questions later sort of person). On more careful testing what I had discovered is this:
The rangefinder seems reasonably accurate compared to the distance markings on the lens as measured from minimum to 15' with a tape measure. When I put the ground glass finder on the back I discover the lens will focus (well) beyond infinity. I can move the film plane out because of the Super 23s ability to do so and basically match the lens distance to the rangefinder and what I'm seeing on the GG. Originally I thought the rangefinder must be at fault, but the ability of the lens to focus beyond infinity, plus the GG being way off compared to the lens marks makes me think this is a problem with the lens.​

Hoping for people with more experience to chime in! Super excited to shoot with my (new) camera! Less excited if I have to focus exclusively with the GG first, I might as well use a view camera with a bigger neg at that point, right? Is there a way to adjust the lens back focus offset?

Thanks in advance for any help!
 

halfaman

Subscriber
Joined
Sep 22, 2012
Messages
1,361
Location
Bilbao
Format
Multi Format
As far as I remember the 100mm f/3.5 has a fixed cam so all focusing adjustments must be done on the camera. There are two screws on the camera rangefinder, one to adjust infitiny and another to adjust close focusing. You can find videos about it googling a bit.

The rest of Mamiya lenses do have an adjustable cam for focus adjustment.
 

mpirie

Member
Joined
Sep 19, 2005
Messages
596
Location
Highlands of Scotland
Format
4x5 Format
I don't have one of these cameras but I have heard that not fully extending the lenses forward can cause out of focus issues.

Mike
 

reddesert

Member
Joined
Jul 22, 2019
Messages
2,370
Location
SAZ
Format
Hybrid
As stated above, most of the 100/3.5 are collapsible lenses and need to be locked in the extended position to use the rangefinder. If it's a collapsible lens, there should be a sticker with an L-shaped arrow on the lens showing you the direction to pull out and turn to lock it in the extended position.

When you extend the back, it should not be possible to reach infinity focus unless you collapse the lens. When the lens is collapsed, it's supposed to push a follower on the body to interpose a sort of striped warning signal over the RF patch so that you know the RF doesn't apply, but maybe that didn't work or you didn't understand the warning.

If your lens is extended, it is hard to imagine how the lens could be way out of adjustment. I can't really explain why the RF and the lens distance scale would be in agreement and disagree with the ground glass, but if the lens isn't locked in either the forward or back position it is possible for it to slide around and you to get discrepant results.
 
OP
OP

Theverant

Member
Joined
Jan 21, 2023
Messages
10
Location
Halifax
Format
Medium Format
Thanks for the replies, all!

Good tip, but the lens has been pulled out and locked in its outward position. I'm aware of this action, as I have been pushing it in for better storage while hiking, making sure to pull it out and lock it (audible click, no play) before shooting.
I did a bunch more testing on the weekend, calibrated the rangefinder a small amount to the lens markings (and cleaned it) - infinity and minimum distances as marked on the lens result in accurate rangefinder focus. Moving the GG out about 3mm seems to match everything up so that the GG also matches the lens markings and rangefinder. I went for it and shot another roll with these settings, trusting the rangefinder, keeping the film locked in this outward position. Haven't processed the film yet. 😓

If things look decently sharp I will look at 3D printing a shim, to make sure the film plane is equal all the way around. I'd rather fix the lens, if it's something that's possible to do.

When you extend the back, it should not be possible to reach infinity focus unless you collapse the lens. When the lens is collapsed, it's supposed to push a follower on the body to interpose a sort of striped warning signal over the RF patch so that you know the RF doesn't apply, but maybe that didn't work or you didn't understand the warning.
Yes this makes sense, and I can definitely overshoot infinity focusing on the GG with the back flush to the camera body. When I had the RF assembly opened I did see a red flag mechanism - is this what you are referring to? Collapsing the lens does not seem to trigger any flagging system in the RF, as I have now just given it a check to see if I could notice what you were referring to. Now, on second check with the lens off I see two rods. The stainless one is the RF couple and a black strangely cut one causes a flag to come up if I poke it with my finger. Testing the lens collapse now that I know what to look for causes just a sliver of a red flag to start coming in, but it's very very minimal.

I'm pretty flummoxed as to why it appears the lens is optically offset - unless there is a problem where the whole collapse assembly got pushed back slightly or something? That's why I'm curious as to how difficult (or even possible) it would be to adjust the distance of the lens assembly within the mount. This would be the entire optical/shutter assembly as it is mounted within the tube that rides the helicoid I guess?

I guess I'll probably get a 65mm soon. At least that will let me compare results with two different lenses, as I have nothing else to test the body or lens against at this point.

Thanks again for the replies. Other ideas, tips, or links to information about servicing this lens greatly appreciated!
 

John Wiegerink

Subscriber
Joined
May 29, 2009
Messages
3,588
Location
Lake Station, MI
Format
Multi Format
I think you are making a smart move by getting another lens for comparative testing. Otherwise you won't know if it's something with the camera or something with the lens or both. Another thing to think about and it doesn't cost much is to buy a repair manual. That's what I did right after I purchased my first Super 23. Nice to have and good reading also. These are far more complicated cameras than they look. You'll see what I mean if you buy a repair manual.
 

reddesert

Member
Joined
Jul 22, 2019
Messages
2,370
Location
SAZ
Format
Hybrid
Thanks for the replies, all!

Good tip, but the lens has been pulled out and locked in its outward position. I'm aware of this action, as I have been pushing it in for better storage while hiking, making sure to pull it out and lock it (audible click, no play) before shooting.
I did a bunch more testing on the weekend, calibrated the rangefinder a small amount to the lens markings (and cleaned it) - infinity and minimum distances as marked on the lens result in accurate rangefinder focus. Moving the GG out about 3mm seems to match everything up so that the GG also matches the lens markings and rangefinder. I went for it and shot another roll with these settings, trusting the rangefinder, keeping the film locked in this outward position. Haven't processed the film yet. 😓

If things look decently sharp I will look at 3D printing a shim, to make sure the film plane is equal all the way around. I'd rather fix the lens, if it's something that's possible to do.


Yes this makes sense, and I can definitely overshoot infinity focusing on the GG with the back flush to the camera body. When I had the RF assembly opened I did see a red flag mechanism - is this what you are referring to? Collapsing the lens does not seem to trigger any flagging system in the RF, as I have now just given it a check to see if I could notice what you were referring to. Now, on second check with the lens off I see two rods. The stainless one is the RF couple and a black strangely cut one causes a flag to come up if I poke it with my finger. Testing the lens collapse now that I know what to look for causes just a sliver of a red flag to start coming in, but it's very very minimal.

I'm pretty flummoxed as to why it appears the lens is optically offset - unless there is a problem where the whole collapse assembly got pushed back slightly or something? That's why I'm curious as to how difficult (or even possible) it would be to adjust the distance of the lens assembly within the mount. This would be the entire optical/shutter assembly as it is mounted within the tube that rides the helicoid I guess?

I guess I'll probably get a 65mm soon. At least that will let me compare results with two different lenses, as I have nothing else to test the body or lens against at this point.

Thanks again for the replies. Other ideas, tips, or links to information about servicing this lens greatly appreciated!

Yes, when you collapse the lens it pushes that second, black rod to slide a red flag over the rangefinder spot as a reminder. It only fully enters the RF spot if you are focused at long distances, that is if you rack the focus out the red flag will go away, but the RF is still inaccurate since the lens is collapsed. The Super 23 manual explains this.

Some pictures of your rig might help. For reference, when the lens is properly extended, if you focus the lens to infinity, the front edge of the focusing ring should just about line up with the L-shaped arrow on top of the lens housing as seen from above, and the word "Normal" should be visible just ahead of the focusing ring. I can post a picture later if this isn't clear.

The focusing cam that contacts the RF feeler is the brass ring visible at the back of the lens. It's only connected to the focus helical, you can slide the collapsing part of the lens forward/back and the cam doesn't move. If the lens pulls out, turns in the direction of the arrow, and clicks into place the lens it _should_ be in the right place (I have never taken the lens far enough apart to understand the collapsing mechanism, but it can't be too complex).

Are you sure it's the correct ground glass back? It seems unlikely that any back other than the correct one would fit. However, the Mamiya M type roll backs (the ones with an S-shaped film path) and the corresponding GG have a depth of about 8mm from back to film plane, while standard film holders/GG backs (Graflex or RB67) have a depth of about 5mm.
 
OP
OP

Theverant

Member
Joined
Jan 21, 2023
Messages
10
Location
Halifax
Format
Medium Format
Thanks again for all the great feedback.
IMG_20230126_220503066_HDR.jpg
I think I'm using the right screen - this was the one that came with the camera (it was a fairly complete kit)

IMG_20230126_220641943.jpg
This is how far out the lens comes at infinity - looking straight down, "NORMAL" is visible, but the arrow is not. Well the top bit is slightly.

I still have to process my other roll of test film I did after adjusting the ragefinder to match the physical markings on the lens. I then put the GG on and pulled the back out to get infinity sharp, about 3mm. I checked the other physical marks on the lens and they seemed okay IE there doesn't appear to be an issue with the helicoid or some other mechanical issue causing a drift in focus accuracy (between testing at infinity and 4'). So I relied on the rangefinder for all but the first photo. Hopefully I will get to that processing tomorrow.
 

campy51

Member
Joined
Oct 16, 2014
Messages
1,215
Location
Boston area USA
Format
Multi Format
If you put the shutter speed on 1/15 the L in normal should be lined up with 1/500. That's the correct position and that's how mine is. Your lens is not pulled out or rotated.
 

reddesert

Member
Joined
Jul 22, 2019
Messages
2,370
Location
SAZ
Format
Hybrid
View attachment 327732
This is how far out the lens comes at infinity - looking straight down, "NORMAL" is visible, but the arrow is not. Well the top bit is slightly.

That looks like mine does, so I think it's right. When the lens is extended and locked in place, and focused at infinity, the arrow is just about even with the focusing ring, and it's at 12 o'clock in a left-right sense, ie in line with the focus distance marker.

I guess the other thing to check is to make sure that the front and rear elements of the lens are screwed tightly into the shutter. Finally, I'm not sure how you are doing on-film tests, but it is useful to take a picture of something like a fence running obliquely away/across the frame, focusing at the center. That way when you examine the negative you can easily find front/back focus and if the system is correctly sharp at some distance.
 
OP
OP

Theverant

Member
Joined
Jan 21, 2023
Messages
10
Location
Halifax
Format
Medium Format
If you put the shutter speed on 1/15 the L in normal should be lined up with 1/500. That's the correct position and that's how mine is. Your lens is not pulled out or rotated.

Yeah, but that whole assembly moves together - this doesn't indicate any sort of relationship to the film plane. It rotates and moves in and out together? I'm not sure what to check with that information?
 
OP
OP

Theverant

Member
Joined
Jan 21, 2023
Messages
10
Location
Halifax
Format
Medium Format
That looks like mine does, so I think it's right. When the lens is extended and locked in place, and focused at infinity, the arrow is just about even with the focusing ring, and it's at 12 o'clock in a left-right sense, ie in line with the focus distance marker.

I guess the other thing to check is to make sure that the front and rear elements of the lens are screwed tightly into the shutter. Finally, I'm not sure how you are doing on-film tests, but it is useful to take a picture of something like a fence running obliquely away/across the frame, focusing at the center. That way when you examine the negative you can easily find front/back focus and if the system is correctly sharp at some distance.

Yeah my tests have been pretty crappy, tbh. Good advice. I need to just stop trying to take photos and do some tests. Recent roll wasn't great and didnt' give useful results. But a few frames could have been half decent if they weren't wrought with technical issues! Gah! :wink:
 

Neil Poulsen

Member
Joined
May 28, 2005
Messages
520
Format
4x5 Format
As halfaman indicated, there's no adjustment on the 100mm, f3.5 lens. In focusing Mamiya Press lenses, begin with the 100mm lens, using the camera adjustments to bring it into focus. Then proceed to other lenses, some of which have and adjustment on the lens.

To use camera adjustments, one removes the top cover, and this reveals two adjustment screws. One sets infinity focus, and the second sets near focus. There are instructions for this on the photo.net site. I believe that there's a sub-forum to the MF forum. The instructions, with photos, are embedded in a post there. (Actually, not so sure about the photos.) Regardless, there was sufficient info in this post for me to properly align my Universal.
 
OP
OP

Theverant

Member
Joined
Jan 21, 2023
Messages
10
Location
Halifax
Format
Medium Format
That looks like mine does, so I think it's right. When the lens is extended and locked in place, and focused at infinity, the arrow is just about even with the focusing ring, and it's at 12 o'clock in a left-right sense, ie in line with the focus distance marker.

I guess the other thing to check is to make sure that the front and rear elements of the lens are screwed tightly into the shutter. Finally, I'm not sure how you are doing on-film tests, but it is useful to take a picture of something like a fence running obliquely away/across the frame, focusing at the center. That way when you examine the negative you can easily find front/back focus and if the system is correctly sharp at some distance.

You nailed it. I finally figured out how to release the optical assembly from the mount assembly and could assess it more clearly - the rear element was out, but also not threaded correctly. So when I tried to check it out seemed tight.

Completely removing it and screwing it back in properly has solved my issue!
 
Photrio.com contains affiliate links to products. We may receive a commission for purchases made through these links.
To read our full affiliate disclosure statement please click Here.

PHOTRIO PARTNERS EQUALLY FUNDING OUR COMMUNITY:


Ilford ADOX Freestyle Photographic Stearman Press Weldon Color Lab Blue Moon Camera & Machine
Top Bottom