When I do my test strips I have to cover up sections of the paper. The result is that the areas of different exposure are themselves on different areas of the image. I have seen plans to make a device that allows you to make comparisons using the same bit of image by making a test strip that slides across a slot. Does anyone know where I can see the plans or if you can buy such a thing new?
-
Welcome to Photrio!Registration is fast and free. Join today to unlock search, see fewer ads, and access all forum features.Click here to sign up
You are using an out of date browser. It may not display this or other websites correctly.
You should upgrade or use an alternative browser.
You should upgrade or use an alternative browser.
Making a test-strip maker
-
A
- Thread starter BetterSense
- Start date


Recent Classifieds
-
Sold SOLD! RW Vacuum Fidelity Elite 4x5 (5 units) & 8x10 (4 units) Film Holders
- Started by B.S.Kumar
-
For Sale Cable Release Adapters for Leica, Nikon, Yashica, Rollei
- Started by Jon Shiu
-
Free Stoesser Pin Registration Punch
- Started by Roger Thoms
-
Want to Buy 4 x 5 Back for Agfa Ansco Universal View Camera
- Started by sharpnikkor
Forum statistics
That's one reason I don't use graduated test strips. For me, it's one pop for the whole strip. The other reason is that the usual 5, 10, 15, etc. sequence gives unequal steps, which, after making those idiotic things for ten years or so, I finally could stand no more. The procedure couldn't be simpler. Looking at the whites only, is it too light or too dark? Correct that, and when it's right, (and only then) look at the blacks. Are they too light or too dark? If too light, need more contrast, if too dark, need less.
I've been teaching beginning photo for something over twenty years, and I've found that when students quit trying to use graduated test strips, they learn the process much faster and make MUCH better prints. At the end of a ten week academic quarter, it is not uncommon for a student or five out of a class to be printing far beyond respectably.
I've been teaching beginning photo for something over twenty years, and I've found that when students quit trying to use graduated test strips, they learn the process much faster and make MUCH better prints. At the end of a ten week academic quarter, it is not uncommon for a student or five out of a class to be printing far beyond respectably.
OP
OP
after making those idiotic things for ten years or so, I finally could stand no more. The procedure couldn't be simpler. Looking at the whites only, is it too light or too dark?
Sure, but the thing is, if you don't make a graduated strip, you have to expose and develop a test strip every time you make a change. I don't see why you can't make the 20-15-10 test strip, and then look at the whites and see if they are too light or dark.
- Joined
- Dec 31, 2006
- Messages
- 2,704
- Format
- Medium Format
I know beauxartes is correct. Still, for myself, I set up my enlarger for my print--magni, focus, f/stop. I then shift my neg left or right so the clear film is centered on the easel. I usually mark the place with a grease pencil. Off light. Make my test strip at 3 second intervals. Soup, stop, fix. Then I look for the first strip that gives the max black of the paper. I use this for my first exposure and adjust contrast as needed with paper grade or filtration--making a new test strip if contrast change is needed.
very good, John. Using the clear film is a great test for black. I use that for making proof sheets exactly at the right time. The edge of the film is not visible in the black at the center of the field, but is just visible in the corners, since the center is the brightest part of the field. That way, I know that I've exposed enough, but not too much. Of course, making proofs is one thing, prints another.
Regarding your observation (BetterSense) I very rarely need to make more than one or two changes. I think that when I threw out the graduated strip, I very quickly learned to identify how much to change the exposure to get what needs getting. When I was freelancing for a magazine, I would get these huge print orders that needed to be done yesterday, and I used this method. It can become incredibly fast.
My approach over the years has changed quite a lot (I was a beginning photographer reading Popular Photography when I heard the news of JFK being assassinated). For a long time I struggled like everyone does, and going to school didn't help. At some point, and I don't remember when that was, I began to understand that if I shifted my focus from solving problems to training my intuition, decisions would make themselves and I could work with a lot more fluidity. I guess this happened when I was shooting for the magazine, because the pressure could be pretty high and stuff needed to happen fast.
So here's a hint if you find this interesting. Make a print that you think is just right. Make two more, only changing the exposure, keeping everything else the same. On one, give it 1/2 as much exposure. On the other, give it twice as much. Keep these for reference. They will show you how much one stop of difference in both directions makes.
If you like this, then try the same with contrast. To do this, you will need a subject that has a good detailed white. You'll need to get the white the same in three prints each made one contrast grade apart, the middle grade being the one you can accept as a standard.
Training the intuition really works, but only if you approach it with something very much like the scientific method. Only ONE variable at a time. I'm guessing that if you do these exercises and study the results, you will be amazed at how fast and accurate your decision process will become. Of course, experience will accomplish the same thing over a long time, but by devising experiments like these, the amount of time it takes can be shortened drastically.
- Joined
- Jun 21, 2003
- Messages
- 29,810
- Format
- Hybrid
great advice!
i have printed kind of like this for a while now ...
every once in a while i get a "habs" type job that uses 35mm or 4x5 film.
i bracket exposures ( one as meter says one 1/2 stop or 1 stop over exposed ).
the whole roll / each view gets printed at nearly the same time ... kind of like machine prints
... done by hand 5prints being souped at once.
negatives that have close to the same tonal range
just get printed like the last one, and after the first print
you can see if it needs to be tweeked somehow ... just a little bit.
sometimes when concentrating on the nitty gritty, like test strips &C
it is hard to see the "big picture" .. kind of like seeing the forest through the trees.
good luck!
john
Exposure/contrast does become intuitive with practice. The above posts contain good advice and should be heeded. I used to print for a local publisher in the early 70's. Most sessions involved printing 5x7 glossies from 100's of negatives of differing quality. No time for making test strips of each negative. A few initial test prints gave the key to exposure/contrast of the whole batch. The eye quickly picks up on the differences and adjustments are made on the fly. It was a sweatshop in the dark.
Test strip printer
I too have printed out the article, waiting for a rainy day with nothing else to do.
Richard
To get the article in PDF format, Google "Darkroommagic" to get to Ralph Lambrecht's site, go to Publications/Way beyond monochrome/Contents/Make your own test strip printer.From what I see the "Way Beyond Monochrome" book has quite a detail instruction on how to do it. I'm kept thinking of doing it as well but kept finding excuse not to.. My bad. May be put my mind on it over this weekend.
I too have printed out the article, waiting for a rainy day with nothing else to do.
Richard
Test Strip Printer
Richard
Sorry, only one "m" in "darkroomagic". Or Google Ralph Lambrecht gets you straight thereTo get the article in PDF format, Google "Darkroommagic" to get to Ralph Lambrecht's site, go to Publications/Way beyond monochrome/Contents/Make your own test strip printer.
I too have printed out the article, waiting for a rainy day with nothing else to do.
Richard
Richard
I very quickly learned to identify how much to change the exposure to get what needs getting.
I rarely do test strips now. I'm more likely to cut a 3" square of paper and expose it at what I estimate to be the correct time then modify it from there.
Steve.
- Joined
- Sep 10, 2002
- Messages
- 3,336
- Format
- 35mm
i posted something similar in the classified section here on apug. you might want to take a look and get some ideas . it is a farily simple device and depending on your dyi skills should be easy
(there was a url link here which no longer exists)
(there was a url link here which no longer exists)
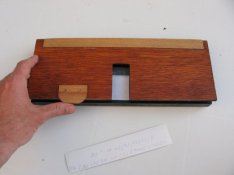
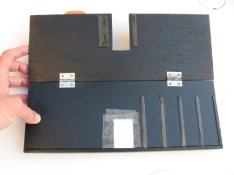
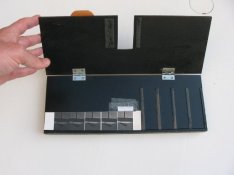
Or something like this - the pictures are self-explanatory....
Very easy to make: I built this after using a cardboard version for several months. It annoyed me that I had to tape it (cardboard version) to the surface in order to prevent movement... So finally I made this - a more permanent and rigid/stable solution.
Very easy to make: I built this after using a cardboard version for several months. It annoyed me that I had to tape it (cardboard version) to the surface in order to prevent movement... So finally I made this - a more permanent and rigid/stable solution.
Attachments
- Joined
- Dec 31, 2006
- Messages
- 2,704
- Format
- Medium Format
"Training the intuition." I like that. When that training sinks in, the entire photographic process becomes intuitive, and one develops what E. Weston labelled "seeing photographically."
The key, whether merely in printing, is getting to know the entire process intuitively. Just like long-term couples can finish each others sentences, the photographer with completely trained intuition sees (feels?) the photograph from first visualization to the final print.
This is best done by using one camera, one film, one developer, one enlarger, one paper, one paper developer until one achieves E. Weston's stated goal--the ability to "see photographically." AND, in keeping with this thread, printing with a base exposure suitable to the specific part of the negative the photographer chooses to make the benchmark exposure is an important part of that goal. I choose minimum exposure through clear film for max black as my baseline.
Some good advice here (both for making the test-strip) and for what I want to achieve. I have only been doing d/room for a month and have to admit that I am clinging to the test strips like a baby's blanket.
That being said, it frustrates the living heck out of me. Its so tedious and time consuming! I'm sure, after a while, I will learn to trust my instincts more!
That being said, it frustrates the living heck out of me. Its so tedious and time consuming! I'm sure, after a while, I will learn to trust my instincts more!
The process I use is a hybrid of those described. I cut up an 8x10 into strips and do them one at a time modifying the exposure and contrast as needed looking at the whites and the blacks. I know more or less what the contrast and exposure will be so this gives me a chance to fine tune specific areas of the photograph. They also help to figure out the appropriate burns needed.
Make a print that you think is just right. Make two more, only changing the exposure, keeping everything else the same. On one, give it 1/2 as much exposure. On the other, give it twice as much. Keep these for reference.
Excellent advice - tack them to the wall of the darkroom and use them every printing session.
Another good aid to intuition is to make a test strip at say, 1/2 stop intervals - spanning white to black - with no negative in the enlarger. It shows how each tone will shift with a 1/2 stop change. For normal grade paper 1/2 stop is about one zone system zone in tone [oooh, sorry about that]. You can see a 1/2 stop change doesn't do much in the highlights or deep shadows but does make quite an impact in the mid grays: a thing to keep in mind when deciding how much to burn or dodge. More info
- Joined
- Sep 10, 2002
- Messages
- 3,336
- Format
- 35mm
to ad to n icholas suggestion, make an 8x10 print of a stouffer 21 step wedge. each step is 1/2 stop apart.
we use this at school all the time. years ago , i began using fstops as a way to determine burning and doging, didn't realize at the time there was a timer that would do the same thing. However, we can't afford 12 of those so i have just stuck with the same method.
we use this at school all the time. years ago , i began using fstops as a way to determine burning and doging, didn't realize at the time there was a timer that would do the same thing. However, we can't afford 12 of those so i have just stuck with the same method.
This is probably a stupid question but I need to understand this instinctive printing. Do those who print by instincts (and not do a test strip) always develop the paper at the same time or does the time in developer very according to what they see as it develops?
- Joined
- Sep 10, 2002
- Messages
- 3,336
- Format
- 35mm
i can only speak for myself, but i always develop the paper to completion. the times and contrast may vary but not the development. different papers may call for different times; ie. ilford's cooltone time are different than the standard rc papers. some warmtone papers may require betwen 2-3 minutes, but that time is determined before the exposure and doesn't vary.
just watching the print in the developer and pulling when "one thinks" it is ready, IMHO, is a poor method for learning. watch the clock.
learning to print by "instinct" comes from lots of practice and experience, it isn't something that just comes to mind out of the blue.
just watching the print in the developer and pulling when "one thinks" it is ready, IMHO, is a poor method for learning. watch the clock.
learning to print by "instinct" comes from lots of practice and experience, it isn't something that just comes to mind out of the blue.
Lee L
Member
- Joined
- Nov 17, 2004
- Messages
- 3,288
- Format
- Multi Format
learning to print by "instinct" comes from lots of practice and experience, it isn't something that just comes to mind out of the blue.
I found the best way to train my instincts was to make about 2000 prints/month. Same paper, developer, developing time (roller processor), etc. I could guess both exposure and VC filter correctly 99% of the time. That was 20 years ago, and it doesn't hold that closely without practice, although the experience still pays dividends when making adjustments.
Lee
This is probably a stupid question but I need to understand this instinctive printing. Do those who print by instincts (and not do a test strip) always develop the paper at the same time or does the time in developer very according to what they see as it develops?
Just to be clear, in case I'm one of those you are referencing, I don't print by instinct at all. Intuition and instinct are not the same thing. Also, most people think that intuition is something like extrasensory perception. It isn't. You could call it "experience", I suppose, but that's not quite right. Experience is what trains the intuition. Lee is right, though, if we can agree on terms. Making thousands of prints helps a lot; especially if you think about it while you are making them!
Also, to answer the question you ask, assuming it is addressed to a group of which I'm a part, I do make test strips but not graduated test strips, one pop and develop, and I NEVER vary the development time. ONE VARIABLE! Everything else is held constant. If you start working with a bunch of variables, you can't ever learn because you really can't know what is producing the result you are getting. When students tell me that they are "messing around" (common!) we have a very pointed discussion.
Another helpful practice is to take a small piece of paper, cut it in half, put one half of it under something in the darkroom and take the other half out in the light for a few seconds. Process both at the same development time/agitation that you give your prints. Hold them in the tray you use to evaluate your test strips for comparison. Print for the white, by adjusting time or aperture, and when you get a white that comes close (it won't match exactly, at least if you care about detail, but it should generally be as close as possible without losing detail), then compare the black. As I mentioned above, if you can't find a black that matches the black patch, or if areas go black that should have detail, adjust the contrast accordingly.
Another tip: Always use the same light for making decisions about prints. If you don't, you are adding yet another variable. I used the same light for about thirty years, and since I'm building a darkroom now, the same light is going in it.
- Joined
- Jun 22, 2009
- Messages
- 44
- Format
- 35mm
That's one reason I don't use graduated test strips. For me, it's one pop for the whole strip. The other reason is that the usual 5, 10, 15, etc. sequence gives unequal steps, which, after making those idiotic things for ten years or so, I finally could stand no more. The procedure couldn't be simpler. Looking at the whites only, is it too light or too dark? Correct that, and when it's right, (and only then) look at the blacks. Are they too light or too dark? If too light, need more contrast, if too dark, need less.
Yep. This is the procedure espoused by Graves in Elements of Black-and-White Printing. I had been addicted to those stupid graduated strips before I read that book.
pentaxuser
Member
These days armed with the fine instructions on Ralph's site, the test strip printer can be done quickly in plastic with a laser cutter. I had one completed by a friend who has access to such a cutter. It's all the test strip printer you'll ever want. Previously I had been able to do what you want to do with a Paterson test strip printer but it was time consuming as it involved moving the printer. With the darkroom magic printer it is easy, quick and idiot-proof and on 6x4 or 5x7 sheets there is a white strip between each exposure which allows a better comparison between exposures than the Paterson strips which tend to blend in with each other.
pentaxuser
pentaxuser
| Photrio.com contains affiliate links to products. We may receive a commission for purchases made through these links. To read our full affiliate disclosure statement please click Here. |
PHOTRIO PARTNERS EQUALLY FUNDING OUR COMMUNITY:  |